Last month – and indeed last year! – we published a blog recapping the highlights from the Works with Home Assistant program in 2025. As with any certification program, our partnerships evolve: some start anew, some grow bigger and stronger, and some naturally run their course. In the interest of visibility for our community, we want to share an update about one such change. When a partner leaves the program, we believe it’s important to document this openly so you get the full picture.
Why we’re making a change
Despite reaching out to HELTUN multiple times during 2025 to discuss renewing their Works with Home Assistant contract with the Open Home Foundation, we haven’t been able to connect. As their previous contract has now lapsed, we’re formally removing HELTUN from the Works with Home Assistant program.
We have no specific issues with the HELTUN devices, and hope they will continue to be compatible with Home Assistant – as Z-Wave devices operate on an open standard, they should continue to function. However, without a contract, HELTUN has no formal obligation to provide ongoing support, such as firmware updates via Z-Wave JS.
This is an example of why the contract is more than just paperwork. It’s intrinsic to the badging as it outlines, in a legal and binding document, our partners’ commitment to the community, keeping devices working long-term, and the values we all care about. Without it, we can’t maintain certification.
What happens now
HELTUN’s integration page will now be removed from the partner filter, and an update has been published on our original HELTUN launch blog stating that the information is no longer applicable. They are now also prohibited from using the Works with badge on relevant marketing materials.
As we have no problems with the devices themselves, we will be happy to welcome HELTUN back into the program should they wish to re-engage in the future.
Looking ahead
In more positive news, don’t forget we’ve introduced an up-to-date list of all certified devices from our current Works with partners to help guide your purchasing decisions – and watch this space for details of more brands joining us in 2026!
I hope you had a wonderful holiday, spending time with your loved ones. We’re kicking off 2026 with a smaller release, as our contributors and maintainers have been enjoying some well-deserved time off as well. But don’t worry, there’s still plenty of good stuff in this release!
Home Assistant 2026.1 brings a refreshed Home dashboard experience on mobile, with summary cards right at your fingertips without extra taps. We’ve also made it easier than ever to navigate to the protocol connecting your devices, such as Zigbee, Z-Wave, Thread and more.
For automation enthusiasts, we’re continuing our work on our even more “human-friendly” triggers, which can be enabled via Home Assistant Labs, so you can build automations using easy-to-understand language instead of technical state changes, like initiating automations if a button is pressed or someone arrives home.
On the integrations front, we welcome eight new integrations to the family, including pet tracking with Fressnapf, energy monitoring with eGauge, and smart heating control with Watts Vision +. Plus, improvements to existing integrations from our amazing community contributors.
I wish you a happy and healthy 2026! Enjoy the release!
A huge thank you to all the contributors who made this release possible! And a special shout-out to @bramkragten, @piitaya, and @abmantis who helped write the release notes for this release. ❤️
Home dashboard improvements
The Home dashboard continues to evolve! In the previous release, we introduced a brand-new sidebar layout, weather tiles, and energy distribution summaries. This release takes it even further with a streamlined mobile experience and better device management.
Streamlined mobile navigation
On mobile devices, the Home dashboard now displays summary cards (like lights, climate, security, media players, weather, and energy) directly at the top of the view, followed by your favorites and areas. This replaces the previous tab-based navigation, giving you instant access to everything that matters without any extra taps.
The desktop experience remains unchanged, with summaries displayed in the sidebar under the For you heading.
New devices page
Ever wondered where your devices went after you removed them from an area? A new Devices page now appears on the Home dashboard, showing all devices that aren’t currently assigned to a specific area. This makes it easy to find and control those “orphaned” devices without hunting through the settings.
The new Devices page shows devices not assigned to any area.
Purpose-specific triggers and conditions progress
In the previous release, we introduced purpose-specific triggers and conditions. Instead of thinking in technical state changes, you can now simply pick things like “When a light turns on” or “If the climate is heating” when building your automations.
This feature is still being refined in Home Assistant Labs, but this release adds a lot more trigger types, making this new approach even more useful. Here is an overview of all the new triggers added in this release:
Button triggers fire when a button entity has been pressed.
Climate triggers now cover all common scenarios. You can trigger on HVAC mode changes, target temperature changes, or when the target temperature crosses a threshold. There are also triggers for current temperature and humidity changes, and even target humidity changes.
Device tracker triggers let you automate based on when a device entered or left home, with support for the first device arriving, last device leaving, or any change. Don’t worry, person-specific triggers are coming soon, the device tracker ones were simply available sooner.
Humidifier triggers will fire when a humidifier turns on or off, starts humidifying, or starts drying. You can also trigger on humidity changes or when humidity crosses a threshold.
Light triggers let you automate based on brightness changes or when brightness crosses a specific threshold.
Lock triggers can now fire when a lock is locked, unlocked, opened, or jammed.
Scene triggers fire when a scene is activated.
Siren triggers fire when sirens are turned on or off.
Update trigger fires when an update becomes available.
As the new purpose-specific triggers and conditions all support targeting something bigger than a simple entity (an area, a floor, or even a label), we also redesigned how the target gets displayed on the automation flow.
The goal of this change is to allow you to quickly glance at your automation, and understand its purpose.
Head over to Settings > System > Labs to enable purpose-specific triggers and conditions and give them a try!
Easier navigation to protocol dashboards
For an organization that loves the open standards that seamlessly connect our devices, we sure didn’t promote them enough! Most people didn’t even know that Home Assistant has dedicated dashboards for protocols like Zigbee, Z-Wave, and more.
This release reorganizes the Settings page to give these open protocols a more prominent spot. The protocols section now appears right after the core settings, making it much easier to find all the different ways you’re connecting your devices and quickly access some very useful protocol-specific configurations.
The menu items only appear when you have the corresponding integration set up, so you’ll only see what’s relevant to your setup.
Integrations
Thanks to our community for keeping pace with the new integrationsIntegrations connect and integrate Home Assistant with your devices, services, and more. [Learn more] and improvements to existing ones! You’re all awesome 🥰
New integrations
We welcome the following new integrations in this release:
AirPatrol, added by @antondalgren
Control your air conditioning units through AirPatrol Wi-Fi devices directly from Home Assistant.
eGauge, added by @neggert
Integrate eGauge energy monitors for residential and commercial applications, commonly used with solar energy installations.
Fluss+, added by @Marcello17
Connect your Fluss+ Button to Home Assistant for quick and easy control of your smart home.
Fish Audio, added by @noambav
Use Fish Audio’s text-to-speech service to generate natural-sounding speech in Home Assistant.
Fressnapf Tracker, added by @eifinger
Track the location of your pets and monitor their activity using Fressnapf GPS Trackers.
HomeLink, added by @ryanjones-gentex
Integrate your HomeLink devices to trigger smart home routines from the comfort of your vehicle.
Watts Vision +, added by @theobld-ww
Control your Watts Vision + smart heating system, allowing remote control of individual home heating zones.
WebRTC, added by @balloob
An internal integration providing WebRTC functionality for camera streaming in Home Assistant.
This release also has new virtual integrations. Virtual integrations are stubs that are handled by other (existing) integrations to help with findability. These ones are new:
It is not just new integrationsIntegrations connect and integrate Home Assistant with your devices, services, and more. [Learn more] that have been added; existing ones are also being constantly improved. Here are some of the noteworthy changes to existing integrations:
The Matter integration gained three new diagnostic binary sensors for thermostat remote sensing status from @lboue, helping you keep an eye on your climate system.
@joostlek added lots of new sensors to the SmartThings integration, including air quality sensors for PM1, PM2.5, and PM10, hood filter usage tracking, fridge temperature sensors for One Door refrigerators, and fan speed control for range hoods.
Roborock owners with Q7 devices can now integrate them thanks to @Lash-L, who added basic read-only support with sensors for battery, status, and cleaning data.
@mib1185 improved the FRITZ!SmartHome integration by adding switch entities that let you enable or disable FRITZ! Smart Home routines (triggers) directly from Home Assistant.
The Ping integration now tracks packet loss, thanks to @mib1185. The new sensor shows packet loss as a percentage and is disabled by default.
@Shulyaka added support for GPT-5.2 and GPT-5.2-pro models to the OpenAI integration, including a new “xhigh” reasoning effort level.
The HomeWizard integration gained two new battery charge modes from @DCSBL: zero charge only and zero discharge only, giving you more control over your energy storage.
@Abestanis expanded the KNX UI configuration to support time, date, and datetime entities, while @farmio added sensor, scene, text, and fan entities, making it easier than ever to set up your KNX installation.
The Squeezebox integration now offers alarm monitoring, thanks to @wollew: you get binary sensors to track if an alarm is upcoming, active, or snoozed, plus a timestamp sensor showing when the next alarm is scheduled.
@andrew-codechimp added support for new meal plan types in Mealie 3.7, including dessert, drink, and snack plans, giving you more flexibility in your meal planning.
The Hikvision integration gained NVR support from @ptarjan, including extended event detection and automatic discovery of video channels.
@FredericMa added a set_time action to the Risco integration, allowing you to sync your local alarm panel’s clock and fix those pesky clock drift issues.
The Nederlandse Spoorwegen integration got a major overhaul from @heindrichpaul, splitting the monolithic sensor into over 15 individual sensors, one for each train route, making it much easier to track specific journeys.
@zweckj added a beautiful entity picture of your coffee machine to the La Marzocco integration’s main switch entity.
The Actron Air integration gained a new switch platform from @kclif9, exposing Away Mode, Continuous Fan, Quiet Mode, and Turbo Mode controls.
@Djelibeybi gave the Pooldose integration a massive upgrade: you now get water meter sensors for monitoring levels, number entities for configuring dosing targets, and select entities for controlling your pool’s operating mode.
The AirPatrol integration now lets you monitor temperature and humidity, thanks to new sensor entities added by @antondalgren.
@mettolen added sensor and number platforms to the Airobot integration, letting you monitor air quality data and control hysteresis band settings.
A huge thank you to all the contributors who improved these integrations, and to everyone else who contributed improvements that aren’t listed here. Your work makes Home Assistant better for everyone! ❤️
Integration quality scale achievements
One thing we are incredibly proud of in Home Assistant is our integration quality scale. This scale helps us and our contributors to ensure integrations are of high quality, maintainable, and provide the best possible user experience.
This release, we celebrate several integrationsIntegrations connect and integrate Home Assistant with your devices, services, and more. [Learn more] that have improved their quality scale:
This is a huge achievement for these integrations and their maintainers. The effort and dedication required to reach these quality levels is significant, as it involves extensive testing, documentation, error handling, and often complete rewrites of parts of the integration.
A big thank you to all the contributors involved! 👏
Now available to set up from the UI
While most integrationsIntegrations connect and integrate Home Assistant with your devices, services, and more. [Learn more] can be set up directly from the Home Assistant user interface, some were only available using YAML configuration. We keep moving more integrations to the UI, making them more accessible for everyone to set up and use.
The following integrations are now available via the Home Assistant UI:
There are many more improvements in this release; here are some of the other noteworthy changes:
If you monitor your home’s oil tank or other slow flow rates, you might appreciate the new gallons per day unit of volume flow rate added by @StaleLoafOfBread. This unit is particularly useful for tracking daily consumption rates of heating oil or similar resources.
Got a Matter speaker? @lboue added volume control support to the Matter integration, exposing a volume slider entity for Matter speakers using the LevelControl cluster.
The statistics graph card now includes a link to the history panel in its header, just like the history graph card already had. Selecting the link takes you directly to the history with the same entities and time range pre-selected, thanks to @joepio.
When using the state badge element in your picture elements card, you can now set a custom name option, giving you more flexibility in your dashboard designs, thanks to @ildar170975.
In 2025.11 we improved the logging efficiency by disabling the duplicated log file. This release adds a new configuration option to re-enable it if needed. If you are using the official Terminal & SSH add-on, make sure it is updated to 9.22.0 or higher to be able to use that option. The Advanced SSH & Web Terminal add-on has not been updated yet, but will be soon.
For integration developers: @bramkragten added a new choose selector, allowing users to select between different input types in the UI. You’ll start seeing this pop up in various places where flexible input is needed.
Energy dashboard date picker
In the previous release, the Energy dashboard received a big update with real-time power monitoring and downstream water tracking. However, some of you noticed that navigating between periods required scrolling back up, making it harder to compare data while looking at graphs further down the page.
This release fixes that! The date picker is now sticky at the bottom of the screen, so you can easily switch between days, weeks, or months without losing sight of the graph you’re viewing. This also makes it much easier to access on mobile devices.
ESPHome action responses
ESPHome 2025.12 introduced a powerful new feature called API action responses, enabling true bidirectional communication between your ESPHome devices and Home Assistant. With this release, Home Assistant now fully supports receiving these responses!
Previously, when calling an action on an ESPHome device, communication was one-way: you could send a command, but the device couldn’t send structured data back. Now, your ESPHome devices can return JSON data in response to actions, unlocking new possibilities like querying device configuration, reading sensor values on demand, or retrieving diagnostic information.
This is particularly useful for actions that answer questions rather than perform tasks. For example, you could create an action that returns your device’s current Wi-Fi signal strength, firmware version, or any custom sensor readings, all as structured data you can use in your automations.
We will also release patch releases for Home Assistant 2026.1 in January.
These patch releases only contain bug fixes. Our goal is to release a patch
release once a week, aiming for Friday.
2026.1.1 - January 12
Fix Hikvision NVR binary sensors not being detected (@ptarjan - #160254)
Home Assistant has a great community of users who are all more than willing to help each other out. So, join us!
Our very active Discord chat server is an excellent place to be, and don’t forget to join our amazing forums.
Found a bug or issue? Please report it in our issue tracker to get it fixed! Or check our help page for guidance on more places you can go.
Are you more into email? Sign up for the Open Home Foundation Newsletter to get the latest news about features, things happening in our community, and other projects that support the Open Home straight into your inbox.
Backward-incompatible changes
We do our best to avoid making changes to existing functionality that might unexpectedly impact your Home Assistant installation. Unfortunately, sometimes it is inevitable.
We always make sure to document these changes to make the transition as easy as possible for you. This release has the following backward-incompatible changes:
Coolmaster
The climate entities provided by the Coolmaster integration now use medium for the medium fan mode; before this change, it was med. If your automations are using med when setting or querying the fan speed, you’ll have to change it to medium.
The “Supports hairpinning” binary sensor has been removed from the Tailscale integration. According to the official Tailscale API documentation, this information is no longer tracked and will always return null.
Select entity state values have been changed from their original mixed-case format to snake_case format with proper translations. This improves consistency and enables proper localization support.
Chime type: Mechanical → mechanical, Digital → digital
Recording mode: Always → always, Detections → detections, Never → never
Infrared mode: Auto → auto, On → on, AutoNoLEDsOn → auto_no_leds_on
Status light mode: On → on, Off → off, OnWhenDark → on_when_dark
HDR mode: Auto → auto, On → on, Off → off
If you have automations, scripts, or templates that check or set the state of UniFi Protect select entities, you need to update them to use the new snake_case values. The UI will continue to display properly translated, human-readable text.
Allowing extra/unused parameters has been removed from the action for Telegram bot. Only users who have used undefined parameters for Telegram bot actions are affected. If you are affected, remove such parameters from your automations and scripts. Supported parameters can be found in the Telegram bot notification actions documentation.
If you are a custom integration developer and want to learn about changes and new features available for your integration, be sure to follow our developer blog.
It’s been a busy few months composing behind the scenes, building up to a massive crescendo. Today, the beat finally drops on Music Assistant’s biggest update yet. With version 2.7, Music Assistant is getting all jazzed up with a visual overhaul, a chart-topping lineup of new features and providers, along with a brand-new streaming protocol we’re spinning up ourselves.
Of course, you can always update and experience all the great new stuff without reading the rest of this, but you might miss a deep cut. In fact, we can’t even cover everything in this blog (there really is that much), so go sing your praises for anything we missed in the comments!
Music Assistant has gained its first full-time employee at the Open Home Foundation. No, not me! My day job is leading the Ecosystems department at the foundation (which comprises all the software projects the Foundation has that are not Home Assistant itself). Marvin will be joining the foundation in the new year to work full-time on Music Assistant, leading the project’s day-to-day operations. Marvin has been contributing to the project for three years now, working on all sorts of parts of the project, and specifically with the Apple Music and YouTube providers.
Not to worry, I’m pretty obsessed with my audio setup and will still be tinkering on my little pet project 😁.
“Everything in Its Right Place”
A visual overhaul
A well deserved visual refresh
Music Assistant joining the foundation has given us a lot more than a nice open home; it’s given the project clearer direction and some expert help. One area some people felt Music Assistant fell short was its UI and UX, and in version 2.7, we’re starting the process of giving it a major overhaul, making it look as good as your music sounds!
This is just the beginning of a big process, so expect every update to bring more polish. The first thing you’ll probably notice is the collapsible navbar on the left of the screen, which looks pretty familiar to another Assistant 😉. Now it’s much more intuitive, especially for new users. The settings page has also been made much easier to navigate with breadcrumbs.
The biggest star of the show is the new Built-in Player, which lets you listen to music on the browser you’re using to hunt for your next track. Great for double-checking if the next song is family-friendly before sending it to every speaker in the home.
“Bulletproof”
Users and logins
User profiles for the whole family!
A lot of new features we’ve implemented wouldn’t be possible without some form of login and authentication. It was a much-requested feature, as security even within your home shouldn’t be ignored. We know logging in every once in a while can be a minor inconvenience, but we’ve tried to make it as unobtrusive as possible, even implementing a way to use your Home Assistant login as a “Single Sign-On”.
You can now have different user profiles with their own music providers. No more having four Tidal accounts all sitting next to each other, cluttering up the Playlists tab. You can even assign who has access to each speaker; say goodbye to the kids playing Demon Hunters on your office speaker during your performance review 😅. In Settings, just head to the User Management section, where you can add and edit your new users.
“Around the world”
Remote music streaming
No matter where, no matter when
One feature made possible with our new login interface is remote music streaming – yes, that’s correct, Music Assistant anywhere you can connect to the internet. We’ve created a new web app that allows for remote connections while you’re out and about.
It uses Home Assistant Cloud’s built-in multimedia streaming capabilities (WebRTC) to help route the audio from your Music Assistant server to wherever you are. A Home Assistant Cloud subscription is not required to use this feature; a big shoutout to Nabu Casa for providing their infrastructure for free to our users. Home Assistant Cloud subscribers get access to even more powerful routing, which improves streaming in more places. This subscription also supports the full-time development of Music Assistant 🙏.
This connection is peer-to-peer and end-to-end encrypted, meaning no one will know if you’re listening to ABBA 😊. I wouldn’t say it’s ready to replace your current music streaming service, but it’s a great way to get your FLACs playing at a friend’s house. You could even open two instances of the web app and stream it to two devices, and they’ll be synchronized… but how is that even possible?
“Spin me right round”
Introducing Sendspin
For some time, the Music Assistant team has been looking for the best way to stream audio, album art, and other music visualizations to the devices we have around our homes. There are a couple of projects out there doing cool stuff with streaming audio, but not any that fit our needs. So, when it doesn’t exist, it’s time to start building.
Introducing Sendspin, a new multimedia streaming and synchronizing protocol. It’s fully open source and free to use. Sendspin can stream high-fidelity audio, album art, and visualizer data, automatically adapting to each device’s capabilities. Imagine an e-paper display showcasing the album cover, while multiple speakers play in sync, and smart lights pulse to the rhythm.
The best way to use it right now is either via your browser or a Home Assistant Voice Preview Edition running beta firmware. We’ve built the experimental ability to use Sendspin on Google Cast-capable speakers (we’re also looking to do the same with AirPlay-capable speakers), which will allow Sendspin to work with a lot of different hardware.
A big thanks to Maxim and Kevin at the Open Home Foundation, who have been instrumental in making Sendspin a reality. Even though it can do some impressive stuff today, it’s very much a tech preview, and this announcement is our call to all developers and DIY audio hobbyists – we need your help building and testing this. This is the spec, start building with it!
All the best things in life are meant to be shared, and your music should be as free and open as the software we love. So spin that record 💿, drop the needle, and send that music across your entire home.
“Aeroplane”
AirPlay additions
We recently added support for external audio sources, the first being Spotify Connect. This allows you to stream audio from the Spotify app to your Music Assistant server, which could send it across all your speakers, even if they don’t support Spotify Connect. We’ve now added the ability to send AirPlay audio to Music Assistant, which you can then send anywhere in your home.
We also now support AirPlay 2 speakers as a player provider, which means perfectly synced audio across all your AirPlay 2-capable speakers, like HomePods. We recommend reading the limitations in the documentation, as not all AirPlay 2 devices are made equal 🤦♂️.
“Sing”
Lyrics support
It's time for karaoke!
Never again be left guessing what Kurt is saying in Smells Like Teen Spirit. As of Music Assistant 2.6, you can now see the lyrics of the song you’re playing. If the lyrics provider supports it, there is the ability to have these words time-synced, making it more like karaoke. Lyrics can be found when you open the queue menu and it will be in the “lyrics” tab (this tab will only appear if the track name, artist and album are matched to the lyrics providers). We started with support of LRCLIB, but have since added Tidal lyric syncing, Genius lyrics, and local LRC files.
“Smooth operator”
Smart fading
Making your playlists seamless
Music Assistant is now your personal in-house DJ, perfectly blending one song into the next, and unlike a DJ it always takes your requests 😎. This latest update adds Smart fading, which takes into account the BPM of each song, to make crossfading between songs sound more natural. To turn it on, go to your player of choice, scroll down to the Audio section, and choose “Enable Smart Fades”.
“All the small things”
And much more
None of these updates are small things, but I’m running out of space, so here is the rest of the hot 100:
There are now DSP presets that allow you to quickly save and apply custom configurations.
Track and share your listening history, with the addition of scrobbling, with support for LastFM, ListenBrainz, and Subsonic.
Several new player providers have been added, including Yamaha MusicCast, and Roku devices running Media Assistant.
Added VBAN as a new input provider.
New radio and podcast providers include Radio Paradise, Podcast Index, BBC Sounds, gPodder, iTunes Podcasts, Dl.fm, and ARD Audiothek.
Can’t follow Phish on tour? Luckily, the new Phish.in provider has you covered. There’s also Nugs.net if you’re looking for more live music.
Another cool hodgepodge of audio is the Internet Archive, which can now be added as a provider.
One of Japan’s biggest streaming platforms Niconico has been added as an audio provider ㊗️.
“Rebel yell”
Join the audio revolution
Music Assistant is also cast compatible!
Your music, your players – it’s time to take back control of your music and the devices you want to play it on. If you’re new to Music Assistant, check how to get started here. While we’re excited about these new features, we’re not hitting pause anytime soon. We’d love to hear your feedback in the comments or on Discord.
If you’re ever in need of a device that works great with Home Assistant, well, I have just the program for you. Works with Home Assistant is our certification program that ensures devices work seamlessly and locally, all with brands that back them up.
Did you know that this year the Works with Home Assistant program has certified 12 partners across 12 months? That’s more than were certified in the two years since the program launched in 2022! The full list of devices is insanely long now (luckily, we made it searchable). To make all this happen over just one year, a lot of important things have been happening behind the scenes.
When we moved it over to the foundation, we also took that chance to beef-up our processes, with robust legal contracts that ensure every partner who joins the program formally commits to things like offering users long-term support and easy updates.
It’s all about the devices
When we started the program we certified brands, but now we certify devices. This means you know exactly which sensors, switches, or other gadgets have been rigorously tested by us to ensure the best experience with Home Assistant. Each certified device has to work locally, without the need for cloud subscriptions or control.
We can now certify in phases, rather than overwhelming our testers with a truckload of devices in order to launch one partner. Also, if a manufacturer has one device that is cloud-controlled, it doesn’t blacklist any remaining items they have that could operate perfectly well locally. It sometimes means that sometimes your favorite devices aren’t part of the first wave of certification but, trust us, the partners check the comments 😉.
Making it easy to find certified devices
Here’s a conundrum: the more products that are certified, the harder it is for you to see and find them. The good news is I think we’ve cracked it!
Last week, we published the first version of our new searchable certified device list. Previously, you’d have to hunt around for info by checking the integration page or digging through launch blogs to see if a device was certified. Now, certified devices are kept up to date in one central, easy-to-use location, with extra information on the region they’re available in, the protocol we’ve certified them under, and notes about any secondary functionality we’re still working on.
So many (useful) columns!
The badge had a makeover
Every certified device earns the right to display our badge on its packaging, proudly announcing it Works with Home Assistant. If you’re not part of the program, you’re not allowed to use the Home Assistant logo. We used to have different versions of the badges depending on whether the device used Matter, Zigbee, or Z-Wave, and so on, but – let’s be honest – they were overcomplicated and impossible to actually read on a box!
Since the badge is such an important signal when you’re browsing products, we decided to simplify it and focus purely on that mark of quality. Now we have just two versions: a color badge and a monochrome design that are easier to read on any packaging.
We love to see the new badge being used IRL!
Companies of all sizes
For 2025, our goal was simple: we wanted both the big names and passionate community projects to be able to join. Yes, we’re thrilled to have major smart home players such as Shelly and Reolink committing to the program, but it’s equally important for us to connect with smaller, community-built projects – the start-ups or developers who keep open source at the heart of everything they do, like AirGradient and Apollo Automation.
This commitment to inclusivity is a big reason why we keep the annual fee for joining the program deliberately low, at only 500 CHF (per partner, not device) per year. We want to ensure being part of Works with Home Assistant is achievable for everyone who shares our vision.
Some of our team visiting the Apollo booth at IFA Berlin in September.
Improving testing
Testing hasn’t always been perfect – we knew we needed to make improvements, and the community has been amazing in helping us find things we need to look at. Like everything we do, we learn as we go, we iterate, and we improve. Previously, everyone was testing in their own way, but now we’ve standardized the way we test and give feedback to partners. This means testing is more consistent, exacting, and able to handle higher volumes – one of the reasons why we’ve been able to increase the number of devices we’ve certified so radically!
A lot of devices that come across our desks don’t pass certification, and it’s often due to organizations not fully understanding the requirements of joining. While this can vary greatly depending on the device and protocol, it was clear we needed to be more transparent. So as well as publishing our Works with Home Assistant Working Group Resolution, we’re also publishing further testing information: this sample testing report for a simple smart plug shows you the process we follow.
Keeping Home Assistant on the bleeding edge
Because we get to see and test new devices in advance, and receive feedback from our certified partners as part of the process, we have a sneak peek into what vendors have in mind for 2026 and beyond. This allows us to look at our product roadmap and see where we need to realign with innovations in the market. By testing today’s devices, we’re guiding tomorrow’s Home Assistant features!
Spot one of the certified cameras in our State of the Open Home segment
What can be controlled in Home Assistant
A core aim of the program is to ensure all certified devices have their “key functionality” available within Home Assistant. So how do we decide what aspects are controllable in Home Assistant and what doesn’t make the cut?
Key: First, we look at the functionality as a whole. Let’s use a door lock for example. The door should lock and unlock from within Home Assistant. That’s key functionality, get it? 😉
Secondary: If the lock also chimes when it locks or unlocks, we think of that as “secondary” functionality. We recommend that the manufacturer has it as an “exposed feature” in Home Assistant, so you can turn it off during quiet hours for example, but it wouldn’t block certification.
We have to look at what’s actually supported by the open standard that we’re testing against too. If a feature is not currently supported by the specification, there’s no way for the manufacturer to actually implement it. This is one of the major challenges in certifying against ‘younger’ specifications such as Matter.
We use our best judgment on this, but we also want your feedback, because everyone has a slightly different point of view, even within our team and testers – so look out for our user research requests, or please share your thoughts in our comments below!
Connecting with our community
For all this talk of testing, Works with Home Assistant is primarily about people and partnerships! As a foundation, we’re focused on making sure the program stays deeply connected with the community it serves, both online and in person.
We’ve been stepping up our presence at meetups and events around the world, so we can share the latest developments and gather your valuable feedback. From gigantic trade shows like CES in Las Vegas to small, local get-togethers, you can expect to see us there! We also want to do this online, so you can ask partners questions on streams, or in comments – keep an eye out for more of this in future.
San Diego Meetup
On to 2026
So that was 2025 in a (big) nutshell. As for 2026, we want to kick it off with some wonderful Zigbee partners we’ve been working really hard on – particularly after the awesome launch of Connect ZBT-2. Even though Zigbee is one of the longest-established protocols, it’s actually one of the hardest for us to test and certify because so many devices operate outside the official specification. This means our team and partners do a lot of prep to get them to a testable state – but in doing so we’re driving big improvements in functionality for everyone!
We also want to improve coverage globally, so, regardless of region, everyone who uses Home Assistant has a good range of certified options to choose from. This means we’re actively seeking partners who will cover regions outside of Europe and North America for everyday essentials like smart plugs and lighting.
As ever, everything coming up will be covered right here – so stay tuned for updates… and here’s to certifying many more devices in 2026! 🎉🥳🎊
As the year winds down and the holidays approach, we’re closing out 2025 with a release that’s all about giving you more control and a little bit of magic. ✨
This month, we’re unveiling Home Assistant Labs, a brand-new space where you can preview features before they go mainstream. And what better way to kick it off than with Winter mode? ❄️ Enable it and watch snowflakes drift across your dashboard. It’s completely unnecessary, utterly delightful, and exactly the kind of thing we love to build. ❄️
But that’s just the beginning. We’ve been working on making automationsAutomations in Home Assistant allow you to automatically respond to things that happen in and around your home. [Learn more] more intuitive over the past releases, and this release finally delivers purpose-specific triggers and conditions. Instead of thinking in (numeric) states, you can now simply say “When a light turns on” or “If the climate is heating”. It’s automation building the way our mind works, as it should be. 🧠
Oh, and if you’re looking to level up your Zigbee or Thread network, check out the Home Assistant Connect ZBT-2 we released last month. It’s four times faster and has a gorgeous new antenna design that you’ll actually want to display on your desk. 📡
From all of us working on Home Assistant:
Thank you for an amazing 2025! ❤️
Happy holidays, and enjoy the release!
../Frenck
A little holiday cheer 🎄🎶
Jingle Labs by Frenck and Darren
Dashing through the code,
With a brand-new Labs to show,
Snowflakes start to fall,
Watch the dashboard glow!
Triggers now make sense,
Conditions feel just right,
What fun it is to automate,
Your smart home every night!
Chorus
Jingle Labs, jingle Labs,
Features on the way!
Oh what fun it is to run,
Home Assistant every day, hey!
Jingle Labs, jingle Labs,
Winter mode is here!
Turn your lights on with a thought,
And spread some holiday cheer!
Power graphs are live,
Water meters too,
Dashboards you can set,
For every user’s view!
Xbox got some love,
Shelly’s platinum now,
Contributors came through this year,
Take a final bow!
Chorus
Jingle Labs, jingle Labs,
Triggers for the win!
Climate, lights, and fans galore,
Let the automations spin!
Jingle Labs, jingle Labs,
Thank you all so much!
Happy holidays from us,
Now go and automate stuff!
When we develop new features for Home Assistant, we often find ourselves in a tricky spot. A feature might be fully built and tested, but we’re not entirely sure if it’s the right fit for everyone just yet. Maybe we want to gather some real-world feedback first, or perhaps we want to see how the community uses it before committing to keeping it around forever.
That’s where Home Assistant Labs comes in! 🧪
Labs is a brand-new place in Home Assistant that gives you a sneak peek at features we’re working on. These are not unfinished experiments or unstable beta features. They are fully functional and tested, but they might change or even disappear based on feedback. We are committed to building in the open, and we want to give more people the choice to hop into the lab with us. By joining us, your feedback will directly help refine these features for the entire community.
The very first preview feature available in Labs is Winter mode ❄️, inspired by a community post on Reddit originally created by u/Possible-Week-5815. Enable it, and watch your Home Assistant interface transform into a winter wonderland with falling snow. A fun way to get into the holiday spirit!
When you enable a preview feature, you can also choose to create a backup first, just to be safe. And if you change your mind? Simply disable it again. No restart required!
Preview features are off by default, and enabling them won’t affect your existing setup. It’s completely optional, so if you prefer to stick with the battle-proven experience, that’s totally fine. But if you’re curious and want to explore what’s coming next, Labs is the place to be.
But what was the first Labs preview feature we put in there? Well, it’s a big one…
Purpose-specific triggers and conditions
Almost two years ago, we released a new automationAutomations in Home Assistant allow you to automatically respond to things that happen in and around your home. [Learn more] editor that unwrapped all our actionsActions are used in several places in Home Assistant. As part of a script or automation, actions define what is going to happen once a trigger is activated. In scripts, an action is called sequence. [Learn more] and made them easier to understand. Instead of a single, obscure “Call service” action, you now see clear options like “Light: Turn on” or “Media Player: Set Volume”.
Ever since, we’ve been wondering: could we do the same for triggersA trigger is a set of values or conditions of a platform that are defined to cause an automation to run. [Learn more] and conditionsConditions are an optional part of an automation that will prevent an action from firing if they are not met. [Learn more]? Instead of relying on technical, state-based options, what if we could offer intuitive alternatives that just make sense? Options like “When a light turns on” or “If a light is on”.
That idea set a two-year plan in motion, and today it’s finally becoming a reality.
Along the way, we discovered something interesting: many of you take a “target-first” approach when building automationsAutomations in Home Assistant allow you to automatically respond to things that happen in and around your home. [Learn more]. You think about what you want to automate (a deviceA device is a model representing a physical or logical unit that contains entities., an entityAn entity represents a sensor, actor, or function in Home Assistant. Entities are used to monitor physical properties or to control other entities. An entity is usually part of a device or a service. [Learn more], or an areaAn area in Home Assistant is a logical grouping of devices and entities that are meant to match areas (or rooms) in the physical world: your home. For example, the living room area groups devices and entities in your living room. [Learn more]) before thinking about how to automate it (which action to perform or which trigger to use). This release embraces that mindset with a completely new way to build automations.
Purpose-specific triggers and conditions are now provided directly by domainsEach integration in Home Assistant has a unique identifier: The domain. It is often shown as the first part (before the dot) of entity IDs. like Light, Climate, Fan, and others, covering the most common automation use cases.
These new triggers and conditions fully support targeting. This means you can trigger an automation when any light in your living room turns on, without having to list them one by one or create a group beforehand. Targeting an area keeps things simple: it’s always aligned with how your home is organized, and you don’t have to update anything when you add or remove devices.
LabelsLabels in Home Assistant allow grouping elements irrespective of their physical location or type. Labels can be assigned to areas, devices, entities, automations, scenes, scripts, and helpers. Labels can be used in automations and scripts as a target for actions. Labels can also be used to filter data. [Learn more] are supported too! You can now check if any of your Christmas lights are on. Perfect timing for the holidays! 🎄
We’ve also introduced a new way to pick triggers, conditions, and actions that fits this target-first approach. You can navigate your home by floorA floor in Home Assistant is a logical grouping of areas that are meant to match the physical floors in your home. Devices & entities are not assigned to floors but to areas. Floors can be used in automations and scripts as a target for actions. For example, to turn off all the lights on the downstairs floor when you go to bed. [Learn more], then area, then device, and see exactly which options are available for each target. It’s a much more intuitive way to build automationsAutomations in Home Assistant allow you to automatically respond to things that happen in and around your home. [Learn more].
This feature is still being refined, so we’ve made it available as a preview feature in Labs. Head over to Settings > System > Labs to enable it and help us shape the future of automation building!
More dashboard improvements!
We have a lot of dashboard improvements to share in this release! From better default dashboard management to an improved Home dashboard, we have been busy making your Home Assistant experience even better.
Set a system-wide default dashboard
Picking a default dashboard is now a system-level setting that takes effect instantly for all users on your Home Assistant installation. The dashboard you choose will appear at the top of the sidebar, replacing the current default.
But don’t worry, personal preferences still matter! We added a new setting in your User profile where you can override the system default and set your own preferred dashboard.
If you set your phone to one dashboard and your wall tablet to another, they’ll now both revert to the default dashboard. If you want your wall tablet to use a different dashboard than your other devices, we recommend giving it a separate user profile that you can customize however you want.
Reorder areas and floors
When using the built-in dashboard experiences (Home, Lights, Security, and others), one of the main pain points was the strict ordering of areasAn area in Home Assistant is a logical grouping of devices and entities that are meant to match areas (or rooms) in the physical world: your home. For example, the living room area groups devices and entities in your living room. [Learn more] (alphabetically) and floorsA floor in Home Assistant is a logical grouping of areas that are meant to match the physical floors in your home. Devices & entities are not assigned to floors but to areas. Floors can be used in automations and scripts as a target for actions. For example, to turn off all the lights on the downstairs floor when you go to bed. [Learn more] (numerically by level). This often didn’t make sense in a real home, where your guest bathroom shouldn’t appear before your living room, and the attic is rarely more relevant than the main floor.
Now you can go to Settings > Areas, labels & zones and use the new Reorder floors and areas menu to manually drag and drop any area or floor to reorder them. Your changes will instantly apply to all built-in dashboards that show areas and floors.
Experimental dashboards have graduated
With the launch of Labs, we retired the experimental flag from the dashboard creation list. The Home dashboard can now be found in the dashboard list (still not visible by default), and the Areas dashboard has evolved into Home, so we’ve removed it for now. If you’re using the Areas dashboard, it will continue to work; you just won’t be able to create another.
Note
We want to keep hearing your voice! Share your experience with us in the Home dashboard survey and help us improve every step of the way. And of course join us on Discord to work together on the future of dashboards.
Home dashboard improvements
We added a new sidebar to the Home dashboard that gathers quick access links we think are useful for you. There’s also a nicer area and floor layout that uses space more efficiently. On a more technical level, the Home dashboard is now a proper built-in dashboard and shows up in the dashboard list.
Important
There is a chance your current favorites might disappear in this release and need to be re-added. This is due to the migration of this dashboard from a strategy to a built-in dashboard.
Undo and redo in the dashboard editor
The dashboard editor now includes the undo and redo feature that we added in 2025.10 to the automationAutomations in Home Assistant allow you to automatically respond to things that happen in and around your home. [Learn more] and scriptScripts are components that allow you to specify a sequence of actions to be executed by Home Assistant when turned on. [Learn more] editor. This allows you to experiment safely while editing your dashboards. You can undo up to 75 changes or restore them with a single click, making editing dashboards faster and less stressful.
Thanks to @jpbede for implementing this handy feature!
Power and water in the Energy dashboard
The Energy dashboard has been helping you track your energy and gas usage for years now, and this release brings two great additions: real-time power monitoring and downstream water tracking.
Real-time power monitoring
Until now, the Energy dashboard was all about energy: the cumulative kWh you’ve consumed or produced over time. But sometimes you want to know what’s happening right now. How much power is that appliance actually drawing? Is your solar system producing at this very moment?
With this release, you can now configure power sensors alongside your energy sensors. Track your real-time grid consumption, see how much you’re exporting back to the grid, and watch those watts flow in real-time. The power configuration options now appear alongside energy settings for each source or device, and new power graphs let you see your power consumption throughout the day.
Downstream water meters
The Energy dashboard has been tracking your water consumption for a while now, but it was missing something: the ability to see where all that water is actually going. Just like you can track individual devices for energy consumption, you can now add downstream water meters to break down your water usage.
Got a smart irrigation controller? A water softener with a flow meter? A separate meter for your pool? Now you can track them all and see exactly how your water consumption is distributed across different uses.
There’s also a brand-new water sankey card that visualizes your water flow, just like the energy sankey diagram you already know. It’s a great way to see where your water is going at a glance.
The new water sankey card shows where your water is going at a glance.
New energy layout
To make room for this new functionality, the Energy dashboard has been reorganized. Don’t worry: if you only have energy configured, you’ll still see the same dashboard. But if you add water, gas, or power, the dashboard will be split into several tabs.
Integrations
Thanks to our community for keeping pace with the new integrationsIntegrations connect and integrate Home Assistant with your devices, services, and more. [Learn more] and improvements to existing ones! You’re all awesome 🥰
New integrations
We welcome the following new integrations in this release:
Airobot, added by @mettolen
Control and monitor your Airobot smart thermostats for intelligent floor heating control via the local REST API.
Anglian Water, added by @pantherale0
Integrate your Anglian Water smart water meter to track water usage and consumption costs.
Backblaze B2, added by @ElCruncharino
Use a Backblaze B2 cloud storage bucket as a backup location for your Home Assistant backups.
EnergyID, added by @Molier
Sync anything from your home directly to EnergyID for advanced analytics, performance tracking and benchmarking.
Essent, added by @jaapp
Monitor dynamic electricity and gas prices for Essent customers in the Netherlands with variable pricing contracts.
Google Air Quality, added by @Thomas55555
Get real-time air quality data for your location using Google’s Air Quality API.
Google Weather, added by @tronikos
Use Google Weather as a source for weather data, providing current conditions, hourly forecasts for the next 24 hours, and daily forecasts for the next 10 days.
Hanna, added by @bestycame
Fetch pool water quality data from your Hanna Pool Controller device, including pH, chlorine levels, ORP values, and water temperature.
Home Assistant Labs, added by @frenck
A dedicated panel where you can preview and test new features before they become standard in Home Assistant.
Philips Hue BLE, added by @flip-dots
Control your Philips Hue Bluetooth lights directly with Home Assistant, without the need for a Hue Bridge.
Saunum, added by @mettolen
Integrate your Saunum Leil sauna control unit to precisely control temperature and monitor your sauna’s operation.
Victron BLE, added by @rajlaud
Integrate Victron Energy devices that support the Bluetooth Low Energy protocol for real-time monitoring.
This release also has new virtual integrations. Virtual integrations are stubs that are handled by other (existing) integrations to help with findability. These ones are new:
It is not just new integrationsIntegrations connect and integrate Home Assistant with your devices, services, and more. [Learn more] that have been added; existing ones are also being constantly improved. Here are some of the noteworthy changes to existing integrations:
@piitaya updated the ESPHome integration to let Home Assistant generate entity IDs using its standard rules, aligning it with how other integrations work.
Thanks to @bdraco, you can configure Wi-Fi on Shelly generation 2+ devices directly from Home Assistant via Bluetooth.
Shelly now supports control modes for upcoming Shelly Cury devices. Nice work, @bieniu!
The Tuya integration received a lot of love! Cat litter boxes now expose switches, buttons, lights, and sensors for controlling your pet’s automated litter box. On top of that, doorbell events are now supported too. Thanks, @heindrichpaul!
@starkillerOG expanded the Reolink integration with an exposure mode select and audio noise reduction controls for supported cameras.
Air conditioner and microwave support has landed in the Home Connect integration, expanding the range of supported BSH appliances. Thanks, @Diegorro98!
@zerzhang added support for the SwitchBot smart thermostat radiator to the SwitchBot integration. Nice!
The Xbox integration got some love from @tr4nt0r! You can now link multiple Xbox accounts, track how many friends you (and your friends) have, see if they’re in a party, and control more remote functions. The media browser also gained a new category showcasing official game art and screenshots.
Got an Ecovacs robot? The Ecovacs integration now has a border spin switch (to reach those tricky edges while mopping) and an auto-empty select entity. Thanks, @aronnebrivio!
The VeSync integration gained a child lock switch, giving you control over this safety feature for your devices. Thanks, @cdnninja!
The SQL integration now supports using templates in your queries, giving you more flexibility when querying your databases. Great addition, @gjohansson-ST!
@tomwilkie expanded the Prometheus integration to export metrics for the water_heater domain.
The Anthropic integration now supports AI task entities. Thanks, @Shulyaka!
Portainer can now show you resource usage of your containers. Nice work, @erwindouna!
@thomasddn added a button to enable reduced guard mode for compatible vehicles to the Volvo integration.
The Plugwise integration now supports the new Anna P1 device and gained a select entity for zone profiles on Adam devices. Thanks, @bouwew!
Bang & Olufsen users can now use their Beoremote One with Home Assistant. The remote’s buttons are exposed as event entities. Awesome, @mj23000!
One thing we are incredibly proud of in Home Assistant is our integration quality scale. This scale helps us and our contributors to ensure integrations are of high quality, maintainable, and provide the best possible user experience.
This release, we celebrate several integrationsIntegrations connect and integrate Home Assistant with your devices, services, and more. [Learn more] that have improved their quality scale:
This is a huge achievement for these integrations and their maintainers. The effort and dedication required to reach these quality levels is significant, as it involves extensive testing, documentation, error handling, and often complete rewrites of parts of the integration.
A big thank you to all the contributors involved! 👏
Now available to set up from the UI
While most integrationsIntegrations connect and integrate Home Assistant with your devices, services, and more. [Learn more] can be set up directly from the Home Assistant user interface, some were only available using YAML configuration. We keep moving more integrations to the UI, making them more accessible for everyone to set up and use.
The following integration is now available via the Home Assistant UI:
The following integrationsIntegrations connect and integrate Home Assistant with your devices, services, and more. [Learn more] are no longer available as of this release:
Dominos Pizza: The Dominos Pizza integration has been removed. The integration no longer functions and its underlying source has been unmaintained since 2019.
Flick Electric: The Flick Electric integration has been removed. All customers of the Flick Electric company have already been moved to Meridian Energy. The service this integration used is already non-functional.
The following integrations have been removed as they are incompatible with the currently supported installation methods:
Bluetooth Tracker
CUPS
Decora
dlib Face Detect
dlib Face Identify
Eddystone Temperature
GStreamer
Keyboard
LIRC
Pandora
Raspberry Pi Camera
SMS
Snips
TensorFlow
Other noteworthy changes
There are many more improvements in this release; here are some of the other noteworthy changes:
New template math functions! @akx added clamp, wrap, and remap to manipulate numbers in your templates. Awesome!
The activity card now supports filtering by state, making it easier to see specific events. Nice one, @karwosts!
@MindFreeze added min and max options to the bar gauge feature for tile cards, giving you more control over the gauge range.
You can now delete helpers directly from the helpers panel, without having to open them first. Thanks, @frenck!
The blueprints panel now shows how many automations and scripts use each blueprint. Great for keeping track, @EarMaster!
@timmo001 added a handy trick: double-click the automation editor sidebar to reset its width.
Labels now show up on the device information card, making it easier to see how your devices are organized. Thanks again, @timmo001!
Get insight into your AI conversations
Ever played around with AI in Home Assistant and wondered what data is actually being sent?
@balloob upgraded the voice assistant debug interface, and you can now inspect the system prompt that tells the AI how to behave, along with any tool calls it made to generate your answer.
This makes it much easier to figure out why the AI decided to skip over that one entityAn entity represents a sensor, actor, or function in Home Assistant. Entities are used to monitor physical properties or to control other entities. An entity is usually part of a device or a service. [Learn more], or why it called a specific tool. You can find the debug interface in the voice assistant configuration panel.
Add entities to Android widgets and favorites
If you’re using the Home Assistant Companion app for Android, there’s a handy new feature waiting for you! Starting with app version 2025.11, you can now add entitiesAn entity represents a sensor, actor, or function in Home Assistant. Entities are used to monitor physical properties or to control other entities. An entity is usually part of a device or a service. [Learn more] to widgets and Android Auto favorites directly from the entity’s more info dialog.
With just a few taps, you can:
Add widgets for quick control of entities right from your home screen
Set entities as Android Auto favorites, making them quickly accessible in your car
No more deep-diving into app settings! The Add to option appears in the more info dialog with options tailored to the entity you’re viewing. For example, adding a media player widget is only available for media players.
This is a first step in integrating native mobile features directly into the Home Assistant interface. Future releases will expand this with support for creating shortcuts, tiles, and watch favorites.
We will also release patch releases for Home Assistant 2025.12 in December. 🎄
These patch releases only contain bug fixes. Our goal is to release a patch
release once a week, aiming for Friday.
Bump aiomealie to 1.1.1 and statically define mealplan entry types (@andrew-codechimp - #158907)
Update systembridgeconnector to 5.2.4, fix media source (@timmo001 - #158917)
Assume cover or valve is always “running” in google assistant when the state is assumed or the position is reported to allow it to be be stopped (@jbouwh - #158919)
Home Assistant has a great community of users who are all more than willing to help each other out. So, join us!
Our very active Discord chat server is an excellent place to be, and don’t forget to join our amazing forums.
Found a bug or issue? Please report it in our issue tracker to get it fixed! Or check our help page for guidance on more places you can go.
Are you more into email? Sign up for the Open Home Foundation Newsletter to get the latest news about features, things happening in our community, and other projects that support the Open Home straight into your inbox.
Backward-incompatible changes
We do our best to avoid making changes to existing functionality that might unexpectedly impact your Home Assistant installation. Unfortunately, sometimes it is inevitable.
We always make sure to document these changes to make the transition as easy as possible for you. This release has the following backward-incompatible changes:
Core and Supervised installation methods, and 32-bit systems
After a 6-month deprecation period, support for the Home Assistant Core and Home Assistant Supervised installation methods, as well as all 32-bit system architectures (i386, armhf, and armv7), has now been fully removed.
These installation methods and architectures will no longer receive updates, including security updates. If you are still using one of these installation methods or architectures, please migrate to a supported installation method and architecture as soon as possible to continue receiving updates and support.
Hive has removed support for their security products. We have removed the alarm control panel from the integration, as the Hive APIs no longer support these products.
The legacy license plate event sensor has been removed from the UniFi Protect integration, as it no longer functions with Protect 6 and newer. The UniFi Protect integration has not been compatible with Protect versions older than 6 for quite some time.
This sensor has been replaced with a new Vehicle Detection Event entity that provides significantly more functionality, including license plate recognition, vehicle type detection, color detection, and confidence scores. The new event entity fires with a 3-second delay to ensure optimal thumbnail and LPR data quality.
The Xbox media browser has been completely overhauled to support multiple accounts and introduce a range of other improvements. As part of this update, the format of the media-source identifiers has been changed as well.
The following and followers sensors introduced in the last release previously included friends in their counts. After a recent API update, friends are no longer included.
If you are a custom integration developer and want to learn about changes and new features available for your integration: Be sure to follow our developer blog. The following changes are the most notable for this release:
The easiest way to start with Zigbee or Thread just got even better, with Home Assistant Connect ZBT-2. This USB adapter plugs into your Home Assistant system and opens up a world of smart device options. Between its precisely tuned antenna and next-generation chip, it’s a big step up for anyone looking to connect Zigbee, Thread, or Matter devices directly to Home Assistant.
For all our Zigbee fans, this might be the best upgrade you’ll make all year. We’ve squeezed every inch out of this technology, giving it the best range, speed, and stability possible. The same can be said for our Thread-heads out there (yeah, I just came up with that cool nickname 😎), making Matter or ESPHome Thread connections rock-solid. Pick whether to dedicate your Connect ZBT-2 to run a Zigbee or Thread network, and it’ll provide the best experience for that protocol (and if all these names just sound like new streaming services to you, check out our explainer below).
If you’re one of those people still rocking three different hubs, what are you waiting for… another giant server outage to take down your smart home? Ditch those cloud hubs and take back your privacy today. As an added bonus, your devices will likely get more controls, range, and resilience.
Available today starting at $49 and €45 (that’s the MSRP, and pricing will vary by retailer). Designed and built by Nabu Casa and the Open Home Foundation, every purchase helps fund the development of Home Assistant. For quick specs, details, and where to buy, visit our beautifulHome Assistant Connect ZBT-2 page.
What are Zigbee, Thread, and Matter?
The short answer is they’re all open standards that let smart devices talk directly to your smart hub of choice, like Home Assistant. We love open standards because they don’t rely on the cloud, which means your devices are fully under your control at home, with no risk of turning into a paperweight if the manufacturer gets bored of paying the server fees. Also, when used with Home Assistant, your smart home data never needs to leave your home, which is always better for privacy.
Zigbee is a wireless standard that’s been a cornerstone of smart home technology for nearly two decades, with thousands of devices from brands like Philips Hue, IKEA, Aqara, Sonoff, frient, and ThirdReality. There’s a good chance you already have some of these devices in your home, and they’ll have their own hubs, which frankly are just taking up extra space, as everything is better connected right to Home Assistant 😉.
Matter is the big new standard – its tech is cutting-edge, and growing really fast. It can use Wi-Fi to talk to devices, but if that device is battery-powered, it’ll probably use Thread instead. Matter devices that use Thread are getting really good, and many are Works with Home Assistant certified, including devices from Nuki, Eve, MotionBlinds, and Aqara.
Whether you set up your Connect ZBT-2 to use Zigbee or Thread, you can’t really go wrong, as both standards have devices for nearly every smart home need. Both give devices great battery life, take some strain off your Wi-Fi, and counterintuitively, the more devices you have, the better the range and stability can be.
Standing on the shoulders of giants
In 2022, we released Home Assistant Connect ZBT-1 (originally called SkyConnect), our first product in the Connect line and first USB adapter. Connect ZBT-1 was designed to be the easiest, most stable way to connect Zigbee devices to Home Assistant. It also came with Thread connectivity support, which was very new at the time. All these years later, it continues to receive software support and is a community favorite.
Sales of Connect ZBT-1 helped fund Home Assistant’s development, and we learned so much that has influenced its next iteration. Alas, as much as we love our little Connect ZBT-1, today we’re saying goodbye. We have now ended production of Connect ZBT-1, but software support will continue. If you’re still using Connect ZBT-1, expect it to keep working far into the future.
If you are looking to upgrade your Zigbee network with a Connect ZBT-2, don’t forget you can continue to use your Connect ZBT-1 as a way to dip your toes into the world of Thread – it’s very easy to switch operating modes.
Upgrading everything
Compared to its predecessor, this version has upgraded everything. First off, we’ve doubled the product number from ZBT-1 to ZBT-2… that’s 2x better already! But there’s definitely more.
Stick with an antenna
First off, to achieve peak performance, we moved away from the small “stick” form factor. Small USB sticks are convenient, but USB ports and nearby electronics can create interference that weakens the signal. With Connect ZBT-1, we recommended using a USB extension cable to keep the adapter away from noise.
The antenna has gone from safety pin-sized 🧷, to tablespoon-sized 🥄
With Connect ZBT-2, we’ve designed away this issue. It’s much easier to properly position as it’s now a free-standing antenna and base, which is perfectly tuned for Zigbee and Thread. The larger antenna is not only good at broadcasting to further away devices, but is also good at listening out for faint signals from far away devices. We even optimized the base, which acts as a “ground plane”, boosting the antenna’s performance. It includes a 1.5 m (4.9 ft) USB cable that lets you place it in a good spot to avoid any interference.
Four times the speed
Inside Connect ZBT-2 is the Silicon Labs MG24, an advanced Zigbee/Thread system-on-chip. Compared to the MG21 used in Connect ZBT-1, it brings higher processing power and better sensitivity to weak signals.
More baud, the better 😜
We also took the opportunity to quadruple the internal communications speed of the chip – taking the baud rate from 115,200 bps to 460,800 bps. In our testing, we saw consistent improvements in device responsiveness. Don’t expect your devices to turn on four times faster, but you’ll feel the difference when turning on several devices simultaneously.
Built for Home Assistant
It is really easy to take advantage of all this performance, as we always work to make Home Assistant hardware super easy to start with. Just plug in the device via the included cable into a spare USB port on your Home Assistant system, and the setup wizard will guide you through everything. This all works so well because the same people who built Zigbee and Thread into Home Assistant also helped build Connect ZBT-2.
You can start a new Zigbee or Thread network in minutes, or use our improved migration tools to move an existing network over. It’s a very easy upgrade, and most adapters migrate with just a few clicks. Best of all, every Home Assistant user upgrading to new adapters will benefit from these new migration tools. Just another example of how hardware sales help level up our software development.
Compatibility and flexibility
Home Assistant Connect ZBT-2 supports Zigbee 3.0 (and yes, we’re looking at Zigbee 4.0 support as well) and is keeping pace with Thread’s rapid development. We’ve tested it working great with ZHA, zigpy-cli, Zigbee2MQTT, matter.js, and OpenThread Border Router, giving you the flexibility to choose how you manage your network.
If it’s a Zigbee-certified device or Matter-certified device that uses Thread, it should work out of the box. Home Assistant already has one of the widest compatibility lists in the world, and our community continuously expands it with every new release. For brands that support the functionality, there are also Over-the-Air (OTA) firmware updates for devices.
Just note: Connect ZBT-2 can only use one protocol at a time, meaning you must choose either Zigbee or Thread. We’ve done extensive testing in the past on running both at the same time, and found it just doesn’t work well for a whole list of reasons.
Second-generation power
Our second-generation Connect line products are all about being open and performant, and one addition that fulfills this promise is our inclusion of the ESP32 chip. Connect ZBT-2 includes an ESP32-S3 as its USB controller, which is a little overkill for this job, but opens up a world of possibilities.
ESP32 devices are well understood by our team, but also the community. It means that anyone can change the firmware on this chip and possibly unlock cool new abilities. For instance, our recently released Connect ZWA-2 uses this same chip to support experimental firmware that adds new functionality. This isn’t to say we’ll do the exact same thing with Connect ZBT-2; it’s more to say the sky’s the limit with our second-gen products. The firmware it ships with is just the start, and we have some cool ideas cooking on what we can do next.
Open design
Look at all those exposed pins and pads 🤤
When we say open, we mean it. In the physical sense, it’s easy to open Connect ZBT-2 as there are no clips or glue, just some lovely standard Phillips head screws. The board has a gorgeous silkscreen, which explains all the chips, exposed pins, and pads.
The bootloader is unlocked, and all the firmware we build is open source and available to modify. We’ve also built a new website that makes it easy to flash the stock firmware, and in the future, experiment with new firmware. We’ll also be providing the PCB and outer casing files if you want to tinker with those. Openness makes our products better… literally, since our community helps us find and fix bugs.
Why USB?
Before you get in the comments asking about Power-over-Ethernet (PoE)… we totally agree it’s cool, but on this occasion, it’s not the direction we took. Yes, PoE has become easier to use and its performance, if implemented correctly, can be quite good (our testing with Connect ZWA-2 shows a pretty minor speed hit). Connect ZBT-2 is focused solely on ease-of-use and pure performance. That said, there are a lot of PoE fans at the foundation, and product sales help fund development, so who knows, maybe we’ll find a way to please everyone.
Don’t hide it
Most other USB adapters are designed to be hidden away, dangling behind a server cabinet. For one thing, antenna orientation is pretty important, but also cool tech should be on show! We’ve designed Connect ZBT-2 to be proudly displayed, and the top even lights up like a candle – perfect timing for the holidays 🕯️.
It all adds up
Not science, but an interesting before-and-after of just one network, about a 60% increase in direct connections 🤩
Nabu Casa, the commercial partner building all official Home Assistant hardware, has knocked the build of this device out of the park. When you combine every small improvement made to Connect ZBT-2, it adds up to a nice performance improvement, while maintaining its predecessor’s reputation for rock-solid stability. What’s more, every purchase helps support the Open Home Foundation and funds the development of Home Assistant. Upgrading your smart home has never felt so good!
What are you waiting for?
Get the most out of your smart home with an adapter that’s open source at its core, delivers maximum performance, and looks good doing it. Home Assistant Connect ZBT-2 is available today for purchase, and as always, thanks for supporting Home Assistant!
November is here, and we’ve been hard at work refining some of the main experiences that you interact with every day, and I think you’re going to love what we’ve built.
My personal favorite this release? The brand new target picker. 🎯
It’s one of those changes that seems simple on the surface, but makes such a huge difference in how you build automations. You can finally see exactly what you’re targeting, with full context about which device an entity belongs to and which area it’s in. No more guessing whether you’re controlling the right ceiling light when you have three of them!
But that’s just the beginning. We’re continuing with the automation editor improvements, this time with a completely redesigned dialog for adding triggers, conditions, and actions. It’s cleaner, easier to read, and sets the foundation for some really exciting stuff coming in future releases. 🤫
And speaking of making things clearer, you can now control exactly how entity names appear on your dashboard cards. Want to show just the entity name? The device name? The area? Or combine them? Even if you rename things, your dashboards will stay perfectly in sync. No more manual updates needed!
Oh, and energy dashboard fans will appreciate the new pie chart view for device energy, complete with totals displayed in the corner of every energy card. 🥧
A huge thank you to all the contributors who made this release possible! And a special shout-out to @bramkragten, @JLo, @MindFreeze, @agners, and @piitaya who helped write the release notes this release. Also, @silamon and @GemPolisher for putting effort into tweaking its contents. Thanks to them, these release notes are in great shape. ❤️
A brand new target picker
Have you ever been building an automation and wondered, “Wait, which ceiling light is this?” when you see three entities all named “Ceiling light”? Or tried to figure out how many lights you’re actually controlling when you target an entire floor or area?
We’ve all been there. Until now, the target picker didn’t show you the full picture. You couldn’t see which device an entity belonged to or which area it was assigned to. And when you selected a floor or area as your target, you had no idea how many entities you were actually affecting. This uncertainty meant many of you stuck with targeting individual entities, even though larger targets (like areas and floors) can make your automations much more flexible.
The new target picker changes all that. Now you get full context for everything you’re targeting, and you can see exactly how many entities will be affected by your action.
Want to dig deeper? You can expand any floor, area, or device to see exactly which entities are included and where they’re coming from.
This makes it so much easier to build automations that scale with your home. When you target an area or floor, your automation automatically adapts as you add or remove devices. No more updating your automations every time you add a new light or sensor. Your automations just work, which is exactly how it should be.
A brand new way to add triggers, conditions, and actions in your automations
It’s no secret that we’re currently working hard on making automations easier to create. After the release of the automation sidebar two releases ago, we are now introducing a new dialog to add triggers, conditions, and actions.
The changes are purely cosmetic: the dialog is bigger, so the description of each block is simpler to read, with a two-pane layout to ease both navigation and block selection.
The building blocks (which are used to perform more complex conditions or sequences of actions, such as repeating actions or branching out your sequence into multiple paths) have been moved into the main dialog on a second tab. There is now a single entry point to add something to an automation instead of two, greatly reducing the number of buttons in complex automations.
As mentioned above, these changes are purely cosmetic, for now! But this new dialog is the foundation of what’s coming next, and we cannot wait to present that to you once it finally lands.
Naming entities on your dashboard
A few releases ago, we gave the entity picker a big upgrade by adding more context so you could easily see where each entity belongs (May 2025 release). In this release, we’re bringing that same flexibility to your dashboards.
You can now choose how names appear on your cards: show the entity, device, area, floor, or even combine them. This gives you full control over how your dashboards look and feel. For example, in a dedicated section for a specific device, you might choose to display only the entity name to avoid repeating the device name on every card.
Of course, you can still set a custom name if you want complete control over the text shown.
And the best part? If you rename an entity or device, your dashboards will automatically stay in sync. No more manual edits needed; everything just updates itself.
Energy pie
We’ve added a new layout to the devices energy graph: “pie” 🥧. You can toggle between the regular bar chart and the new pie chart by clicking the icon in the top-right corner.
Doing this made the top-right corner of the other energy cards feel empty, so we used that space to display the total energy for the selected period. For example, if the date picker is set to today, the total solar energy for today will be displayed in the corner of the solar production graph card.
Progress for Home Assistant and Add-on updates
With this release, you can now track the progress of updates to Home Assistant and Add-ons (managed by the Supervisor)! The progress includes the stages of downloading and unpacking, so the time required will vary based on your internet speed, CPU performance, and system load. As a result, the progress is not reflected as perfectly linear, but it does still provide a good estimate of how far along the update is.
Integrations
Thanks to our community for keeping pace with the new integrationsIntegrations connect and integrate Home Assistant with your devices, services, and more. [Learn more] and improvements to existing ones! You’re all awesome. 🥰
New integrations
We welcome the following new integrations in this release:
Actron Air, added by @kclif9
The Actron Air integration allows you to control Actron Air air conditioning controllers in Home Assistant.
Fing, added by @Lorenzo-Gasparini
The Fing integration provides network scanning, device detection, and presence monitoring capabilities using the Fing platform.
Firefly III, added by @erwindouna
Integrate with the Firefly III project, a free open source personal finance manager with full transaction management, budgets, categories, and reports.
iNELS, added by @epdevlab
Integrate with the iNELS smart home system to manage lighting, heating, and automation components for enhanced home control.
Lunatone Gateway, added by @MoonDevLT
Integrate with Lunatone Gateway, enabling control and monitoring of DALI lighting systems through Lunatone’s DALI gateway interface.
OpenRGB, added by @felipecrs
The OpenRGB integration allows unified control of RGB lighting across various hardware brands and devices through the OpenRGB project.
Noteworthy improvements to existing integrations
It’s not just new integrationsIntegrations connect and integrate Home Assistant with your devices, services, and more. [Learn more] that have been added; existing integrations are also being constantly improved. Here are some of the noteworthy changes:
The SwitchBot integration now supports garage door openers. Thanks @zerzhang!
@tr4nt0r added support for notifications to the Habitica integration. Nice work!
The VegeHub integration now has support for switches to control actuators. Cool @Thulrus!
The Portainer integration gained support for switches, buttons, and sensors, so you can control and monitor all your containers! Well done @erwindouna!
The Volvo integration can now show the location of your car and has buttons to control it. We got @thomasddn to thank for that!
Your Control4 climate devices (for example, thermostats) are now supported in Home Assistant. Thanks @davidrecordon!
Support for controlling Growatt MIN/TLX inverters was added, and you can now enable grid charge! Thanks @johanzander!
@hanwg added event entities to the Telegram bot integration. You can use these entities to more easily automate when you get a message, for example! Cool!
The Xbox integration now has support for images! It shows an image of the game you are currently playing, the avatar, and the Gamerpic for yourself and your friends. Thanks @tr4nt0r!
@AndyTempel added support for solar production forecasting to Victron Remote Monitoring, so you can now use it in the energy dashboard to see a forecast of how much solar energy you will produce today!
The Shelly integration now supports climate and valve entities. Thanks @thecode!
@starkillerOG improved the Reolink integration; it can now report bicycles and the type of person, vehicle, and animal. So you now know if a man or a woman is detected on your cameras. Great work!
Now available to set up from the UI
While most integrationsIntegrations connect and integrate Home Assistant with your devices, services, and more. [Learn more] can be set up directly from the Home Assistant user interface, some were only available using a YAML configuration. We keep moving more integrations to the UI, making them more accessible for everyone to set up and use.
The following integration is now available via the Home Assistant UI:
One thing we are incredibly proud of in Home Assistant is our integration quality scale. This scale helps us and our contributors to ensure integrations are of high quality, maintainable, and provide the best possible user experience.
This release, we celebrate several integrationsIntegrations connect and integrate Home Assistant with your devices, services, and more. [Learn more] that have improved their quality scale:
This is a huge achievement for these integrations and their maintainers. The effort and dedication required to reach these quality levels is significant, as it involves extensive testing, documentation, error handling, and often complete rewrites of parts of the integration.
A big thank you to all the contributors involved! 👏
Farewell to the following
The following integrationsIntegrations connect and integrate Home Assistant with your devices, services, and more. [Learn more] are no longer available as of this release:
Vultr has been removed. The integration has not been working since the API v1 that it used was taken offline in September 2023.
IBM Watson IoT Platform has been removed. On September 8, 2020, IBM announced the withdrawal of its support for the IBM Watson IoT Platform and successively discontinued all versions until September 30, 2022.
Plum Lightpad has been removed. Their servers have been shut down, which made the integration non-functional.
Other noteworthy changes
There are many more improvements in this release; here are some of the other noteworthy changes:
@thecode added group support for valves, so you can group multiple valves into one.
Searching in data tables got a lot better; you can now search over multiple columns at once. Thanks @wendevlin!
Energy graphs now show the total of the period in the top-right corner. Great addition, @MindFreeze!
Thanks to @karwosts, you can now use images from any integration providing images for your dashboard background.
Improved logging efficiency
If you’re using the Home Assistant Operating System, we have some great news for you! We’ve made our logging system way more efficient. 🚀
You might not realize it, but all those Home Assistant logs you can find in Settings > System > Logs were actually being stored on your disk twice. 🙈
Home Assistant OS keeps all logs for everything, including Home Assistant itself, in a very efficient way, even across restarts! But on top of that, we were also writing them to a log file in your Home Assistant configuration folder.
That’s not ideal. It takes twice the disk space, but more importantly, it causes unnecessary wear on your storage medium, which means it will fail sooner. This is especially concerning if you’re using an SD card in, for example, a Raspberry Pi.
As of this release, we’ve stopped writing logs to the configuration folder. You can still view and download all logs from the Home Assistant settings page, just like before. We’ve adapted that page to read the logs from the OS directly instead.
Tip
Are you more into the command line? No worries, our Home Assistant CLI has you covered. Check it out by running ha core logs --help for more information.
The new Home Dashboard keeps getting smarter
Following the improvements introduced in the latest releases, this release makes the experience even smoother and more intuitive.
We’ve simplified and reorganized things:
Suggested entities and favorites are now combined into a single, smart section, showing you what’s most relevant in one place.
Areas are now grouped by floor, making it easier to browse and understand your home’s layout at a glance.
The Lights, Climate, and Security views have been moved to their own dedicated dashboards, so you can access them directly under Settings > Dashboards. These dashboards now also include devices that aren’t assigned to any specific area, ensuring nothing is overlooked.
These improvements bring everything together more naturally, helping your Home Dashboard feel less like a setup and more like a true reflection of your home.
Patch releases
We will also release patch releases for Home Assistant 2025.11 in November.
These patch releases only contain bug fixes. Our goal is to release a patch
release once a week, aiming for Friday.
2025.11.1 - November 7
Improve scan interval for Airthings Corentium Home 2 (@LaStrada - #155694)
Remove @progress_step decorator from ZHA and Hardware integration (@puddly - #155867)
Home Assistant has a great community of users who are all more than willing to help each other out. So, join us!
Our very active Discord chat server is an excellent place to be, and don’t forget to join our amazing forums.
Found a bug or issue? Please report it in our issue tracker to get it fixed! Or check our help page for guidance on more places you can go.
Are you more into email? Sign up for the Open Home Foundation Newsletter to get the latest on features, things happening in our community, and other projects that support the Open Home straight into your inbox.
Backward-incompatible changes
We do our best to avoid making changes to existing functionality that might unexpectedly impact your Home Assistant installation. Unfortunately, sometimes, it is inevitable.
We always make sure to document these changes to make the transition as easy as possible for you. This release has the following backward-incompatible changes:
Set assumed state to group if at least one child has assumed state
Previously, the group’s assumed state was always false, regardless of the state of its child entities.
This has now changed:
The group will now have an assumed state of true if at least one child entity has an assumed state.
This makes the group’s assumed state reflect the uncertainty of its children more accurately.
These domains have been added: switch, fan, light, and cover.
The mealie integration now requires Mealie version 2 or later.
Mealie version 1 is no longer supported. Version 2 was released in October 2024, so over a year ago. Given the differences between versions 1 and 2, we are no longer able to support or test backward compatibility with version 1.
The tilt position of motion_blinds devices has been corrected to align with the Home Assistant standards.
The new tilt position will be: 0 = closed/covering the window opening, 100 = open/letting light through.
The previous tilt position can be converted to the new tilt position as follows:
new = 100 - old
current_tilt_position = 100 -> 0
current_tilt_position = 75 -> 25
current_tilt_position = 50 -> 50
current_tilt_position = 25 -> 75
current_tilt_position = 0 -> 100
open_cover_tilt -> close_cover_tilt
close_cover_tilt -> open_cover_tilt
Any automations concerning Motion Blinds devices that use the current_tilt_position attribute or use tilt open/close will need to be adjusted.
The mobile_app integration, which supports the iPhone and Android companion apps, now handles zone-only updates better. When your companion app sends just the zone name (not the exact coordinates), the device tracker will show the zone’s friendly name.
The person entity now shows the zone’s friendly name (not its object ID) for custom zones. This might break existing automations that trigger on a person’s state.
As an example, if you have a zone named zone.kids_school with the friendly name School:
Before this change, the state of the corresponding person and device_tracker entities would be kids_school when the “Location Sent” in the companion app was set to send “Zone Name Only” and School when it was set to “Exact”.
After this change, the state of the corresponding person and device_tracker entities will be School for both the “Location Sent” settings in the companion app.
The discovery of Renault functionality was previously based on assumptions that may have created invalid and non-functional entities.
These will no longer be created.
The Traccar integration has been updated to use a more secure API Token for authentication. This is a required, one-time breaking change to align with Traccar’s security recommendations and ensure the integration continues to work.
This release migrates the integration away from the older username/password method, ensuring continued stability and security for all users while also allowing users with SSO-based setups to use the integration.
When you update Home Assistant, the existing Traccar integration will need to be re-authenticated:
Generate an API Token on your Traccar server (you’ll find this option in your Traccar server’s user settings).
Go to Settings > Devices & services > Traccar Server.
Click “Reconfigure” and enter your new API Token when prompted.
Once you’ve done this, your Traccar devices and entities will work exactly as they did before.
The Account tier and Gold tenure sensors have been retired, as they no longer receive updates following the transition from Xbox Live Gold to Xbox Game Pass. Additionally, the In party and In multiplayer binary sensors have been removed, since they’ve been non-functional for quite some time.
If you are a custom integration developer and want to learn about changes and new features available for your integration, be sure to follow our developer blog. The following changes are the most notable for this release:
We’re delighted to welcome ELTAKO to the Works with Home Assistant program! ELTAKO’s robust relay switches have formed the blueprint for smart building and smart home control across Europe for decades – and happen to be the first Matter relays to join the program.
You may never have seen one of ELTAKO’s little blue devices before, and that’s the point. They usually sit quietly behind walls, furniture and in distribution boards, doing their jobs without interfering with interiors. Now, thanks to their joining the Works with Home Assistant program, you can bring these professional-level installations to your own smart set-up.
Out of the blue and into the open home
ELTAKO has been a well-known name in the German building trade and throughout Europe for more than 75 years. In fact, the name itself derives from ‘ELektrischer TAst-KOntakt’ (electrical push-button contact) in a nod to ELTAKO’s first impulse switch innovation that started it all back in 1949.
For those of us who haven’t been around quite that long, an impulse switch (also known as a latching or step relay) toggles a circuit on or off each time it receives an electrical pulse. Instead of requiring constant power, it ‘remembers’ its state until the next signal. As well as using less energy, this means it’s possible to control a single light or system from multiple switches without complex wiring – with obvious advantages for the smart home. So synonymous is the brand with this type of device that impulse switches are still referred to as ‘ELTAKOS’ by the professional electricians and engineers who use them.
Because of this innovative spirit, it’s perhaps no surprise that over the years ELTAKO has broadened its range to a full ecosystem of sensors, dimmers, and energy meters – all based on wired or wireless technologies, such as RS485, EnOcean, Modbus or DALI, which are built for longevity and local control, rather than cloud dependency.
True to that philosophy, ELTAKO has embraced open standards such as Matter, ensuring its products speak the same languages that support our mission to keep homes open, private, and locally controlled.
"As a manufacturer that has relied on open standards like Matter and EnOcean from the very beginning, joining the Works with Home Assistant program is a natural step for us. This allows us to make our products accessible to an even larger community and enables our customers to integrate them seamlessly into diverse smart home environments. We are convinced that the future lies in openness and interoperability – which is why we deliberately embrace partnerships that offer users long-term investment security and maximum flexibility."
- Kai Sepp, Sales Director North & West Europe at ELTAKO
Devices
ELTAKO’s integration with Home Assistant starts with items from the 64 series, which was awarded the SmartHome Germany Award this year. This is the brand’s line that uses Matter over Wi-Fi, showing just how serious they are about interoperability moving forward.
We were also lucky enough to see the ELTAKO team at ISE Barcelona this year, and we’ll be catching up with them again at the Connectivity Standards Alliance (CSA) meeting in November, also in Barca. Since CSA certification is a must for brands joining the program, it’s great to see ELTAKO so engaged.
As always, all the devices below have gone through our rigorous certification process to ensure they meet our standards for performance, reliability and open-home compatibility.
These Matter devices that work over Wi-Fi are all about giving you freedom to control your current hardware – switch lights on and off and dim them automatically – without replacing it all. The shading actuator is particularly useful in continental Europe, where shutters are more common. It has a good energy-saving use case to reduce the need for air conditioning, since automatic shutters help keep your home cool in summer and warm in winter, potentially reducing utility bills. This also reflects ELTAKO’s wider focus on sustainability – from low-power devices to recyclable packaging and shipping materials.
In case you didn’t know, when using Matter devices with Home Assistant you have local control with no need for external internet for day-to-day operation. If you do want to access your dashboard while you’re away from home, using Home Assistant Cloud is a simple, secure, way to do this (and help fund Home Assistant’s development in the process!).
Professional quality, support for all
Like all brands within the Works with Home Assistant program, ELTAKO isn’t just adding our little blue logo to their little blue products – they’re joining our community. That means active engagement and shared expertise to help everyone get the best from their devices. Because ELTAKO’s products are built to professional standards, installation can sometimes require a qualified electrician – especially for wired set-ups. That’s where ELTAKO’s directory of system partners and specialists in many regions, as well as a tech support hotline, can help you find the installation advice you need, whether you’re a complete novice or electrical enthusiast.
With ELTAKO on board, we hope Home Assistant users will have further flexibility to explore new devices and experiment with different set-ups, as well as open up more ways to mix and match products to build a professional-standard smart home.
FAQs
Q: If I have a device that is not listed under ‘Works with Home Assistant’ does this mean it’s not supported?
A: No! It just means that it hasn’t gone through a testing schedule with our team or doesn’t fit the requirements of the program. It might function perfectly well but be added to the testing schedule later down the road, or it might work under a different connectivity type that we don’t currently test under the program.
Q: OK, so what’s the point of the Works with program?
A: It highlights the devices we know work well with Home Assistant and the brands that make a long-term commitment to keeping support for these devices going. The certification agreement specifies that the devices must have key functionality within Home Assistant, operate locally without the need for cloud, and will continue to do so long-term.
Q: How were these devices tested?
A: All devices in this list were tested using a standard HA Green Hub and with our certified Matter Integration. If you have another set-up that’s not a problem, but we test against these as they are the most effective way for our team to certify within our ecosystem.
Q: Will you be adding more ELTAKO devices to the program?
A: Why not! We’re thrilled to foster a close relationship with the team at ELTAKO to work together on any upcoming releases, or add in further products that are not yet listed here. We’re really excited about what ELTAKO are doing with EnOcean and green power generally, but we haven’t tested or certified any of these products yet. We don’t have this protocol as part of the Works with Home Assistant certification (even if people are already using EnOcean in Home Assistant), and could explore how we certify these kinds of products.
Welcome to Voice Chapter 11 🎉, our long-running series where we share all the key developments in Open Voice. In this chapter, we will tell you how our assistant can now control more things in the home, in multiple languages at the same time, all while not talking your ear off. What’s more, our list of supported languages has grown again with several languages that big tech’s voice assistants won’t support. Join us for a deeper look at this voice chapter in our livestream on Wednesday, October 29. It’s been a couple of months, we’ve been building up our voice, and now have a lot to say, so let’s get to it!
Multilingual assistants
Our original goal for the Year of Voice back in 2023 was to “let users control Home Assistant in their own language”. We’ve come a long way towards that goal, and really broadened our language support. We’ve also provided options that allow users to customize voice assistant pipelines with the services that best support their language, whether run locally or in the cloud of their choice. But what if you speak two languages within your home?
For some time, users have been able to create Assist voice assistant pipelines for different languages in Home Assistant, but interacting with the different pipelines has either required multiple voice satellite devices (one per language) or some kind of automation trigger to switch languages.
Since even the tiniest voice satellite hardware we support is capable of running multiple wake words now, we’ve added support in 2025.10 for configuring up to two wake words and voice assistant pipelines on each Assist satellite! This makes it straightforward to support dual language households by assigning different wake words to different languages. For example, “Okay Nabu” could run an English voice assistant pipeline while “Hey Jarvis” is used for French.
Multiple wake words and pipelines can be used for other purposes as well. Want to keep your local and cloud-based voice assistants separate? Easy! Assign a wake word like “Okay Nabu” to a fully local pipeline using our own Speech-to-Phrase and Piper. This pipeline would be limited to basic voice commands, but would not require anything to run outside of your Home Assistant server. Alongside this, “Hey Jarvis” could be assigned to a different pipeline that uses external services like Home Assistant Cloud and an LLM to answer questions or perform complex actions.
We’d love to hear feedback on how you plan to use multiple wake words and voice assistants in your home!
Voice without AI
The whole world is engulfed in hype about AI and adding it to all the things — we’re not exactly quiet about the cool stuff we’re doing with AI. While powering your voice assistants with AI/LLMs makes them much more flexible and powerful, it comes at a cost: paying to use cloud-based services like OpenAI and Google, or pricey hardware and energy to run local models via systems like Ollama. We started building our voice assistant before AI was a thing, and thus it was designed without requiring it. We continue to make great progress towards delivering a solid voice experience to users who want to keep their home AI free — keeping AI opt-in only and not required are guidelines we follow.
Opening/closing and locking/unlocking doors, windows, shades, etc
Adjusting the brightness and color of lights
Running scripts and activating scenes
Controlling media players and adjusting their volume
Playing music on supported media players via Music Assistant
Starting/stopping/pausing multiple timers, optionally with names
Adding/completing items on to-do lists
Delaying a command for later (“turn off lights in 5 minutes”)…
…and more!
Want to include your own voice commands? You can quickly add custom sentences to an automation, allowing you to take any action and tailor the response.
The easiest way to get started is with Home Assistant Voice Preview Edition, our small and easy-to-start with Voice Assistant hardware. This, combined with a Home Assistant Cloud subscription, allows any Home Assistant system to quickly handle voice commands, as our privacy-focused cloud processes the speech-to-text (turning your voice into text for Home Assistant) and text-to-speech (turning Home Assistant’s response back into voice). This is all without the use of LLMs, and supports the development of Home Assistant 😎.
For users wanting to keep all voice processing local, we offer add-ons for both speech-to-text and text-to-speech:
All of this together shows just how much can be done without needing to include AI, even though it can do some pretty amazing things. And we’re continuing to close the gap with the features highlighted in this blog post, including multilingual assistants, improved sentence matching, and the ability to ask questions from automations.
More intents
Intents are what connect a voice command to the right actions in Home Assistant to get something done. While the end result is often simple, such as turning on a light, intents are designed as a “do what I mean” layer above the level of basic actions. In the previous section, we listed the sorts of voice commands that intents enable, from turning on lights to adding items to your to-do list. Over the last three years, we’ve been progressively adding new and more complex intents.
Recently, we’ve added three new intents to make Assist even better. To control media players, you can now set the relative volume with voice commands like “turn up the volume” or “decrease TV volume by 25%”. This adds to the existing volume intent, which allows you to set the absolute volume level like “set TV volume to 50%”.
Next, it’s now possible to set the speed of a fan by percentage. For example, “set desk fan speed to 50%” or even “set fans to 50%” to target all fans in the current area. Make sure you expose the fans you want Assist to be able to control.
Lastly, you can now tell the kids to “get off your lawn” because your robot is going to mow it! Making use of the lawn_mower integration, your voice assistant can now understand commands like “mow the lawn” and “stop the mower”. Paired with the existing smart vacuum commands, you may never need to lift a finger again to keep things clean and tidy.
Ask question
Picture this: you come home from work and, as you enter the living room, your voice assistant asks what type of music you’d like to hear while preparing dinner. As the music starts to play, it mentions you left the garage door open and wants to know if you’d like it closed. After dinner, as you’re hanging out on the couch, your voice assistant informs you that the temperature outside is lower than your AC setting and asks for confirmation to turn it off and open the windows.
Surely you’d need a powerful LLM to perform such wizardry, right? With the Ask Question action, this can all be done locally using Assist and a few automations!
Within an automation, the Ask Question action allows you to announce a message on a voice satellite, match the response against a list of possible answers, and take an action depending on the user’s answer. While answers can be open-ended, such as a musical artist or genre, limiting the possible answers allows you to use the fully local Speech-to-Phrase for recognizing speech without an internet connection.
Improved sentence matching
Assist was designed to run fast and fully offline on hardware like the Raspberry Pi 4 for many different languages. It works by matching the text of your voice commands against sentence templates, such as “turn on the {name}” or “turn off lights in the {area}”. While this is very fast and straightforward to translate to many languages, it can also be inflexible, resulting in the dreaded “Sorry, I couldn’t understand that” or other errors.
Starting in Home Assistant 2025.9, we’ve included an improved “fuzzy matcher” that is much better at handling extra words or alternative phrasings of our supported voice commands.
The fuzzy matcher is pre-trained on the existing sentence templates, so we will be able to use it for all of our supported languages. However, this is initially only available for the English language and we’re working to determine the best way to enable this for other languages.
Non-verbal confirmations
After a voice command, Assist responds with a short confirmation like “Turned on the lights” or “Brightness set”. This lets you know it understood your command and took the appropriate actions. However, if you’re in the same room as the voice assistant, this confirmation is redundant; you can see or hear that appropriate actions were taken.
Starting with Home Assistant 2025.10, Assist will detect if the voice command’s actions all took place within the same area as the satellite device. If so, a short confirmation “beep” will be played instead of the full verbal response. Besides being less verbose, this also serves as a reminder that your voice command only affected the current area.
Non-verbal confirmations will not be used in voice assistant pipelines with LLMs, since the user may have specific instructions in their prompt, such as “respond like a pirate”, and we wouldn’t want to deprive you of a fun response, me mateys 🏴☠️.
Text-to-speech streaming
Large language models (LLMs) can be especially verbose in their responses, and we quickly realized that this exposed a weakness in Home Assistant’s text-to-speech (TTS) implementation. For most of its life, TTS in Home Assistant has required the full response to be generated before any audio can be played. This meant a lot of waiting for multi-paragraph LLM responses, especially with local TTS systems like Piper.
Fixing this required an overhaul of the TTS architecture to allow for streaming. Instead of waiting for the entire audio message to be synthesized before playing, we enabled TTS services within Home Assistant to work with chunks of text (input) and audio (output). As chunks of text are streamed in from an LLM, the TTS service can synthesize audio chunks and send them out to be played immediately.
To demonstrate the benefit of streaming, we asked an LLM to “tell me a long story about a frog” and timed how long it took to start speaking the (multi-paragraph) response. Without streaming, both Home Assistant Cloud and Piper took more than five seconds to respond! This is long enough to make you wonder if your voice assistant heard you 😄 With streaming enabled, both TTS services took about half a second to start talking back. A 10x improvement in latency!
New Piper voices
Piper, our homegrown text-to-speech tool, continues to grow with support for several new languages! These new voices were trained from publicly available voice datasets, and are available now in the Piper add-on:
If your language is missing from Piper, or you don’t like the existing voices for your language, we’re always looking for volunteers to contribute their voices! Please contact us at voice@openhomefoundation.org
Conclusion
In the past three years, we’ve made great strides with Home Assistant Voice on both the hardware and software fronts. Users today have a wide variety of choices when it comes to voice: from fully local to using the latest and greatest AI to power their smart homes. The great thing about our experimentation with AI is that there are no investors looking for returns, fake money, or “rug-pulls”. We do everything for you, our community. We’re in this for the long haul, and want this all to be your choice, keeping you in full control of whether you want to use this technology or avoid the hype completely.
Much of the advanced work done on voice is only possible with the support of our community, especially those who subscribe to Home Assistant Cloud or anyone who has purchased our Home Assistant Voice Preview Edition (both great ways to get started with voice).
Today, we’re announcing that we will no longer be producing Home Assistant Yellow. Rest assured, it will continue to receive software support far into the future.
I’m Carl, Vice President of Commercial at Nabu Casa, the organization that builds and sells official hardware for the Open Home Foundation. I couldn’t be more proud of our hardware achievements over the past 12 months, including Voice Preview Edition and Connect ZWA-2 (including its cool new Wi-Fi and PoE experimental firmware).
Home Assistant Yellow was similarly groundbreaking at launch and helped fund Home Assistant’s development. However, for reasons I’ll explain below, the time has come to end production. This means that if you were considering buying a Home Assistant Yellow, you’ll need to act fast, as stock will not be replenished (check the Order Now button on the Home Assistant Yellow page to see if your local retailer still has stock).
Nabu Casa is now exploring what hardware could replace Home Assistant Yellow, so if you have any suggestions on what we should do next, pleasetell us in the comments! In the meantime, the good news is that there are already plenty of other great ways to run Home Assistant. For example, if you’re looking for hardware that’s both easy to start with and supports the Open Home Foundation, we’d recommend the Home Assistant Green.
A golden era
There is a long yellow brick road that brought us to today. All the way back in 2021, we announced Home Assistant Yellow (originally called Amber). It included some pretty unique features, including its built-in Zigbee or Thread adapter, optional PoE, and overall expandable approach. As it used the Raspberry Pi Compute Module platform, included GPIO, and had an NVMe slot, there were a lot of different ways you could upgrade it over time (including people being able to upgrade from CM4 to CM5, which was quite the speed bump 🏎️).
It wasn’t all smooth sailing with Home Assistant Yellow. We essentially launched the device in the middle of the great Pi shortage. It definitely complicated things for a time, but it all eventually stabilized. In late 2023, we launched Home Assistant Green, which became the easiest way to get started with Home Assistant. This new product led us to end the sale of Home Assistant Yellow devices that shipped with a CM4 already installed (called the Home Assistant Yellow Standard), which allowed us to focus the product line on the kit versions.
Small, but so much room for activities
Home Assistant Green continues to have strong sales, but Home Assistant Yellow sales have been naturally slowing down, as happens a couple of years into any product’s life. This month, it finally reached the point where it no longer made sense to have another production run, which ultimately pushed us to discontinue Home Assistant Yellow.
Technology changes, and small-form-factor computing has always moved fast. For instance, in the early days of Home Assistant, the community’s de facto recommendation was always the most recent Raspberry Pi device, but we’re seeing more people gravitate towards Mini PCs. We’re now exploring what we could build next for our power users, but we’re still some way off, so don’t wait if you need something today.
Software support continues
As long as it’s possible to run Home Assistant on Yellow, we will continue to provide builds. If you want living proof of this commitment, take our first hardware device: Home Assistant Blue. It ended production in 2022, but still receives new builds of Home Assistant, something that shows no signs of changing for a long time. We continue to streamline and make Home Assistant more efficient, as it’s our goal for you to run it on the hardware you have.
Say ‘ellow to the future
I’d just like to take a moment to thank everyone who bought a Home Assistant Yellow over the years, and for all the great feedback you shared with us. We’re sad to say goodbye to our trusty little expandable powerhouse, but it’s had a good run and we’re super proud of how far we’ve come. Also, we’ll soon be announcing the date of our next hardware product (not a computing device… but something very cool nonetheless), so stay tuned!
Last month, we launched the Home Assistant Connect ZWA-2, our take on the best possible Z-Wave adapter. Basedonthereviews, it sounds like we hit the mark 😎. Today, we’re announcing a new, experimental firmware that allows you to do even more with the ultimate Z-Wave adapter.
I’m Keith, a Senior Hardware and Software Engineer at Nabu Casa, but you also might know me from my work on the ESPHome project. If you weren’t aware, Nabu Casa is the commercial partner of the Open Home Foundation, and the organization that helps build official Home Assistant hardware.
During the launch, one piece of feedback we often received was that people wanted more flexibility in where they could place Connect ZWA-2 in their home — often far away from their Home Assistant system. It was no easy feat (more on that below), but we were able to build a solution that allows you to put it anywhere you have a network connection.
This experimental firmware will allow you to not only leverage the Wi-Fi chip inside the Connect ZWA-2, but also use it with other hardware to facilitate the use of the much-requested PoE. 🎉 This new firmware is only possible because of the second-generation platform we built Connect ZWA-2 on, which is open by design, allowing you to tinker and extend the device you own. Every piece of Home Assistant hardware reflects Nabu Casa and the foundation’s philosophy of constant evolution, and the software it launches with is just the beginning. Whenever we think of a cool new capability, we will work together to add it.
Home Assistant Connect ZWA-2 connected to a Waveshare ESP32-S3-ETH
NOTE: This firmware is experimental. Do not use it if you’re looking for the most stable Z-Wave experience.
To get started using your Connect ZWA-2 over your local network, you can use one of the two following configurations:
Wi-Fi - the new firmware will be installed on the Connect ZWA-2 and use its built-in Wi-Fi chip to communicate over your network.
PoE - the new firmware will be installed on an external development board that supports Power-over-Ethernet (PoE); Connect ZWA-2 will use its stock firmware and will plug into this new device via USB.
First, before installing this new firmware, make sure to back up your Z-Wave network and ensure your Home Assistant instance is running version 2025.10.2 or later. Only after those steps should you use the toolkit website for Portable Z-Wave. The toolkit’s wizard will walk you through the whole process of installing and connecting your device to your network. When the installation is complete, it should join your network and be discovered by both the ESPHome and Z-Wave integrations in Home Assistant.
This firmware has proven to work well in our lab and home environments, but the real world is a different place; your local network and Z-Wave network might behave differently. For this reason, we’re seeking your feedback. If you try it out, please let us know about your experience – good or bad, brief or long-winded – by leaving a comment below. We’re eager to know how and where we can improve it!
The Portable Z-Wave experiment
Before we launch any of our hardware products, we try to get our pre-production batch to as many testers as possible – most are hobbyists and tinkerers from the community, and of course, the first thing they tend to do is get out the screwdriver and open it up (to be fair, it’s designed to be easy to open — no glue, no clips). When looking at the insides of Connect ZWA-2, they were instantly greeted with an ESP32 chip, and were equally excited and confused. It was initially included just as a USB controller, and yes, an ESP32-S3 is a bit overkill for this specific task, but we wanted to give the device room to grow. This brings us to the experiment we are sharing with you today…
Making things mesh
When you use a Z-Wave adapter with Home Assistant, which relies on the Z-Wave JS add-on, they use USB to communicate via a specialized Z-Wave serial protocol. And yes, it is technically possible to run this Z-Wave serial protocol over your network (serial-over-IP), but our testing reveals that it’s not as reliable or as easy as we’d like. Some parts of the Z-Wave serial protocol are latency (delay) sensitive, specifically the acknowledgment of Z-Wave packets. If your network is busy and decides to take its sweet time with one of those critical packets, your Z-Wave device’s connection can time out and fail. This can stall Z-Wave device communication, or even completely break it.
For Z-Wave to work over a network, we need to address the latency-sensitive parts on the actual device; everything else can be forwarded over the network. This is where ESPHome steps in: it’s the open source software for network-capable microcontrollers that runs on ESP32 devices. We built an ESP32 into the Connect ZWA-2, and it has the horsepower (and Wi-Fi antenna) to handle this task.
To help make this all possible, we added Z-Wave support to ESPHome, allowing it to talk to Z-Wave chips. We then added the ability for Home Assistant and Z-Wave JS to communicate with Z-Wave adapters via ESPHome. As this work is open source, it shouldn’t be limited just to our Connect ZWA-2. Theoretically, it should be able to work with any certified Z-Wave adapter connected to an ESP32. However, before we look at supporting other adapters, we want to ensure that it’s stable when running on the Connect ZWA-2.
Home Assistant connected to the ZWA-2 via its integrated Wi-Fi chip.
Home Assistant connected to the ZWA-2 via the PoE module.
ESPHome handles serial message acknowledgments internally, then leverages its API (specifically its Protobuf implementation) to send the messages over the network more reliably than serial-over-IP. Even if your home network is bogged down by some spikes in traffic, ESPHome will have you covered, keeping your Z-Wave network stable. That’s not to say this has no impact on performance, but it may be less than you think – or can even notice!
Performance
Wi-Fi is very convenient, but the million-dollar question is: how will it impact your Z-Wave network? To find out, we ran some benchmarks to see how Portable Z-Wave stacks up to its USB counterpart.
Compared to a direct serial (USB) connection, a data packet will take longer to travel between Home Assistant/Z-Wave JS and your Z-Wave network when routed through your local network. On a network with only a low to moderate workload, the additional delay is very small and is generally not noticeable. That said, if your network is heavily stressed or the Wi-Fi signal is poor, you should expect packets to take longer to move around, which can lead to a perceivable delay. It can still control your lights and other devices, but it may be a bit slower. Here are some numbers illustrating the typical latency that we were able to achieve across our test environments:
Connection type
Min (ms)
Max (ms)
Mean (ms)
USB
4
9
5.36
Ethernet
15
32
25.14
Wi-Fi
15
92
29.16
Your results will likely differ somewhat, especially in less ideal conditions and environments. For instance, if you place your Connect ZWA-2 in a spot with really poor Wi-Fi connectivity, you might notice devices not reflecting their actual state or other buggy behavior. Avoid using VPNs or other complex network routing or configuration, as that will add latency. Also, don’t worry about Wi-Fi interfering with your Z-Wave network, as they operate on totally different radio frequencies that don’t interact. I think with a healthy dose of common sense, you can find a great spot that gets both great Wi-Fi connectivity while nicely optimizing your Z-Wave network.
Thanks
This project was brought to you by a collaboration between Nabu Casa and the people below from the Open Home Foundation. None of this would be possible without the support of Home Assistant Cloud subscribers and those who care about Z-Wave and have purchased the Home Assistant Connect ZWA-2. Thank you!
Thanks to Dominic, founder of Z-Wave JS, for quickly jumping in on this project, adding support to Z-Wave JS, and building the browser installation tooling.
Thanks to Nick and Jesse for their support with the ESPHome implementation.
Thanks to Steven for making the new Open Home Foundation toolbox website to allow easy installation of the experiment.
FAQs
Q: Is the Portable Z-Wave experiment limited to the Home Assistant Connect ZWA-2?
A: Theoretically, it should work with other Z-Wave adapters, but thus far we have only tested it with the ZWA-2. The code is part of ESPHome 2025.10, Home Assistant 2025.10.2, and Z-Wave JS v15.15.0. We chose Home Assistant Connect ZWA-2 as the first device with support since it already contains an ESP32-S3. If you’d like to try it out with your favorite Z-Wave adapter, you should start by taking a look at our ESPHome configuration for the ZWA-2 (all that should need changing are the vendor and product IDs to match the Z-Wave adapter).
Q: Is the Portable Z-Wave experiment limited to Home Assistant?
A: No. It is made to work directly with Z-Wave JS. If you use Z-Wave JS v15.15.0, either standalone or with another smart home platform, you are able to use it, too! Configure Z-Wave JS to connect to esphome://<IP OF THE ZWA-2>.
Q: Can I use Ethernet instead of Power-over-Ethernet?
Works with Home Assistant is opening its doors to another new partner who is bringing the first Garage Door Openers and Alarm Panel to the program, all of which are using ESPHome under the hood. Konnected are well known for their devices that let you retrofit new smarts into the devices you already have, allowing you to use them in Home Assistant and keep them working longer.
Getting Konnected
Konnected have been well-known in the Home Assistant community, as they’ve been active members for years. As members of the community, they know how hard it can be to connect the devices that are already built into your home, whether they’re smart or not. That’s why Konnected’s first product was their drop-in replacement alarm panel boards, which allow you to take decades-old wired alarm systems and add them into Home Assistant.
Another challenge the community was facing was garage door openers (GDOs), especially cloud-based openers. In the early days of Home Assistant, the community figured out the APIs for these providers and controlled them that way. Some manufacturers noticed this and put barriers up blocking people from controlling the devices they own, claiming it as “unauthorized usage” 🙄.
The community was naturally incensed, and did what tinkerers tend to do when a cloud gets in their way — they began tinkering with hardware. A community emerged to take back control of these devices, starting with projects like ratgdo, which Konnected used as a base for their work. Today, because of these projects, there are multiple great open source tools to control a large number of these GDOs, ranging from DIY schematics to finished controllers. Konnected has an open source solution which works locally, as well as having the form factor and safety standards to match. Even better, Konnected devices are available in over 60 countries.
For anyone who has used Konnected for quite some time, you’ll notice that they had their own integration, which has now been deprecated in favor of the ESPHome firmware, so that it’s always straightforward to find (or build) the firmware you need. They even publish all their code on GitHub 👏, which allows the community to help them fix issues and add features.
"We've been users of Home Assistant ourselves since 2018 and thrilled to finally be officially part of the Works with Home Assistant program. Konnected shares many of the same founding principles as Home Assistant, including our commitment to 100% local control, open-source firmware, and high-quality hardware that makes your home smarter, safer and accessible to everyone."
- Nate Clark, Founder / CEO at Konnected
Konnected is another example of ESPHome (a project from the Open Home Foundation) fostering an entirely new ecosystem of Open Home projects. It works fully locally, and it’s perfect for tinkerers, allowing you to build DIY smart home devices yourself (get started with one of our ready-made projects). Konnected also have a thriving community of their own if you have questions or comments.
Creators can also use it to make pre-built, plug-and-play products that give users a really seamless experience. Devices are easily discovered and added to your Wi-Fi network and Home Assistant, along with a one-click update within Home Assistant. To learn more about how Konnected uses ESPHome, look out for Nate on the next ESPHome live stream on October 14!
Remember, the development of projects like ESPHome from the Open Home Foundation is supported by Home Assistant Cloud subscribers and anyone who purchases Home Assistant hardware. While all of Konnected’s devices work locally, if you’re interested in remote access, allowing you to keep tabs on your home’s security when you’re out and about, check out Home Assistant Cloud.
Devices
The Konnected Smart Garage Door Opener blaQ
For anyone new to the Works With Home Assistant program, it’s a way for us to formally certify devices that have been tested by our team, and help you know what works great out of the box with Home Assistant. Any company joining also commits to providing long-term support and firmware updates. Works With Home Assistant is operated by the Open Home Foundation, and the support of Home Assistant Cloud subscribers funds this work. These items were all tested by members of the ESPHome team to see exactly how they function in their own homes.
A nice benefit of retrofitting your old wired security system is not needing to maintain loads of battery-powered sensors 🪫. The Alarm Panel Pro has the ability to connect 12 zones (security speak for individual or joined up sensors), it also allows you to connect keypads and sirens, and includes 12V power for the devices that need that. It’s highly customizable, and there’s also plenty of support available if you need help with installation. You can power it using 12V or Power-over-Ethernet, or both! The Alarm Panel Pro is designed to be always-on, and they’ve designed it to consume very little power. This also allows it to easily run for hours on their backup battery.
You’ll also probably be wondering why there are two different variants of the garage door openers, and that’s because each supports a different set of manufacturers. There is a wizard to help you figure out which variant will work with your opener. Between the Konnected GDO blaQ and White, you get support for some of the biggest manufacturers out there, including Chamberlain, LiftMaster, Craftsman, Merlin, Genie, Stanley, and more.
Even with the Konnected controlling your garage door opener, you’re still able to use the included remote or the original manufacturer’s app (if you like that kind of torture). The GDO White features a built-in optical laser sensor that detects whether your garage door is open or closed. The GDO blaQ offers control over the opener’s light and lock, and can even partially open the door (for openers that support these features).
As we mentioned at the top, it’s great to have more products added to the program that help people get the most out of the things they already own. A big part of the Open Home Foundation’s mission is sustainability in the smart home, and Konnected are helping our community get longer lasting use of their existing security and garage door systems.
FAQs
Q: If I have a device that is not listed under ‘Works with Home Assistant does this mean it’s not supported?
A: No! It just means that it hasn’t gone through a testing schedule with our team or doesn’t fit the requirements of the program. It might function perfectly well, but has not yet been added to the testing schedule, or it might work under a different connectivity type that we don’t currently test under the program.
Q: Ok, so what’s the point of the Works with program?
A: It highlights the devices we know work well with Home Assistant and the brands that make a long-term commitment to keeping support for these devices going. The certification agreement specifies that the devices must have full functionality within Home Assistant, operate locally without the need for cloud and will continue to do so long-term.
Q: How were these devices tested?
A: All devices in this list were tested using a standard Home Assistant Green Hub with the ESPHome integration. If you have another set-up that’s not a problem, but we test against these as they are the most effective way for our team to certify within our ecosystem.
Q: Will you be adding more Konnected devices to the program?
A: Why not! Konnected are also looking to do some exciting things with Matter soon, so we’re excited to work together on any upcoming releases or add in further products that are not yet listed here.
We just celebrated our birthday 🥳, which means it is time for spooky season; get ready for Halloween! And, hello to the October release of Home Assistant 2025.10! 🎃
This release iterates on some of the features we introduced in the last couple of releases, but also introduces some brand-new ones!
The highlight of this release is definitely the iterations of the automation editor, which gained a sidebar last release, and now has gained undo/redo functionality, a resizable sidebar, improved copy/paste, and more! Thanks for all the feedback you provided on the previous release; it made a massive difference in this release.
Using multiple wake words for voice assistants is now possible, which opens up a lot of possibilities, especially for dual-language households (like mine 😉). Dashboards get more intelligent by suggesting entities based on your usage patterns, and the AI Task can now generate images, which I’m curious to see what the community will do with it!
A huge thank you to all the contributors who made this release possible! And a special shout-out to @JLo, @laupalombi, and @piitaya who helped write the release notes this release. Also, @googanhiem, @SeraphicRav, @tronikos, and @richardpolzer for putting effort into tweaking its contents. Thanks to them, these release notes are in great shape. ❤️
Automation editor
In the last release, we introduced a new layout for the automation editor, and your feedback has been invaluable in helping us refine it!
This release fixes a few of the most common issues we managed to gather from all of you. Thanks for all the feedback! ❤️
The sidebar is resizable
Working on an action that is too complex for a small sidebar? Maybe one with a few YAML fields? You can now resize the sidebar to adapt the layout to your current task!
CTRL+V
We previously introduced keyboard shortcuts to copy and cut.
Pasting was more complex to bring to life because you can paste a block (trigger, condition, action) in many different locations in your automation. In this release, we introduce a really simple pattern. If you previously copied a block, you can paste it below any block simply by selecting it and pressing CTRL+V.
Another very simple, but very welcome, quality-of-life improvement to the automation editor!
The overflow menu is back
We initially relocated the overflow menu (the menu that appears when you click the ⋮) with all the options related to a block on the sidebar, thinking this would make the flow cleaner.
Due to popular demand and helpful feedback that some actions were more difficult to reach (such as testing a condition or running an action), we decided to bring it back to the main section of the editor as well.
Undo/Redo
We’ve all been there: you’re building a complex automation, make a mistake, and want to revert it, only to find out that it’s really not simple. Up until now, the only way to revert some unsaved changes made to an automation was to close it and start over again… A very painful workflow.
This release introduces an Undo functionality (and its associated Redo). You can now undo up to 75 steps back in your automation editing history (and redo them if you want). Standard keyboard shortcuts (CTRL+Z and CTRL+Y) are also available! An amazing contribution from @jpbede, thanks!
Repeat repeat repeat repeat
Finally, we noticed some unwanted complexity in our “repeat” building block, which allows you to repeat one or multiple actions for as long as you need to.
This complexity stemmed from the fact that we were trying to cover four main use cases in a single block.
We decided to split this building block into four smaller ones, with simpler descriptions explaining each use case. Nice!
Here’s how they were separated:
Repeat multiple times - Repeat a sequence of actions a fixed number of times.
Repeat until - Repeat a sequence of actions until a condition is satisfied. The condition is checked after each run of the sequence.
Repeat while - Repeat a sequence of actions as long as a condition is satisfied. The condition is checked before each run of the sequence.
Repeat for each - Repeat a sequence for each element of a list.
Note
For our advanced users: This evolution is only cosmetic. The YAML format of the repeat block does not change; this means your existing automations will not be affected by this change.
Automation editor feedback
Tip
One of Home Assistant’s greatest strengths is our community. We’re building this automation editor together, and your input will shape where it goes next. There are two ways to get involved:
In this release, we introduce a way to generate images!
Now every time someone rings your doorbell, you can receive a notification with a cartoon version of the doorbell snapshot. @JLo has made this example a reality, and here’s his demo with the associated automation!
Automation details
alias:Demo Doorbelltriggers:-trigger:stateentity_id:-binary_sensor.doorbell_demoto:"on"actions:-action:notify.mobile_app_iphonedata:title:"🔔Doorbell"message:Processing image ...data:tag:doorbell-action:ai_task.generate_datadata:task_name:Doorbell descriptioninstructions:|-Someone rang my doorbell.Instructions:- Describe the scene, describe every person on the scene- Count People- Count Animalsentity_id:ai_task.ai_task_gpt_4ostructure:summary:description:>-Summary of the scene and the people inside it. Keep it under 180charactersselector:text:nullperson_count:description:Number of person in the sceneselector:number:nullanimal_count:description:Number of animal in the sceneselector:number:nullattachments:media_content_id:media-source://media_source/local/doorbell_test.pngmedia_content_type:image/pngmetadata:title:doorbell_test.pngthumbnail:nullmedia_class:imagechildren_media_class:nullnavigateIds:-{}-media_content_type:appmedia_content_id:media-source://media_sourceresponse_variable:ai-action:notify.mobile_app_iphonedata:title:>-🔔 Doorbell ({{ai.data.person_count}} 🧑🏻🦱 / {{ai.data.animal_count}}🐊)message:"{{ai.data.summary}}"data:tag:doorbell-action:ai_task.generate_imagedata:task_name:Mangainstructions:Transform this image into a super cute manga!entity_id:ai_task.google_ai_taskattachments:media_content_id:media-source://media_source/local/doorbell_test.pngmedia_content_type:image/pngmetadata:title:doorbell_test.pngthumbnail:nullmedia_class:imagechildren_media_class:nullnavigateIds:-{}-media_content_type:appmedia_content_id:media-source://media_sourceresponse_variable:ai_imageenabled:true-action:notify.mobile_app_iphonedata:title:>-🔔 Doorbell ({{ai.data.person_count}} 🧑🏻🦱 / {{ai.data.animal_count}}🐊)message:"{{ai.data.summary}}"data:tag:doorbellimage:http://homeassistant.local:8123{{ai_image.url}}enabled:truemode:single
Image generation is already working great, and we cannot wait to see what you will build with this!
Dashboards get smarter - let your home suggest what to show
In the last release, we introduced the Home dashboard, offering a simpler way to control and monitor your smart home if you don’t have the time, energy, or need to customize your own dashboard in detail.
Now we’ve added a new concept: sections of suggested entities. This follows a basic algorithm that suggests entities you have interacted with the most in the past. It then shows these entities based on the hour of the day, with only relevant controls being suggested.
Adding prediction entities to any dashboard
If you’re creating a manual dashboard with sections, you can integrate these prediction controls directly into it. The setup follows a section-based approach:
Add a new section.
Open and edit the YAML of that section.
Replace the entire section YAML with the following snippet:
One of Home Assistant’s greatest strengths is our community. We’re building this dashboard together, and your input will shape where it goes next. There are two ways to get involved:
For a very long time, ESPHome-based voice assistants (even the tiny Atom Echo) secretly supported multiple wake words under the hood. With this release, we’re finally opening up this feature to you!
You can now define two wake words and two assistants for every voice assistant in your home!
This makes it straightforward to support dual-language households by assigning different wake words to different languages. For example, “Okay Nabu” could be used for French, while “Hey Jarvis” is used for English.
Multiple wake words and assistants can be used for other purposes as well. Want to keep your local and cloud-based voice assistants separate? Easy! “Okay Nabu” could be used for a cloud-based assistant while “Hey Jarvis” is used for a local one.
We’d love to hear feedback on how you plan to use multiple wake words in your home!
Beep boop
After a voice command, Assist responds with a short confirmation like “Turned on the lights” or “Brightness set”. This lets you know that it understood your command and took the appropriate actions. However, if you’re in the same room as the voice assistant, this confirmation can feel redundant since you can see or hear that the appropriate actions were taken.
Starting with this release, Assist will detect if your voice command’s actions all took place within the same area as the satellite device. If so, a short confirmation “beep” will be played instead of the full verbal response. Besides being less verbose, this also serves as a quick reminder that your voice command only affected the current area.
Note
This feature does not work for AI-enabled Assistants, as they can generate a wide variety of responses that can’t be replaced with a simple beep.
Integrations
Thanks to our community for keeping pace with the new integrationsIntegrations connect and integrate Home Assistant with your devices, services, and more. [Learn more]
and improvements to existing ones! You’re all awesome 🥰
New integrations
We welcome the following new integrations in this release:
Compit, added by @Przemko92
The Compit integration allows you to integrate air conditioning, ventilation, and heating controllers with Home Assistant.
Cync, added by @Kinachi249
Connect your GE Lighting Cync smart devices—including smart lighting (formerly known as C by GE)—with Home Assistant.
Droplet, added by @sarahseidman
Connect your Droplet devices to Home Assistant. Droplet accurately monitors your home’s water usage in real time.
ekey bionyx, added by @richardpolzer
Integrate your ekey bionyx biometric access control systems to receive events for individual finger scans and digital inputs in your smart home.
IRM KMI, added by @jdejaegh
Get accurate weather data from Belgium’s Royal Meteorological Institute (IRM-KMI) for precise regional forecasting.
Libre Hardware Monitor, added by @Sab44
Monitor your computer’s hardware sensors, including CPU temperature, GPU usage, fan speeds, and system performance metrics.
Portainer, added by @erwindouna
Manage and monitor your Docker containers, keeping track of the status of your running containers.
Smart Meter B Route, added by @SeraphicRav
Connect your smart meter via the B Route protocol—designed for the Japanese market—to access real-time energy consumption data.
SFTP Storage, added by @maretodoric
Set up secure remote backup locations using SFTP/SSH protocols for your Home Assistant backups and data storage.
Usage Prediction, added by @balloob
An internal integration that provides predictions of what entities you are most likely to interact with. Used by our new Home dashboard.
Victron Remote Monitoring, added by @AndyTempel
The Victron Remote Monitoring (VRM) integration pulls site statistics and solar production and consumption forecasts from Victron Energy’s VRM portal.
Noteworthy improvements to existing integrations
It is not just new integrationsIntegrations connect and integrate Home Assistant with your devices, services, and more. [Learn more] that have been added; existing integrations are also being constantly improved. Here are some of the noteworthy changes to existing integrations:
LG added support to the LG ThinQ integration to now provide energy usage sensors for better energy monitoring of your devices! Nice!
Amazing work from @natekspencer: Litter-Robot got several enhancements: last feeding sensors, food dispensed today tracking, next feeding sensors, gravity mode switch, and globe light settings for Litter-Robot 4!
AccuWeather now provides hourly forecasts, giving you more detailed weather predictions throughout the day! Thanks, @bieniu!
The Blue Current integration got a new start charge session action for managing your EV charging! Nice work, @NickKoepr!
The Ecowitt integration now supports the LDS01 sensor! Great addition, @GSzabados!
Reolink cameras got several new features including encoding select entity, Home Hub siren support, and color temperature support for light entities! Awesome work from @starkillerOG!
Geocaching enthusiasts will love the new cache sensors added to the Geocaching integration by @marc7s! Nice if you have hidden one!
Lutron Caseta now supports multi-tap actions for more advanced button control! Thanks, @rlopezdiez!
Thanks to @alexqzd, SmartThings air conditioners can now control the AC display light!
Shelly devices received massive updates including illuminance sensor for Plug US Gen4, presence component entities, virtual buttons support, object-based entities, presence zone component support, and cable unplugged sensor for Flood Gen4! Great work from @chemelli74, @bieniu, and @thecode!
The SwitchBot integration expanded device support with Plug Mini EU, RelaySwitch 2PM, and K11+ Vacuum! Thanks, @zerzhang!
The SwitchBot Cloud integration got several improvements including AC off support, humidifier platform, Plug-Mini-EU support, and Climate Panel support! Great work from @SeraphicRav and @XiaoLing-git!
Thanks to @timmo001, the System Bridge integration now includes a power usage sensor for better system monitoring!
Exciting to see that the Tasmota integration now supports camera functionality! Nice addition from @anishsane!
Using the Tibber integration? It now provides 15-minute price data, which goes into effect on October 1st. Good timing, @Danielhiversen!
The Tuya integration received extensive updates with support for various new device categories and sensors: energy sensors for TDQ devices, power sensors for ZNDB devices, energy sensors for DLQ devices, solar inverter support, energy consumption for several smart switches, PM10 air quality monitoring, motor rotation mode for curtains that support it, charge state for siren alarms, cooking thermometer support, cat toilet support, electric desk support, white noise machine support, and water quality sensor support! What an impressive list! Thanks, @zzysszzy, @rokam, and @mhalano!
The Workday integration now has a calendar that you can view from the calendar sidebar! Thanks, @gjohansson-ST!
The ntfy integration got a big upgrade! You can now send richer, customizable notifications with tags, icons, URLs, and attachments. Plus, with the new event platform, you can subscribe to topics and trigger automations from incoming messages. Thanks, @tr4nt0r!
Integration quality scale achievements
One thing we are incredibly proud of in Home Assistant is our integration quality scale. This scale helps us and our contributors to ensure integrations are of high quality, maintainable, and provide the best possible user experience.
This release, we celebrate several integrationsIntegrations connect and integrate Home Assistant with your devices, services, and more. [Learn more] that have improved their quality scale:
This is a huge achievement for these integrations and their maintainers. The effort and dedication required to reach these quality levels is significant, as it involves extensive testing, documentation, error handling, and often complete rewrites of parts of the integration.
A big thank you to all the contributors involved! 👏
Now available to set up from the UI
While most integrationsIntegrations connect and integrate Home Assistant with your devices, services, and more. [Learn more] can be set up directly from the Home Assistant
user interface, some were only available using YAML configuration. We keep moving
more integrations to the UI, making them more accessible for everyone
to set up and use.
The following integrations are now available via the Home Assistant UI:
There are many more improvements in this release; here are some of the other noteworthy changes:
The “Logbook” has been renamed to “Activity” in the UI. This better reflects its purpose of showing a timeline of activities and events in your Home Assistant instance.
Matter continues to expand with occupancy sensing hold time, climate running state for heat/cool fans, and thermostat outdoor temperature sensors! Great contributions from @lboue and @virtualbitzz!
Lawn mower entities now support start mowing and dock intents for better voice control! Thanks, @piitaya!
The analog clock we introduced last release got some more options! You can now enable a smooth motion for the seconds hand. Beautiful, @timmo001!
Need the version of the Home Assistant Mobile Companion App you are using? If you have installed the latest versions of our apps, the version is now shown on the about page in the settings menu! Nice one, @TimoPtr!
Thanks to @cr7pt0gr4ph7, the add-on configuration UI has gotten support for more complex configurations; this means you will get a better experience when configuring add-ons with more complex options (like lists or user accounts). Well done!
Talking about add-ons, we now include switch entities for those, making it easier to control your add-ons. Thanks, @felipecrs!
Using a webhook trigger in your automation? You can now make it even more dynamic by using a template for the webhook_id. Thanks, @RoboMagus!
We now have support for MCF (1000 Cubic Feet) as an alternate unit of measure for volume, thanks to @ekobres, @xtimmy86x added m/min for speed sensors, and @pioto added inH₂O pressure unit support. Nice!
New more information dialog for media player entities
This one, we have @jpbede and @matthiasdebaat to thank for! The ‘more information’ dialogs for media players have a revamped design, offering a cleaner and more intuitive interface.
Sync zooming charts in the history panel
When you have multiple charts in the history panel, zooming in on one chart will now automatically zoom in on all other charts as well. This makes it easier to compare data across different entities. Well done, @birrejan!
Template & YAML editors get a toolbar
@TCWORLD has contributed a toolbar for the YAML and template code editors in our UI. This solves an issue where the previous floating button would float over the content of the editor and obscure it from view.
The new toolbar also includes undo and redo buttons, bringing the same convenient undo and redo functionality we introduced for the automation editor to these code editors as well. Plus, there’s a nice little copy button to quickly copy your code! Nice!
Patch releases
We will also release patch releases for Home Assistant 2025.10 in October.
These patch releases only contain bug fixes. Our goal is to release a patch
release once a week, aiming for Friday.
Home Assistant has a great community of users who are all more than willing
to help each other out. So, join us!
Our very active Discord chat server is an excellent place to be,
and don’t forget to join our amazing forums.
Found a bug or issue? Please report it in our issue tracker
to get it fixed! Or check our help page for guidance on more
places you can go.
Are you more into email? Sign up for the Open Home Foundation Newsletter
to get the latest news about features, things happening in our community, and other projects that support the Open Home straight into your inbox.
Backward-incompatible changes
We do our best to avoid making changes to existing functionality that might unexpectedly impact your Home Assistant installation. Unfortunately, sometimes, it is inevitable.
We always make sure to document these changes to make the transition as easy as
possible for you. This release has the following backward-incompatible changes:
Targeting labels in automations and scripts
Configuration and diagnostic entities with a label assigned to them will now be targeted/affected by service actions targeting that label. Previously, those entity categories were ignored on service action calls targeting labels.
If you have an automation or script with an action targeting a label, make sure that only entities that should be affected have that label assigned, even if they are config or diagnostic entities.
HERE deprecated the previous free tier. The new Base Plan has 5000 free requests per month. The automatic update interval of the HERE Travel Time integration changed from 5 minutes to 30 minutes, so one route can be supported without costs.
The effect of the property “invert position” is extended from the position itself to the status (open or closed). With this adjustment, it is no longer necessary to use cover templates to invert the position to correct the status. If you have covers with inverted position and are using the state in automations, you must adjust the automations accordingly.
We removed official support for Zabbix 5.0 from the integration. While this does not directly break connections to Zabbix 5.0, future updates will not check for compatibility with this version. Note that Zabbix 5 LTS left its support window in May of 2025.
If you are a custom integration developer and want to learn about changes and
new features available for your integration: Be sure to follow our
developer blog. The following changes are the most notable for this
release:
Every September, we celebrate the anniversary of Home Assistant’s first PR in 2013 – for our 12th birthday, we’re going all in on community again. Last month, we asked for submissions on how Home Assistant helps you, and today we will highlight our favorites! We will also take a look at all the cool milestones over the past year in the project, thanks to contributions from you all, and the new things coming up for the community.
It’s a communal effort
When I (Missy Quarry) joined as the Community & Social Media Manager in February 2024, I was still new to how an open source project the size of Home Assistant manages its community. Over the past 18 months, I’ve seen Home Assistant community members from all walks of life — whether DIY tinkerers or people simply looking to make small improvements at home — contribute in their own ways. By sharing your stories and inspiring others, you’ve helped the project grow. For our 12th birthday, I want to celebrate these contributions, no matter the size or complexity. 😌
Before I jump into celebrating all your amazing contributions and how they shape the projects managed by the Open Home Foundation, I have a couple of birthday presents for you. 🎁
First, I’m thrilled to share our new Community website! Right now, it’s a simple hub to find community information with ease, but we expect to evolve this over the coming months (or so). You’ll find links to our official community platforms, information on events, and details on meetups, including how to get reimbursed for certain fees as a host. In the future, I’d like to include links to regional communities we’re aware of and showcase more of the kinds of stories I’ll be sharing today.
Feel like something’s missing from this new page? Let me know!
Next, we’ve been working hard to do more of our development in the open. Last September, I redesigned the Discord server and in doing so I gated the Developer category behind a role. This has made it more difficult to develop in the open with the channels hidden behind a role, so we’re switching things up.
As of this week, the Developer category is now read-only for every member. Want to take a peek into the future of Home Assistant? Head to the #projects channel and see what contributors are talking about! Want to join in and contribute with either your feedback or skills? I’ve created an info thread for the channel that explains how to assign yourself either the Developer or Designer role and unlock the ability to chat in the threads.
Let’s jump into those submitted stories now… 🤩
Happily ever after
In my opinion, the best thing about Home Assistant is its flexibility - you can integrate such a wide range of devices into it and use their data to build a unique-to-your-home experience. And that’s exactly why I wanted to hear how you, the community, use it in your own home to benefit you. Here are my favorite stories you submitted - I hope one inspires your next project. ✨
Sythsaz uses Home Assistant to make sure their pupper is fed. 🐾 “I’ve managed to make it so my dog’s food auto emails the vet then the response to the email gets put on my calendar so I know how long a bag of food lasts as well as adding the receipts to Google Drive.”
Inspired by PowerDisplayESPHome, JannickBlmndl made an LED matrix that helps their household be more sustainable by being energy flexible. It displays the live energy prices from their energy provider. 📊
Tano Spirits in Melbourne, Australia, uses Home Assistant to automate their Japanese Shochu distillery, inspired by a small brewing company in Singapore. 🍻
Several years ago, HillPhantom found that Home Assistant wasn’t quite ready for him. Over the past year, though, he’s now got Ollama set up with his Home Assistant Voice Preview Edition and has been building guides on how to make your own mmWave radar sensors in Home Assistant. 👋🏻
Over just a few weeks, Pieter van Kampen recently integrated 190 devices that respond to voice control and more than 1200 active entities from his KNX home to create over 30 automations to help with everything from mowing the lawn to controlling shades based on the sun’s location and intensity. 🪟
MB used Zigbee buttons to help collect data for their son’s doctor after he developed some trouble sleeping. This gave excellent insight for the doctor to start looking into causes, and they even used the system remotely while doing further evaluation. 📈
Graham Hosking took automations to another level (before we did) with his AI Automation Suggester and Automation Inspector. It takes the load off your brain by helping come up with new, clever automations! 🤖
Wessam Lauf fell down the rabbit hole that is Home Assistant once he got his setup running. Inspired by the Graphite theme and after some LLM vibe-coding, he wrote a template for his very own theme, Frosted Glass - now available in HACS. 🎨
Too many of us anthropomorphize our homes, telling it to chill out when five things break the same day. Biofects took that to heart and created this Home Assistant avatar for his home (here’s a bonus, nightmare fuel first version). 🫣
Developers! 👏🏻 Developers! 👏🏻 Developers! 👏🏻
Our community is more than developers, it’s true. But we wouldn’t be the largest open source project on GitHub if we didn’t have a vibrant and active developer community. This ship sails largely due to their contributions, and we genuinely appreciate all of their efforts.
That’s why we’re eager to interview community members when we open new roles at the foundation. We’ve employed community members like Joostlek (who designed the new Integration Quality Scale and helps onboard new integrations into Core), Timo (who is our first ever Android developer and has focused on polishing the Android app), and Maxim (a talented developer from the Music Assistant community who works on both Music Assistant and ESPHome and is one of our newest additions to the team). Their contributions have helped shape how things work around here, but it was their contributions as community members that helped pave the way for their joining the foundation. These are just a select few of the several new hires at the foundation who were active community members.
(Have you checked our jobs page recently to see what roles are open? 👀)
With our community of contributors and working with Nabu Casa on the hardware design, we have successfully launched a few new pieces of hardware. The Home Assistant Voice Preview Edition brought in language experts from every corner of the world to help ensure our language coverage is the most robust in the industry. Thanks to contributors, we support languages like Greek, Icelandic, and more recently Irish Gaeilge! 😎 We had community contributors help make sure the Home Assistant Connect ZWA-2 was prepared for launch last month. Sincerely, we couldn’t be more grateful for your support and efforts in these spaces.
A SPECIAL CONGRATULATIONS to bdraco, who just last week surpassed balloob (the founder of Home Assistant) as the contributor with the most commits!
The top 8 contributors of all time in home-assistant/core👏🏻
This is just a small peek into all the hard work that goes into maintaining Home Assistant - we have more repositories than just Core, and every single contribution is valued.
Honorable dev mention from the submitted community stories - I couldn’t leave Joostlek’s (joke) submission out. 🤣
Our very own Head of Developer Relations (his words), Joost Lekkerkerker, says Home Assistant helps keep him off the street. He’s just launched his new blog that talks about his vision of a smart home, and how he was inspired to not buy Tuya Wi-Fi lights after seeing my experience with some path lights.
Our humble gratitude
Community is the core of what we do and the heart of Home Assistant. We thrive because you care and contribute your valuable time to support our collective success. Whether you found our platform because you wanted more privacy from big tech, were intrigued by the number of choices implemented into a single app, or needed something to track your sustainability efforts — you support our values every day. Thanks for choosing us, and thank you for all you do to help support the foundation and the projects we maintain.
A very special thanks to all our Home Assistant Cloud subscribers and anyone who has purchased our official Home Assistant hardware. These support the full-time development of Home Assistant (along with ESPHome, Music Assistant, and so much more), and are the easiest way to ensure these projects keep getting cool new features!
We have more things coming down the line for you. In the near future, we plan on announcing a new merch store 👕. In the first half of next year, I’ll announce when Home Assistant Community Day 2026 will be. We’re already working with Nabu Casa on the next exciting hardware announcement (no spoilers…for now). And that’s not even touching the industry events we plan on attending, the State of the Open Home, and so much more. I’m excited to take you all on the journey we’re already working on over the next 12 months, and I’m always looking forward to another year of amazing contributions. 😌
Last year, we laid out our vision for AI in the smart home, which opened up experimentation with AI in Home Assistant. In that update, we made it easier to integrate all sorts of local and cloud AI tools, and provided ways to use them to control and automate your home. A year has passed, a lot has happened in the AI space, and our community has made sure that Home Assistant has stayed at the frontier.
We beat big tech to the punch; we were the first to make AI useful in the home. We did it by giving our community complete control over how and when they use AI, making AI a powerful tool to use in the home. As opposed to something that takes over your home. Our community is taking advantage of AI’s unique abilities (for instance, its image recognition or summarizing skills), while having the ability to exclude it from mission-critical things they’d prefer it not to handle. Best of all, this can all be run locally, without any data leaving your home!
Moreover, if users don’t want AI in their homes, that’s their choice, and they can choose not to enable any of these features. I hope to see big tech take an approach this measured, but judging by their last couple of keynotes, I’m not holding my breath.
Over the past year, we’ve added many new AI features and made them easy to use directly through Home Assistant’s user interface. We have kept up with all the developments in AI land and are using the latest standard to integrate more models and tools than ever before. We’re also continuing to benchmark local and cloud models to give users an idea of what works best. Keep reading to check out everything new, and maybe you can teach your smart home some cool new tricks.
Local AI is making the home very natural to control
We were doing voice assistants before AI was cool. In 2023, we kicked off our Year of the Voice. Since then, we’ve worked towards our goal of building all the parts needed for a local, open, and private voice assistant. When AI became the rage, we were quick to integrate it.
Today, users can chat with any large language model (LLM) that is integrated into Home Assistant, whether that’s in the cloud or run locally via a service like Ollama. Where Assist, our home-grown (non-AI) voice assistant agent, is focused on a predetermined list of mostly home control commands, AI allows you to ask more open-ended questions. Summarize what’s happening across the smart home sensors you’ve exposed to Assist, or get answers to trivia questions. You can even give your LLM a personality!
Users can also leverage the power of AI to speak the way they speak, as LLMs are much better at understanding the intent behind the words. By default, Assist will handle commands first. Only questions or commands it can’t understand will be sent to the AI you’ve set up. For instance, “Turn on the kitchen light” can be handled by Assist, while “It’s dark in the kitchen, can you help?” could be processed by an AI. This speeds up response times for simple commands and makes for a more sustainable voice assistant.
Another powerful addition from the past year is context sharing between agents. So your Assist agent can share the most recent commands with your chosen AI agent. This shared context lets you say something like “Add milk to my shopping list,” which Assist will act on, and to add more items, just say “Add rice.” The AI agent understands that these commands are connected and can act accordingly.
Here is an excellent walkthrough video of JLo's AI-powered home, showing many of these new features in action
Another helpful addition keeps the conversation going; if the LLM asks you a question, your Assist hardware will listen for your reply. If you say something like “It’s dark”, it might ask whether you’d like to turn on some lights, and you could tell it to proceed. We have taken this even further than other voice assistants, as you can now have Home Assistant initiate conversations. For example, you could set up an automation that detects when the garage door is open and asks if you’d like to close it (though this can also be done without AI with a very clever Blueprint).
AI pushed us to completely revamp our Text-to-Speech (TTS) system to take advantage of streaming responses from LLMs. While local AI models can be slow, we use a simple trick to make the delay almost unnoticeable. Now, both Piper (our local TTS) and Home Assistant Cloud TTS can begin generating audio as soon as the LLM produces the first few words, improving the speed of the spoken response by a factor of ten.
Prompt: “Tell me a long story about a frog”
Setup
Time to start speaking
Cloud, non-streaming
6.62 sec
Cloud, streaming
0.51 sec (13x faster)
Piper, non-streaming
5.31 sec
Piper, streaming
0.56 sec (9.5x faster)
Ollama gemma3:4b on an RTX 3090, and Piper on an i5
Great hardware to work with AI
People built some really cool voice hardware, from landline telephones to little talking robots, but the fact that it was so DIY was always a barrier to entry. To make our voice assistant available to everyone, we released the Home Assistant Voice Preview Edition. This is an easy and affordable way to try Home Assistant Voice. It has some seriously powerful audio processing hardware inside its sleek package. If you were on the fence about trying out voice, it really is the best way to get started.
Voice Preview Edition is not only open and powerful, but it looks and feels great too!
It’s now easier than ever to set up your Assist hardware to work with LLMs with our Voice Assistants settings page, and you can even assign a different LLM to each device. The LLM can recognize the room it’s in and the devices within it, making its responses more relevant. Assist was built to be a great way to control devices in your home, but with AI, it becomes so much more.
AI-powered suggestions
Last month, Home Assistant launched a new opt-in feature to leverage the power of AI when automating with Home Assistant. The goal is to shorten the journey from a blank slate to your finished idea.
When saving an automation or script, users can now leverage the new Suggest button: When clicked, it will send your automation configuration along with the titles of your existing automations and labels to AI to suggest a name, description, category, and labels for your new automation. Over the coming months, we’re going to explore what other features can benefit from AI suggestions.
To opt-in to this feature, you need to take two steps. First, you need to configure an integration that provides an AI Tasks entity. For local AI, you can configure Ollama, or you can also leverage cloud-based AI like Google, OpenAI, or Anthropic. Once configured, you need to go to the new AI Task preferences pane under System -> General and pick the AI Task entity to power suggestions in the UI. If you don’t configure an AI Tasks entity, the Suggest button will not be visible.
AI Tasks gets the job done
Enabling AI Tasks does more than quickly label and summarize your automations; its true superpower is making AI easy to use in templates, scripts, and automations. AI Tasks allow other code to leverage AI to generate data, including options to attach files and define how you want that data output (for instance, a JSON schema).
We have all seen those incredible community creations, where a user leverages AI image recognition and analysis to detect available parking spots or count the number of chickens in the chicken coop. It’s likely that AI Tasks can now help you easily do this in Home Assistant, without the need for complex scripts, extra add-ons, or HACS integrations.
Below is a template entity that counts chickens in a video feed, all via a short and simple set of instructions.
template: - triggers: - trigger:homeassistant event:start - trigger:time_pattern minutes:"/5" actions: - action:ai_task.generate_data data: task_name:Count chickens instructions:>- This is the inside of my coop. How many birds (chickens, geese, and ducks) are inside the coop? structure: birds: selector: number: attachments: media_content_id: media-source://camera/camera.chicken_coop media_content_type: image/jpeg response_variable: result sensor: - name: "Chickens" state: "{{ result.data.birds }}" state_class: total
This template sends a snapshot of the camera to the AI, asking it to analyze what is going on. It defines that the output should always be a number, since we want to use that information in Home Assistant. All of this is embedded in a template entity that automatically updates every 5 minutes. An AI Task could also be embedded in an automation, a script, or any other place that can execute actions.
An automation triggers an AI Task to identify what caused motion on a camera.
Lastly, users can set a default AI Task entity. This allows users to skip picking an entity ID when creating AI automations. It also lets you migrate everything that uses AI Tasks to the latest model with a single click. This also makes it easy to share blueprints that leverage AI Tasks, like this blueprint that analyzes a camera snapshot when motion is detected:
MCP opens a whole new world
Model Context Protocol (MCP) is a thin layer allowing LLMs to integrate anything. When the specification was announced, we quickly jumped on it and integrated it into Home Assistant. Effectively, these servers give Home Assistant’s Assist conversation agent access to all sorts of new tools. You could connect MCP servers that give Assist access to the latest news stories, your to-do lists, or a server that catalogues your vinyl collection, allowing you to have richer conversations (“Okay Nabu, which Replacements albums do I have, and which aren’t on my Vinyl-to-Purchase list?”).
On the flip side, you can also turn Home Assistant into an MCP server, allowing an AI system to access information about your home. For instance, you could create a local AI that’s great at making Home Assistant automations, and it could include all your entity names or available actions. MCP keeps gaining more support, and there are some great cloud and self-hosted solutions available.
How to pick a model
There are a lot of models available, it’s hard to know where to start. Luckily, Home Assistant’s resident AI guru @AllenPorter is here to help. He has put together an incredibly useful Home LLM Leaderboard. This dataset includes his extensive tests of cloud and local LLM options, and even has tests that give small local LLMs a fighting chance (see assist-mini).
Currently, the charts show the big cloud players’ most recent models ranking pretty close to each other, while recent local models that use 8GB or more of VRAM are nearly keeping up. In the past, there was a big disparity between most models, but now it’s hard to go wrong.
This is especially helpful as the options for LLMs in Home Assistant have just grown exponentially with the addition of OpenRouter, a unified interface for LLMs. With OpenRouter, users can access over 400 new models in Home Assistant, and it supports AI Tasks right from day one. We really are spoiled for choice.
The future is Open, and Open Source
Home Assistant is open. We believe that you should be in control of your data, and your smart home. All of it. Local LLMs and the way we have architected Home Assistant extends this choice to the AI space, all while maintaining your privacy.
Most crucially, we’ve made all of this open source. We are community-driven and work on this together with our community. The Open Home Foundation has no investors and is not beholden to anyone but our users. Our work is funded through hardware purchases and Home Assistant Cloud subscriptions, allowing us to make all the technology we build free and open.
While the above was happening this month, as if the project wasn’t already busy enough, we kept on pushing to prepare for this release; and it is an absolute massive one! 🤯
This month introduces a new experimental Home dashboard, which aims to become the new default dashboard for Home Assistant in a future release. A first iteration, of which we love to see your feedback and input on. As you know, we develop and iterate in the open. Give it a shot and let us know what you think!
Talking about dashboards, my personal favorite card is definitely the tile card; it is just so versatile. And this release brings in a staggering amount of new features for it! Most notably, the ability to add a trend graph to the tile card! 📈
I’m the most excited about the visual changes to the automation editor this release brings: a sidebar. It is a huge and very visible change, that just makes so much sense. This release denotes the start of a whole series of improvements to the automation editor in this, and upcoming releases. As automations make a smart home feel magical, I personally can’t wait to see how this evolves. 🤖
On this year’s Home Assistant roadmap, we have set the goal of making automations easier to create. We have big plans, all based on tons of research, and with this release… we are shipping the first part of all this work, with the intent to gradually add more improvements over multiple releases!
This release tweaks the automation editor user interface experience by introducing a sidebar! If you select an item in your automation, instead of that item expanding, it will open a new sidebar to the right with the settings for that selected item.
This allows you to keep an overview of your automation on the left side of your screen, while you can tweak its behavior on the right. Of course, we have thought of smaller screens as well. On mobile, instead of the sidebar, a sheet will pop up at the bottom of the screen. This pop-up is also resizable, making it easier than ever to edit an action while reviewing your triggers.
Besides the sidebar, we have made tons of other little improvements as well. Tiny layout and styling changes that you will definitely notice as they really help with the overall readability. For example, small lines and borders around grouped elements have been added, making it easier to distinguish between different parts of your automation. Oh! And drag-and-drop support is now available on mobile! 🎉
Tip
One of Home Assistant’s greatest strengths is our community. We’re building the changes to our automations together, and your input will shape where it goes next. There are two ways to get involved:
Over the past year, we have focused on dashboards and their capabilities a lot. We’ve looked at a lot of your dashboards you’ve shared on socials, and talked to many of you about how you organize all your smart home devices and services. The goal? Making dashboards faster and easier to create, while still making them very customizable.
With this release, we’re introducing a brand-new Home dashboard. The purpose is simple: to give you easy access to the right information at the right time.
The dashboard adapts to your Home Assistant experience level: powerful enough for advanced users, yet approachable for newcomers. We’re working to have it earn its name, and hope it will eventually become your new Home page. As always, it’s optional; you can always pick your own dashboard. This is the first iteration, and we’ll continue developing it in the open.
When you first open the Home dashboard, it gives you a quick way to navigate to useful summaries for your light, climate, security, and media devices. You can also browse by areas, getting an overview of all the devices and services associated with that part of your home.
We’re also introducing Favorites. You can pin any entity to the top, whether it’s a light, climate, or a person. We’d love to see what you choose (more on this in the future).
The Home dashboard is not just about quick control. It also brings insights and information about your home. This first release includes weather and energy cards. It’s a simple start, and we have a lot of ideas to explore with you. For example, helping you create your first automation, or show discovered devices.
For now, the Home dashboard is considered experimental. Configuration options are limited, and it’s guaranteed to evolve. It won’t appear automatically, and if you want to try it you’ll need to add it manually in the dashboard settings, by adding a new “Home” dashboard.
Tip
One of Home Assistant’s greatest strengths is our community. We’re building this dashboard together, and your input will shape where it goes next. There are two ways to get involved:
One superpower of the tile card is its “features”, which are small additions where you can add quick interactions to these cards. For example, a slider to control the brightness of a light or buttons for the speed presets of a fan. Features have been extended quite a bit in this release by a dedicated group of community members.
Trend chart
This release, an absolute banger is the addition of the trend chart features for tile cards created by @MindFreeze.
This feature adds a handy quick graph to the tile card, showing the history of a specific entity over time. For this initial version, the time window shown is 24 hours.
Media player controls
@timmo001, added tile card features for media player controls and volume! This makes the tile card now a viable alternative to the media player card. Awesome!
Bar gauge
A new tile card feature, made by @MindFreeze: The bar gauge!
For this initial version, it works with sensors that use a percentage (%) for their unit of measurement.
This makes the card great, for example, for a battery overview dashboard. Nice work!
Fan direction and oscillation controls
Thanks to @pcan08 we now have a tile card feature to control fan direction and oscillation!
Buttons
Thanks to @dhoeben we now have a tile card feature for buttons! He added these buttons for automation, script, and button entities. The text can be changed to display standard button text or custom text.
Valve open/close and position controls
Thanks to @timmo001 we now have a tile card feature to control the open/close and the position of valves.
Setting the date
@timmo001 continued and also added a new tile card feature to support date and datetime entities (including the input datetime helpers). It allows you to add a feature that allows for setting a date.
Integrations
Thanks to our community for keeping pace with the new integrationsIntegrations connect and integrate Home Assistant with your devices, services, and more. [Learn more]
and improvements to existing ones! You’re all awesome 🥰
New integrations
We welcome the following new integrations in this release:
ToGrill Bluetooth BBQ thermometers, added by @elupus
Connect your ToGrill-compatible Bluetooth grill thermometer and monitor your BBQ efforts to cook steaks to absolute perfection.
Noteworthy improvements to existing integrations
It is not just new integrationsIntegrations connect and integrate Home Assistant with your devices, services, and more. [Learn more] that have been added; existing
integrations are also being constantly improved. Here are some of the noteworthy
changes to existing integrations:
Husqvarna Automower got some nice additions from @Thomas55555! You can now reset cutting blade usage time and track error events with a new event entity. Perfect for keeping track of your lawn mowing robot!
The Reolink integration now includes speak and doorbell volume controls, plus a chime silent time number entity! Nice @starkillerOG!
You can now send notifications with the PlayStation Network integration! Send direct messages to your friends! Thanks, @tr4nt0r!
Network admins will love @Tomeroeni bringing individual (enable/disable) switch port control to UniFi switches!
One thing we are incredibly proud of in Home Assistant is our
integration quality scale. This scale helps us and our contributors to ensure
integrations are of high quality, maintainable, and provide the best possible
user experience.
This release, we celebrate several integrationsIntegrations connect and integrate Home Assistant with your devices, services, and more. [Learn more] that have improved
their quality scale:
This is a huge achievement for these integrations and their maintainers. The
effort and dedication required to reach these quality levels is significant,
as it involves extensive testing, documentation, error handling, and often
complete rewrites of parts of the integration.
A big thank you to all the contributors involved! 👏
Now available to set up from the UI
While most integrationsIntegrations connect and integrate Home Assistant with your devices, services, and more. [Learn more] can be set up directly from the Home Assistant
user interface, some were only available using YAML configuration. We keep moving
more integrations to the UI, making them more accessible for everyone
to set up and use.
The following integration is now available via the Home Assistant UI:
The following integrationIntegrations connect and integrate Home Assistant with your devices, services, and more. [Learn more] is no longer available as
of this release:
Uonet+ Vulcan has been removed. Vulcan has changed their API and their
policies forbid using the API from unofficial software.
Other noteworthy changes
There are many more improvements in this release; here are some of the other noteworthy changes:
Based on feature requests from the community, all modern template entity syntax now supports setting a default entity ID directly in YAML. Thanks @Petro31 for implementing that!
@Petro31 also added support for two new entity types to the template integration. You can now create your own templated event entities and update entities. Awesome!
Home Assistant now supports m³/min as a volume flow rate unit. Nice addition @fetzerch!
Our voice guy @synesthesiam has been busy with some great QoL improvements this release as well.
The intent handling for the default agent (non-LLM) now supports fuzzy matching. The technique ensures voice pipelines recognize many more sentences. This improvement is available for English only, while we are looking for ways to extend this to other languages.
We now have built-in intents to control the volume of (active) media players! Like the song? Just ask Home Assistant to turn it up a notch!
After all that dancing, you might have gotten a little warm. Hence in this release, we now also have intents to control fan speeds. Nice!
For this release, @timmo001 made this card more feature-rich by adding support for displaying the clock in a customizable analog clock style. Nice!
Storage insights
Disk almost full? You might wonder where your storage space has gone…
This release adds disk metrics to the storage configuration panel, letting you see usage at a glance, helping you identify what is taking up space.
You can find these metrics by navigating to Settings > System > Storage, or by selecting the My Home Assistant button down below.
Patch releases
We will also release patch releases for Home Assistant 2025.9 in September.
These patch releases only contain bug fixes. Our goal is to release a patch
release once a week, aiming for Friday.
Home Assistant has a great community of users who are all more than willing
to help each other out. So, join us!
Our very active Discord chat server is an excellent place to be,
and don’t forget to join our amazing forums.
Found a bug or issue? Please report it in our issue tracker
to get it fixed! Or check our help page for guidance on more
places you can go.
Are you more into email? Sign up for the Open Home Foundation Newsletter
to get the latest news about features, things happening in our community, and other projects that support the Open Home straight into your inbox.
Backward-incompatible changes
We do our best to avoid making changes to existing functionality that might unexpectedly impact your Home Assistant installation. Unfortunately, sometimes, it is inevitable.
We always make sure to document these changes to make the transition as easy as
possible for you. This release has the following backward-incompatible changes:
Encoding units containing the μ character
The encoding for some units that contain the μ character has been changed. Users that consume state data from sensors that have changed units will be impacted (such as exported state data to InfluxDB). The units with a changed encoding are:
μSv/h for the aranet integration as a unit for radiation rate
μS/cm for UnitOfConductivity.MICROSIEMENS_PER_CM
μV for UnitOfElectricPotential.MICROVOLT
μg/ft³ for concentration in micrograms per cubic foot
μg/m³ for concentration in micrograms per cubic meter
μmol/s⋅m² for the fyta integration as a unit for light
The integration now requires the Automower PIN when being set up. This ensures Home Assistant can communicate with more models of mowers and with higher security levels.
KNX scene entities now also change their state when a scene was activated externally (from bus). Previously they only updated when activated from within Home Assistant.
The battery property on vacuum entities is being removed in Home Assistant. Therefore, this property is now removed from this integration and is replaced by a battery level sensor.
Please review your automations, scripts, and dashboards using the battery property and update the code to use the battery sensor instead.
The August integration now uses OAuth authentication with Yale August’s official API. This is a required one-time breaking change as the unofficial authentication method will stop working soon. This migration helps reduce unnecessary load on Yale August’s servers while ensuring continued access for all users.
When you update Home Assistant, you’ll be prompted to re-authenticate your August account:
Select the notification or go to Settings → Devices & services → August
Select “Reconfigure” and follow the OAuth flow to sign in
Once authenticated, your devices will work exactly as before
We’re grateful to Yale August for officially supporting Home Assistant with dedicated API access!
If you are a custom integration developer and want to learn about changes and
new features available for your integration: Be sure to follow our
developer blog. The following changes are the most notable for this
release:
We’re making new frients this week, and they’re bringing an extensive line of Zigbee devices to our Works With Home Assistant program. Each device is tested by our team, ensuring they provide the best experience possible for Home Assistant. Frient is widely available across Europe, and are well-known for their sleek, unobtrusive designs that its customers love for their high Home Approval Factor.
Our newest frient
Based in Denmark, the frient brand was developed by Onics, (formerly Develco Products), and they have years of experience with Zigbee devices. Frient is bringing its proven technology to the Works With Home Assistant program, as well as their Danish design that easily blends into almost any home.
Recent Works With partners have brought Z-Wave, Matter, and even Bluetooth devices to Home Assistant, but it’s been a couple of years 😅 since Zigbee-specific devices have joined the program. Zigbee is one of the most popular open protocols that is used with Home Assistant, with hundreds of thousands of users making use of it today. It’s a proven technology that connects directly to Home Assistant, no cloud or Wi-Fi connection required. Zigbee is a mesh protocol, where some devices act as repeaters, strengthening the network as more are added. It was built from the ground up to power the smart home, and has been optimized to give devices really long (sometimes multi-year) battery life.
"Joining the Works With Home Assistant program is a proud milestone for frient. It reflects our strong commitment to open, user-centric smart home experiences and ensures that our products seamlessly integrate with one of the most trusted platforms in the market. For Home Assistant users, it means more choice and flexibility — and for frient, it strengthens our position as a key player in the connected smart home space."
- Martin Langballe, International Business Development Manager at frient
All you need to get started with Zigbee in Home Assistant is a Zigbee adapter or ‘stick’, such as the Home Assistant Connect ZBT-1 (wow, we released this in 2022, I wonder when we’re finally going to build a successor? 😉). By plugging the adapter into a USB port on your Home Assistant system, it should then discover the device and add the ZHA integration. After that is set up, you can start adding devices to your Zigbee network. We’ve even added in a cool new visualization so that you can see how your Zigbee devices interact with each other.
ZHA is built with the support of the Open Home Foundation, and it even has a full-time developer (@puddly) dedicated to improving it and helping certify new Works With partner devices. Your support makes this possible, whether through a Home Assistant Cloud subscription or by purchasing official hardware.
Devices
When your energy company won’t provide your raw usage data, there’s always another way 😉
In case you didn’t know, Works With Home Assistant differs from other certification programs as products are rigorously tested in-house to ensure they work seamlessly out of the box with Home Assistant. Any company joining also commits to providing long-term support and firmware updates while being a positive force in the Home Assistant community. Works With Home Assistant is operated by the Open Home Foundation, and the support of Home Assistant Cloud subscribers funds this work.
Our team has worked extensively with frient to ensure that the following items work seamlessly with Home Assistant.
This is a big portion of frient’s product line, and provides energy monitoring, device control, safety, and security sensors. The frient IO Module is the first certified Zigbee module that can be used to turn low-voltage dumb devices like electric blinds or garage doors into devices that can be controlled by Home Assistant.
There are some great devices here for building a more sustainable smart home. The Electricity Meter Interface 2 LED allows you to get the data off your energy meter and record it into Home Assistant. Another win for sustainability is their use of AA and AAA batteries wherever practical, meaning you can use rechargeables instead of constantly buying and recycling coin cells.
I also selfishly love to see some great UK-specific devices being brought into the program with the frient Smart Siren having both UK and EU versions.
Best frients forever
It’s great to see Zigbee get some high-quality certified Works With Home Assistant devices after a multi-year wait. Frient has put a good deal of work into this launch and are big fans of our work and the community. There are more exciting Zigbee developments to come, so stay tuned!
FAQs
Q: If I have a device that is not listed under “Works With Home Assistant” does this mean it’s not supported?
A: No! It just means that it hasn’t gone through a testing schedule with our team or doesn’t fit the requirements of the program. It might function perfectly well but be added to the testing schedule later down the road, or it might work under a different connectivity type that we don’t currently test under the program.
Q: Ok, so what’s the point of the Works With program?
A: It highlights the devices we know work well with Home Assistant and the brands that make a long-term commitment to keeping support for these devices going. The certification agreement specifies that the devices must have full functionality within Home Assistant, operate locally without the need for cloud, and will continue to do so long-term.
Q: How were these devices tested?
A: All devices in this list were tested using a standard HA Green Hub with the ZBT-1 and with the ZHA integration. We haven’t tested these devices with Zigbee2MQTT, so we would recommend checking their device compatibility documentation. If you have another hub, Zigbee adapter, or integration, that’s not a problem, but we test against these as they are the most effective way for our team to certify within our ecosystem.
Q: Will you be adding more frient devices to the program?
A: Why not! We’re thrilled to foster a close relationship with the team at frient to work together on any upcoming releases or add in further products that are not yet listed here.
We’re excited to announce that AirGradient is the latest manufacturer to join the fast-growing Works With Home Assistant program! They bring their air quality monitors to the program, with both indoor and outdoor models.
AirGradient is the first partner in the program focused on building advanced indoor and outdoor air quality monitors. They are also well known within our community for their powerful tech, and for their focus on open source and dedication to local air quality projects around the world.
A breath of fresh air
AirGradient is the first partner to join that operates out of Thailand, and they initially started making their air monitors to help their local community. They actively support air quality improvement projects both in Thailand itself, but also globally. AirGradient donates monitors and has partnered with a variety of different organisations and NGOs, including UNICEF. These monitors are often placed in schools, helping young people to better understand and work to protect their air quality.
An Open Air Monitor in Vietnam
Community is central to our work with AirGradient. Their hardware and software are open source, just like our own. Plus, they’ve taken an active role in integrating into Home Assistant, bringing their local Wi-Fi integration up to not just the gold, but the platinum tier on our integration quality scale. Like all of our Works With partners, the devices work completely locally with no need for a cloud connection. What’s more, they really embrace the DIY aspect of the smart home, with their devices available fully assembled or as a build-it-yourself kit!
AirGradient’s open approach even extends to the data collected by their community of users. Whilst completely optional, users can share their air quality readings with the world (which they visualize into an amazing map). This helpful air quality map grows every time a user opts to share their data, and is a fantastic open resource for climate researchers, students, or anyone concerned about air quality in their local area. If your area is a blank spot on this map, that is all the more reason to buy an AirGradient outdoor monitor.
Each kit comes with a screwdriver and is designed for easy repair. Broken sensor? Swap it out. Firmware update needed? Flash it yourself. Sustainability is one of the core guiding principles of the Open Home Foundation, and we love that repairability is built in. AirGradient also donates at least 1% of annual sales to non-profits and community direct donations. In fact, they asked us to include in this blog an open invitation to our community: If you have a local project that you think would benefit from open source air quality monitors, get in touch through this link.
"We're excited to join the Works With Home Assistant program because it aligns perfectly with our open-source philosophy. Home Assistant represents the same values we believe in - local control, privacy, and community-driven innovation. Together, we're proving that open systems don't just work better for users, they create better outcomes for the planet."
- Achim Haug, Founder and CEO of AirGradient
Certified Devices
In case you’re new to Works With Home Assistant, unlike some certification programs, it’s not just a badge. We rigorously test items in-house and provide feedback to the manufacturers to ensure that products work easily out of the box and provide a seamless experience. The Works With program is operated by the Open Home Foundation and funded by the support of Home Assistant Cloud Subscribers.
AirGradient has certified the following devices with us:
Finally, a metric to show precisely how badly you burned your dinner
When we talk about sustainability in relation to the smart home, it’s easy to focus on energy management and reducing our carbon impact. However, with AirGradient, you can deep dive into the impacts of the release of CO2 and other air pollutants, better understanding what you, your family, and friends breathe in every day. With an in-house science team of atmospheric chemists and public health experts, they ensure that the monitors are accurate and each of the fully assembled monitors are tested in a dedicated test chamber.
Whether you want to see if your new furniture is putting dangerous VOCs into the air, or if a smelly candle is going to aggravate any allergies, the use cases are endless. The AirGradient One also has a built-in display with both detailed data and a set of LEDs to show general air quality at a glance. Both devices measure carbon dioxide, VOCs, nitrogen oxides, particulate matter, temperature, and humidity. AirGradient also provides helpful documentation on their website that helps you understand these measurements and the impact they can have on your household.
These devices can not only give you in-depth information about the air in and out of your home, but they can also unlock powerful automations. We often see these devices paired with door or window open/close sensors, air purifiers, dehumidifiers, or air conditioners to reduce particulates in the home from pets or carpets.
Clearing the air
We’re so excited to be partnered with AirGradient. Their mission is important, and their open and sustainable approach is precisely what we love to see. Partnerships like this are only possible with the support of Home Assistant Cloud subscribers. Many of us at the Open Home Foundation have picked up AirGradient monitors and are sharing our air quality data today, and we’d love for you to join us on the map!
FAQs
Q: If I have a device that is not listed under Works With Home Assistant, does this mean it’s not supported?
A: No! It just means that it hasn’t gone through a testing schedule with our team or doesn’t fit the requirements of the program. It might function perfectly well, but be added to the testing schedule later down the road, or it might work under a different connectivity type that we don’t currently test under the program.
Q: Ok, so what’s the point of the Works With program?
A: It highlights the devices we know work well with Home Assistant and the brands that make a long-term commitment to keeping support for these devices going. The certification agreement specifies that the devices must have full functionality within Home Assistant, operate locally without the need for cloud and will continue to do so long-term.
Q: How were these devices tested?
A: All devices in this list were tested using a standard HA Green Hub with the local AirGradient integration and a Wi-Fi network. HA will automatically discover them after they join your network (following the device’s instructions to add it to the WiFi). If you have another setup, that’s not a problem, but we test against these as they are the most effective way for our team to certify within our ecosystem.
Q: Will you be adding more AirGradient devices to the program?
A: Why not! We’re thrilled to foster a close relationship with the team at AirGradient to work together on any upcoming releases or add in further products that are not yet listed here.
Introducing the Home Assistant Connect ZWA-2, the ultimate way to connect Z-Wave devices to Home Assistant. Between its optimized antenna and seamless integration with Home Assistant, it should be a big upgrade for anyone using Z-Wave today.
If you’re not using Z-Wave, it’s time to take a second look, as Connect ZWA-2 is a different beast. It might be just what you need to reach that tricky spot in your home… or even beyond. Connect ZWA-2 supports Z-Wave Long Range, and this modern take on the standard delivers exceptional reach along with more responsive, battery-efficient devices. Every home is different, but our testers have managed connections in places they once thought impossible.
Join the smart home range revolution for $69 or €59 (that’s the recommended MSRP, and pricing will vary by retailer). For quick details, specs, and where to buy, visit our Home Assistant Connect ZWA-2 page. It’s available for purchase today. Read on to learn what goes into the ultimate Z-Wave upgrade.
We love open standards
Open standards let you connect devices directly to Home Assistant for local, private control, and keep working for years, even if the manufacturer disappears. To make connecting these standards as seamless as possible, we like to build our own hardware.
In late 2022, we launched Home Assistant Connect ZBT-1 (formerly SkyConnect), a USB adapter for Zigbee and Thread. It made both protocols much easier to get started with, and sales helped fund Home Assistant development. We knew the next standard to tackle was Z-Wave, and after another couple of hardware launches (Home Assistant Green and Voice Preview Edition), we finally had the time to do it right.
Why Z-Wave?
If you’re new to Z-Wave, its key advantage over other open standards is its use of sub-GHz radio waves, which are better at getting through thick walls and reaching across large households. While Wi-Fi, Bluetooth, Zigbee, and Thread all compete for the same crowded airspace (2.4 GHz), Z-Wave operates in its own much quieter spectrum (865-926 MHz). Z-Wave is great for range, but its new Z-Wave Long Range variant builds even further on this… but more on that later.
As the standard is over two decades old, it’s had a lot of time to iron out any kinks, but it also has over 4,500 certified devices to choose from. Our opt-in stats show over 130,000 Home Assistant households are using Z-Wave today. Several Works with Home Assistant partners are building amazing Z-Wave products, including Zooz, Shelly, Ultraloq, Leviton, and Homeseer. You can also go to any local marketplace and pick up any working Z-Wave smart device, no matter how old, and it will still connect with Home Assistant!
Connect ZWA-2 in-depth
We’ve learned a lot about hardware since the launch of Connect ZBT-1, and we also knew we could breathe some new life into Z-Wave on Home Assistant. Making this device was the start of us leveling up the Connect platform and establishing our second generation, which is all about building the most performant and open design. That is why we jumped straight to two for this Connect ZWA-2!
Go big or go home
To be the most performant, we knew we had to ditch the “stick” form factor. It was never ideal, as USB ports can output a lot of interference. We even shipped a USB extender with Connect ZBT-1, and urged people to use it, as it kept the device away from any noisy components. Instead of building a stick we built an adapter, which includes an optimized standalone antenna and base that connects to your Home Assistant system with a USB cable.
We’re not compensating for anything; a big antenna does make a big difference. For starters, you need an antenna that’s the right size for your wavelength. As Z-Wave is in the sub-GHz, this means the antenna has to be longer than your average Wi-Fi antenna (about 33 cm or a foot is the sweet spot).
You need to optimize not just the antenna, but also the base of the device (also known as the ground plane). Our hardware experts really went deep into all the physics involved, and the results speak for themselves. Basically, by choosing the right ratio of antenna to base, the two work in harmony to maximize the range and reliability of the signal.
While some Z-Wave adapters may claim they can hit the maximum transmit levels with their postage-stamp-sized antennas, that can sometimes come with a lot of interference. We’ve engineered away that problem. Connect ZWA-2 can speak loudly and clearly 🗣️, and what’s even more important, it’s a great listener 👂.
Positioning is everything
Having a big optimized antenna is great, but placement is almost as important. Its sturdy base and good-sized USB cable allow it to be placed in the right spot. No more will you have a dangling dongle hidden behind a server cabinet. We even put in an accelerometer to ensure people position the antenna upright, this ensures devices are in the sweet spot of the antenna. If you place it on its side, it will subtly blink the status light at the top.
All the Z-Wave
Inside Connect ZWA-2, we include the latest Z-Wave 800 chip, which supports all Z-Wave devices. We’re also Z-Wave certified, giving you that extra peace of mind. This, combined with Home Assistant’s industry-leading Z-Wave software, means Z-Wave has never been this good. On your certified smart devices, you might see Security 2 (S2), SmartStart, Z-Wave Plus, or Z-Wave Plus V2 — don’t worry, we support it all. One new feature we support that is getting people very excited is Z-Wave Long Range👇.
Go long
Combining Z-Wave’s natural abilities with an optimized antenna has given us some impressive range, but we took it a few steps further. We added Z-Wave Long Range to Connect ZWA-2, which might be one of the most substantial updates to Z-Wave yet.
Z-Wave Long Range Long Range doesn’t use mesh, where devices relay messages through each other to reach the hub. Instead, each device talks straight to your hub, which brings some benefits. It runs on the same frequency as regular Z-Wave but at a higher power, and uses new technology that lets it reach farther, handle more devices, respond faster, and save battery. Right now, it is only available in North America and Europe, and the selection of compatible devices is still growing. This is just scratching the surface; for more on this impressive tech, read a full breakdown from our friends at the Z-Wave Alliance.
Z-Wave Long Range is different enough that it needs its own separate network. Connect ZWA-2 can run both Z-Wave and Z-Wave Long Range at the same time. When you add a Long Range capable device to Home Assistant, the setup wizard lets you choose which network to use. This way, you get the best of both worlds: a strong mesh network for your older devices, and the reach of Long Range for the newest devices that include support.
How long?
See that bridge in the background? Our prototype connected to a device all the way over there.
People are getting some impressive results with ZWA-2:
You might have seen our range testing in a previous blog. Since then, we’ve optimized the design and achieved a line-of-sight range of 1.5 kilometers (0.9 miles) 🤯. This was under less than ideal circumstances (raining and within a car), and we think we could go even further.
The certifying engineer said it was “the best range she had ever seen”.
Another test had it communicating via Z-Wave Long Range through several floors of concrete.
Testers with outdoor lights and internal brick walls have commented on how this is the first time they’ve had reliable connections with devices.
Interesting Long Range use cases have included smart mailboxes that notify you when you’ve got mail, or contact sensors on garden gates.
Every home and setup is different, so we can’t definitively say how far your devices will span. What we can say is that nothing else we’ve tested comes close to what Connect ZWA-2 can do.
Built for Home Assistant
Whenever we build new hardware, we step up our software development to match. You may have noticed a lot of love going into Z-Wave for Home Assistant. All Z-Wave users benefit from this, and when people buy Connect ZWA-2, they’re helping fund this development.
Connect ZWA-2 is built for Home Assistant, and because of this, it’s super easy to get started with. We’ve built Connect ZWA-2 to support every region, no matter where you buy it from. When you plug in Connect ZWA-2, it automatically detects and sets your region using the location configured in your Home Assistant system.
We’ve built handy wizards to help you set up your first Z-Wave network and to guide you in setting up new devices. A wizard also helps you quickly migrate from most Z-Wave adapters to Connect ZWA-2 in a couple of clicks. We also have the ability to update the firmware of Connect ZWA-2 right from Home Assistant, and update the firmware over-the-air (OTA) of Z-Wave devices in a single click.
ESP inside
I’ll save you the time opening it up; here is the front and back of the PCB.
As always, we’ve made Connect ZWA-2 easy to open. Just pop out the rubber feet and remove the four Phillips screws, with no glue or clips to get in the way. If you do open it up, you’ll see a familiar sight, an ESP32-S3. We’re using it as a USB controller, and it’s not running ESPHome. Yes, it does have a “Wi-Fi antenna”, but we’re not using it. We’ve provided a lot of easily accessible pins/pads, open source firmware files, unlocked bootloader, and good documentation, so feel free to tinker. We’ll also provide all the files to allow you to 3D-print the outer casing.
Blending into the home
It’s no small feat to make something 33 cm (1 ft) long look so subtle in the home. We’ve modeled its design after a candle and even used the top of the antenna as a status indicator. Its quality injection-molded exterior has a premium feel and shares many design cues from our sleek-looking Voice Preview Edition.
Join the smart home range revolution
Last year, we proclaimed in a blog that “Z-Wave is not dead”, and this hardware is a testament to that belief. Even with new technologies being released every week, there’s still room to innovate with something tried and tested. We will always support technology that respects your privacy, allows you to control your devices without the cloud, all while keeping the things you already have in your home running for years to come.
After 1600 words on a Z-Wave adapter, we’re obviously very proud of what we’ve built and excited to see what amazing things people will do with this labor of love. So, whether you’re a Z-Wave veteran or just interested in cool new technology, take a look at Home Assistant Connect ZWA-2 today.
In most parts of the world, summer mode is in full effect! ☀️ Many at the Open Home Foundation and many of our contributors are enjoying a well-deserved break from work and open source. I hope that you are maybe enjoying a well-deserved break as well! 🏖️
Alright, on to the release! We keep moving during summer and are excited to bring you the August release of Home Assistant!
Let’s start with my personal favorite of this release: The improved experience when viewing a group, for example, a group helper with lights. 💡 When viewing such a group entity, you can now control the individual members of that group directly in that dialog. Super useful! I’m pretty sure that will be used a lot in our house.
But as the release title suggests, this release brings in an important foundation for new AI opportunities in Home Assistant: AI Tasks.
Think of it as a way to delegate tasks to AI and get back the result of that task in a structured way so it can be used. Sounds vague?
Dive into the release notes below!
We introduced our first AI integration in Home Assistant 2023.2 where users could let OpenAI handle their interactions with Home Assistant Voice. Since that time, AI has seen a big surge in popularity within the Home Assistant community for all kinds of use cases. Funny notifications when the laundry is done, analyzing what’s happening on a camera or skipping the song when AI determines it’s a country song 😅.
Though AI gets many people excited, there are still people who would prefer not to have this technology in their smart homes. We want to accommodate everyone’s choices, whether that’s to use AI or not. These features won’t appear unless you set up an AI integration and configure some specific settings.
Last year, we sat down to determine how all these use cases, all complicated to achieve, could be made accessible to everyone. The first thing that came out of this was integration sub-entries, which we shipped in the last release. It allows users to configure their Ollama server or API key for OpenAI once, and then create many different agents using different models or configuration underneath. In this release we’re building two new things you can optionally enable via these new sub-entries for AI integrations: AI tasks and Suggest with AI. We’re also introducing a new integration, OpenRouter, which is a unified LLM interface giving access to over 400 extra LLM models.
When you use Home Assistant Voice to talk to an AI, you can do a lot more than just control your home. LLMs can summarize the state of your home, and when using LLMs from Google and OpenAI, they can search the web to answer your questions with up-to-date information. This is great, but these answers can become quite long. Previously, voice responses wouldn’t begin until the AI had finished generating the entire answer, so longer replies meant a longer wait before anything was read aloud.
When a user waits for Home Assistant Voice to respond, long wait times really hurt the experience. We have overhauled Home Assistant so our Text-to-Speech system can start generating the response audio before the full response is done generating. Last release we launched this for Piper, our local Text-to-Speech system. In this release we’re making this available to the voices included in Home Assistant Cloud – the best way of supporting the Home Assistant project.
This improvement will especially benefit users who use local AI (which can be slow in generating responses) or users who play long announcements on their speakers.
Integrate AI into your workflow using AI Task
AI Task is a new integration that allows you to generate data using AI. After you add the “AI Task” sub-entry in your AI of choice, the entity will appear in the integration. This allows you to attach files or cameras and ask it what is happening. The output can either be given in text or formatted in a data structure of your choice. This is all accessible from the new ai_task.generate_data action, which can be embedded in automations, scripts, and template entities.
Below is an example of a template entity that updates every five minutes and counts the number of chickens in the coop. Example inspired by this blog post.
template:-triggers:-trigger:homeassistantevent:start-trigger:time_patternminutes:"/5"actions:-action:ai_task.generate_datadata:task_name:Count chickensinstructions:>-This is the inside of my goose coop. How many birds (chickens, geese, andducks) are inside the coop?structure:birds:selector:number:attachments:media_content_id:media-source://camera/camera.chicken_coopmedia_content_type:image/jpegresponse_variable:resultsensor:-name:"Chickens"state:"{{result.data.birds}}"state_class:total
To help get started with AI task, we’ve prepared a blueprint to analyze camera footage:
Work faster with Suggest with AI buttons
The AI Task integration has one extra feature under its belt: default entities. You can go to Settings > System > General and configure what AI Task entity you want to use as the default. With a default set, you no longer have to specify an entity when generating data, making it easier to share blueprints.
Setting a default also does more: When a default is configured, and only then, a new type of button will start showing up in different places in Home Assistant:
This button is not visible by default and will only appear if you enable it in the “AI suggestions” settings. For this release, the button has been added to the save dialog for automations and scripts. It helps users come up with a name, description, category, and label, while taking into account your current labels and other automation/script names. Keep in mind that generating this text sends the full contents of the automation or script, along with the names of your other automations/scripts and labels, to the LLM. So, this may be a task you will want to relegate to your shiny new local LLM.
Area dashboard improvements
We’ve added a small improvement to the areas dashboard based on your feedback. You can now choose to show the first camera in an area, or its image or icon, in the area dashboard editor.
It’s a simple way to make certain area cards stand out a bit more—especially handy if you want quicker visual access to specific spaces.
Integrations
Thanks to our community for keeping pace with the new integrationsIntegrations connect and integrate Home Assistant with your devices, services, and more. [Learn more]
and improvements to existing ones! You’re all awesome 🥰
New integrations
We welcome the following new integrations in this release:
OpenRouter, added by @joostlek
Access over 400 different large language models through the OpenRouter API, providing a unified interface for AI integrations in your automations.
Ubiquiti UISP airOS, added by @CoMPaTech
Monitor and manage airOS devices through their local API, providing performance metrics and device status information of your wireless point-to-point infrastructure.
Uptime Kuma, added by @tr4nt0r
Monitor the uptime and status of your services and websites with Uptime Kuma, keeping track of your infrastructure health directly in Home Assistant.
Volvo, added by @thomasddn
Connect your Volvo vehicle to Home Assistant for remote monitoring of battery status, location, and other vehicle information.
This release also has new virtual integrations. Virtual integrations are stubs that are handled by other (existing) integrations to help with findability. These ones are new:
It is not just new integrationsIntegrations connect and integrate Home Assistant with your devices, services, and more. [Learn more] that have been added; existing
integrations are also being constantly improved. Here are some of the noteworthy
changes to existing integrations:
The PlayStation Network integration received major updates from @tr4nt0r and @JackJPowell, adding sensors to track your and your friends’ online status, currently playing game, and last online time. Also a binary sensor for your PS Plus subscription status, and a notification platform. PS Vita is now supported as well!
Reolink cameras got multiple enhancements from @starkillerOG: WiFi signal sensors for IP cameras, post-recording time controls, and pre-recording entities.
Pi-hole users can now leverage API v6 functionality, enabled by @HarvsG.
Immich users can now upload files directly through a new action, implemented by @mib1185.
KNX now includes a new group monitor with improved filtering and search options, thanks to @philippwaller.
Integration quality scale achievements
One thing we are incredibly proud of in Home Assistant is our
integration quality scale. This scale helps us and our contributors to ensure
integrations are of high quality, maintainable, and provide the best possible
user experience.
This release, we celebrate several integrationsIntegrations connect and integrate Home Assistant with your devices, services, and more. [Learn more] that have improved
their quality scale:
This is a huge achievement for these integrations and their maintainers. The
effort and dedication required to reach these quality levels is significant,
as it involves extensive testing, documentation, error handling, and often
complete rewrites of parts of the integration.
A big thank you to all the contributors involved! 👏
Now available to set up from the UI
While most integrationsIntegrations connect and integrate Home Assistant with your devices, services, and more. [Learn more] can be set up directly from the Home Assistant
user interface, some were only available using YAML configuration. We keep moving
more integrations to the UI, making them more accessible for everyone
to set up and use.
The following integration is now available via the Home Assistant UI:
There are many more improvements in this release; here are some of the other noteworthy changes:
Home Assistant’s interface has received a refresh for better accessibility! The primary color and button colors have been updated to meet WCAG AA accessibility standards, improving contrast and readability throughout the interface. All buttons have been redesigned with distinct styles, sizes, and visual priority variants, making it much easier to distinguish between primary, secondary, and less prominent actions. This marks the beginning of a broader effort to update other UI components for improved accessibility and consistency across Home Assistant.
@mib1185 added a new device class for absolute humidity with support for both sensor and number entitiesAn entity represents a sensor, actor, or function in Home Assistant. Entities are used to monitor physical properties or to control other entities. An entity is usually part of a device or a service. [Learn more]. Nice!
Group management was improved by @piitaya, who added the ability to reorder members within a group, making it easier to organize your device groups exactly how you want them. Thanks!
System diagnostics was extended by @balloob with the addition of a device analytics dump download feature. Awesome!
The History StatsintegrationIntegrations connect and integrate Home Assistant with your devices, services, and more. [Learn more] now includes a preview in the options flow, thanks to @karwosts. This makes it easier to configure your history statistics.
The TemplateintegrationIntegrations connect and integrate Home Assistant with your devices, services, and more. [Learn more] received a massive update from @Petro31! Here’s what’s new:
Trigger-based numeric sensors can now be set to unknown state
The cover, fan, light, lock, and vacuum platforms are now supported in the UI
Availability templates are now supported in the UI for all available platforms
Preview entity has been added to the UI for alarm control panel and select platforms
Template locks now support the opening state
The alarm control panel, fan, light, lock, switch, and vacuum platforms now support all optimistic YAML modes
Control individual members of a group
Groups are a great way to control multiple entitiesAn entity represents a sensor, actor, or function in Home Assistant. Entities are used to monitor physical properties or to control other entities. An entity is usually part of a device or a service. [Learn more]
at once, but sometimes you want to control individual members of a group.
So, for this release, @piitaya and @MindFreeze improved the entity information dialog to show the individual members of a light and cover group, allowing you to control them directly from that dialog. Super useful!
He suggested adding the ability to specify weekdays in the time trigger,
allowing users to create automations that only trigger at a specific time
on specific days of the week.
This feature has been implemented in this release, allowing you to specify
the weekdays in the time trigger. This is especially useful for automations
that need to run on specific days, such as weekdays or weekends.
Energy flow on your energy dashboard
The Home Assistant energy dashboard is great, but as of this release it’s even a little better!
Based on the Sankey Chart custom card, @MindFreeze added a new
energy flow visualization for the energy dashboard, which shows exactly where
your energy is coming from and where it is going to.
Really cool addition to the energy dashboard @MindFreeze!
Patch releases
We will also release patch releases for Home Assistant 2025.8 in August.
These patch releases only contain bug fixes. Our goal is to release a patch
release once a week, aiming for Friday.
2025.8.1 - August 11
Make Tuya complex type handling explicit (@epenet - #149677)
Home Assistant has a great community of users who are all more than willing
to help each other out. So, join us!
Our very active Discord chat server is an excellent place to be,
and don’t forget to join our amazing forums.
Found a bug or issue? Please report it in our issue tracker
to get it fixed! Or check our help page for guidance on more
places you can go.
Are you more into email? Sign up for the Open Home Foundation Newsletter
to get the latest news about features, things happening in our community, and other projects that support the Open Home straight into your inbox.
Backward-incompatible changes
We do our best to avoid making changes to existing functionality that might unexpectedly impact your Home Assistant installation. Unfortunately, sometimes, it is inevitable.
We always make sure to document these changes to make the transition as easy as
possible for you. This release has the following backward-incompatible changes:
Android Debug Bridge (ADB)
Android Debug Bridge media players entities now report to be off where they previously reported to be in standby state.
If you have automations or scripts that rely on the Android Debug Bridge media player reporting standby state, you will need to update them to use the new off state.
Apple TV media players entities now report to be off where they previously reported to be in standby state.
If you have automations or scripts that rely on the Apple TV media player reporting standby state, you will need to update them to use the new off state.
Cambridge Audio media players entities now report to be off where they previously reported to be in standby state.
If you have automations or scripts that rely on the Cambridge Audio media player reporting standby state, you will need to update them to use the new off state.
The battery property on vacuum entities is being removed in Home Assistant. Therefore, this property is now removed from this integration and is replaced by a battery level sensor.
Please review your automations, scripts or cards using the battery property and update the code to use the battery sensor instead.
The summary field of calendar events provided by the Husqvarna Automower calendar platform has been updated to include the device name as a prefix. This change improves clarity when multiple mowers are used, but may affect automations relying on the previous summary format.
LOOKin media players entities now report to be off where they previously reported to be in standby state.
If you have automations or scripts that rely on the LOOKin media player reporting standby state, you will need to update them to use the new off state.
The battery property on vacuum entities is being removed in Home Assistant. Therefore, this property is now removed from this integration and is replaced by a battery level sensor.
Please review your automations, scripts or cards using the battery property and update the code to use the battery sensor instead.
Mediaroom media players entities now report to be off where they previously reported to be in standby state.
If you have automations or scripts that rely on the Mediaroom media player reporting standby state, you will need to update them to use the new off state.
The battery property on vacuum entities is being removed in Home Assistant. Therefore, this property is now removed from this integration and is replaced by a battery level sensor.
Please review your automations, scripts or cards using the battery property and update the code to use the battery sensor instead.
The Reolink Wi-Fi signal strength sensor has changed from an indicator value between 0 and 4 (amount of bars) to a value in dBm between -85 dBm and -30 dBm.
Note that all values in this range are possible, but roughly the old values can be converted like this:
The battery property on vacuum entities is being removed in Home Assistant. Therefore, this property is now removed from this integration and is replaced by a battery level sensor.
Please review your automations, scripts or cards using the battery property and update the code to use the battery sensor instead.
Snapcast media players entities now report to be off where they previously reported to be in standby state.
If you have automations or scripts that rely on the Snapcast media player reporting standby state, you will need to update them to use the new off state.
Sony PlayStation 4 media players entities now report to be off where they previously reported to be in standby state.
If you have automations or scripts that rely on the Sony PlayStation 4 media player reporting standby state, you will need to update them to use the new off state.
The battery property on vacuum entities is being removed in Home Assistant. Therefore, this property is now removed from this integration and is replaced by a battery level sensor.
Please review your automations, scripts or cards using the battery property and update the code to use the battery sensor instead.
Support for UniFi Protect installations running on versions below 6.0.0 has been removed.
This change is necessary as we are migrating the Home Assistant integration to use the new UniFi Protect Public API, which is only available in current versions.
If you are running an older version of UniFi Protect, you will need to upgrade to at least version 6.0.0 in order to continue using this integration.
You can read more about the 6.0 release in Ubiquiti’s official blog post:
🔗 Introducing Protect 6.0
Note on future updates:
The Public API is still under active development and may change over time. As we continue to migrate more features of the integration to use the Public API, it is likely that the minimum required version of UniFi Protect will increase further in upcoming Home Assistant releases. We will make these changes step by step as the API evolves and new capabilities become available.
What do I need to do?
Upgrade your UniFi Protect installation to version 6.0.0 or later.
Be prepared for possible further minimum version increases in the future.
If you are already using version 6.0.0 or newer, and the user in use has sufficient permissions, the integration will attempt to automatically create a new API key. If this succeeds, no further action is required. If it fails, a reauthentication will be triggered, requiring you to re-enter your password and provide your API key manually.
The door state for washer/dryer machines is now reported as a binary sensor instead of being part of the main machine state sensor, which now reports only the cycle states. Users relying on this state in automations or scripts will need to update their configurations to use the new binary sensor.
If you are a custom integration developer and want to learn about changes and
new features available for your integration: Be sure to follow our
developer blog. The following changes are the most notable for this
release:
We’re excited to welcome Shelly to the Works with Home Assistant program! Shelly is very well-established in both our ecosystem and the smart home world, so it’s great to formally certify a selection of their Z-Wave devices.
Their retrofit smart switches and relays are amazing for turning all sorts of dumb devices, like light fixtures or ceiling fans, into devices you can easily control in smart new ways. Also, being Works with certified means they have been thoroughly tested, ensuring they give the best possible experience with Home Assistant.
The variety of complex settings and functionality, like energy monitoring, makes them popular with our community doing advanced smart retrofits, like connecting an old garage door or motorized shutters. These are perfect for keeping non-smart devices out of the landfill and working for years to come.
From A to Z-Wave
Shelly, originally launched in Bulgaria in 2017, has been a mainstay in our community for some years. They became known initially for their WiFi smart switches and relays that could be easily used locally, but now offer a wide range of smart devices and ways to connect them. For this first round of Works with Home Assistant certified products, the focus is firmly on the Z-Wave lines.
If you’re not familiar with Z-Wave, it’s a well-established low-powered wireless technology designed with the smart home in mind. It uses an entirely different bit of radio spectrum than WiFi, meaning it has less chance of experiencing interference. This spectrum makes it better at getting through thick walls and communicating over longer distances — with the recent Long Range iteration of the standard, they can communicate even further.
Given our focus on local control, items that work on Z-Wave are ideal if you want to avoid the cloud. Home Assistant will act as your Z-Wave controller using the Z-Wave JS add-on (another awesome Open Home Foundation project). So, all you need is a Z-Wave adapter to use alongside these devices. If you haven’t purchased one yet, you might want to wait before hitting that buy button 😉.
Shelly shares our focus on interoperability, with items using a variety of protocols, while being available worldwide. These items are also super helpful for the energy-conscious. They have low power consumption, power metering, and can easily blend in with your current home decor, as they sit in the wall behind your existing switches.
Mini? This thing is microscopic!
Getting Involved
We’ve been lucky enough to meet the Shelly team on several occasions, and they were kind enough to showcase how the Las Vegas Mob Museum uses Shelly and Home Assistant during our annual ‘State of the Open Home’ event. In May, they went one step further and hosted one of our Community Days in South Florida. It’s really exciting to see that partners who join the ‘Works with’ program don’t just see it as a badge to stick on a box, but a real chance to engage with, and contribute to, this amazing community.
"Many of our users already rely on Home Assistant to power their smart homes, and we’ve seen firsthand how important local control, privacy, and flexibility are to them. By joining the Works with Home Assistant program, we’re reinforcing our commitment to open, reliable smart home solutions. With the upcoming launch of our Shelly Wave Long Range devices—offering wireless coverage of up to 1 kilometer — we’re pushing the boundaries of what smart home technology can do. Combined with Home Assistant’s powerful platform, this will be a market-leading solution, capable of covering use cases no other ecosystem today can reach. Together, we’re building the future of smart homes: open, powerful, and ready for real-world demands."
- Leon Kralj, CTO at Shelly
Devices
In case you didn’t know, Works with Home Assistant differs from other certification programs as products are rigorously tested in-house to ensure they work seamlessly out of the box. Any company joining also commits to providing long-term support and firmware updates while being a positive force in the Home Assistant community. Works with Home Assistant is operated by the Open Home Foundation, and the support of Home Assistant Cloud subscribers funds this work.
Whilst the Shelly Wave Pro 1PM sits in an electrical box, the remaining devices sit behind a standard plug, switch or device. This means they are a super cost-effective way to retrofit devices, which in turn reduces e-waste. The Minis are very small (duh), and so should fit in most tight places around the home, even with low-profile installations. The Shelly Wave 1PM Mini is the world’s smallest Z-Wave smart switch. In some areas of the world, you may need professional installation by a qualified electrician, so be sure to check your region’s regulations. If you’re a confident DIYer, Shelly has a lot of helpful guides on their site to walk you through installing it yourself.
The first of many waves
These devices are the first from Shelly to join the program, but certainly won’t be the last, as we look forward to many exciting developments with Z-Wave Long Range. Keep your eyes peeled for our upcoming hardware announcement that will work perfectly with our Z-Wave partners.
Thanks again for your support (by subscribing to Home Assistant Cloud and buying official hardware), which allows the Open Home Foundation to build these partnerships and certify new devices to join Works with Home Assistant.
FAQs
Q: If I have a device that is not listed under ‘Works with Home Assistant does this mean it’s not supported?
A: No! It just means that it hasn’t gone through a testing schedule with our team yet or doesn’t fit the requirements of the program. It might function well but be added to the testing schedule later down the road, or it might work under a different connectivity type that we don’t currently test under the program. It may also have a feature missing in Home Assistant that we’re working to add.
Q: Ok, so what’s the point of the Works with program?
A: It highlights the devices we know work well with Home Assistant and the brands that make a long-term commitment to keeping support for these devices going. The certification agreement specifies that the devices must work well within Home Assistant, operate locally without the need for cloud and will continue to do so long-term.
Q: How were these devices tested?
A: All devices in this list were tested using a standard HA Green Hub, a Z-Wave adapter and with our Z Wave integration. If you have another hub / adapter / integration that’s not a problem but we test against these as they are the most effective way for our team to certify within our ecosystem.
Q: Will you be adding more Shelly devices to the program?
A: Absolutely. Shelly has a huge number of product lines and will be expanding their Z-Wave Long Range list. We’re sure they’ll keep our testers busy with a steady stream of devices to add.
The Home Assistant companion app for Android just keeps getting better with every release, and recently, it gained some dedicated support to help accelerate its development. Several months ago, I (Timothy Nibeaudeau, also known as @TimoPtr) joined the Open Home Foundation as our dedicated Android developer 🎉.
It’s been over two years, and hundreds of thousands of installs, since we’ve published a dedicated update for our community on the development of the app, and I’d like to give you a quick update on recent improvements and what’s coming next.
Behind the Screens
In the beginning, all of Home Assistant’s official companion apps were developed by the community in their spare time, with many still being part-time projects. It’s incredible the work they put into building these apps. This gives you not just the ability to view your Home Assistant instance on the go (or around the house) and takes advantage of many of the sensors available on the device while providing rich notifications to users.
Very impressive growth in installs over the years!
The Android app alone has seen over 2,700 contributions! It’s a lot of work keeping up with Android versions, new capabilities of Home Assistant, and bug fixes. This app doesn’t just support Android phones and tablets but also devices they connect to, specifically Android Auto, Android Automotive, and Wear OS.
Progress in the millions
They did all this work while reaching nearly 1.5 million installs, with over 6 million total installs over the years. There are 400,000 daily active users and 1 million monthly active users. The phone app also has a very nice 4.3-star rating on the Play Store and 2,800 stars on GitHub 🤩. This feedback really helps us improve.
It’s been over a year and a half since the Apple companion apps gained a full-time developer with the addition of the amazing Bruno Pantaleão 😎. Around the same time as Bruno was hired, we began looking for an Android developer, and let’s say that took a little longer.
My name is Timothy Nibeaudeau, and as mentioned at the start, I’m your new dedicated Android engineer. As someone who has been using Home Assistant since 2018, I’m passionate about open source and smart home technology. I’ve been working in software development for nearly a decade, developing apps for all sorts of projects from medical-grade IoT products to smart toothbrushes 🪥.
I am committed to bringing my talents to the project, but I cannot do it alone. The community is what makes Home Assistant special, and together, we can achieve even more. Specifically, I’d like to thank @dshokouhi, @jpelgrom, and @JBassett for their years of work making this app what it is today!
I’d also like to thank you! Your support (by subscribing to Home Assistant Cloud and buying official hardware) allows the Open Home Foundation to hire dedicated developers. Dedicated developers keep development focused, helping the community to work together in delivering the feature they’re passionate about.
Since our last blog
Like I said at the top, it’s been a long time (over two years 🫢) since we’ve published a blog highlighting the improvements made to the Android app. You’ve probably been enjoying these new features for some time, but in case you missed it, here are some of the biggest improvements made by the community over that time.
Health Connect sensors linked to your Android phone have been added, including heart rate, fitness data, and glucose levels (as always, you have complete control over what you share with your Home Assistant instance, and that data stays local).
By working with Android natively, Assist can now replace your phone’s (or Wear OS devices’) assistant.
You can now set the Home Assistant app as your device’s default launcher, which is great for wall panel setups.
We’ve updated our widgets to support some of the new features, like To-do lists.
Wear OS has had its Tile capabilities improved and a new thermostat tile was added.
There are now more Android Auto sensors, like speed and remaining range.
A simpler way to connect Wi-Fi compatible devices to your home network (such as the Home Assistant Voice Preview Edition) using Improv Wi-Fi over Bluetooth (an open standard for connecting devices to Wi-Fi using Bluetooth, built by the Open Home Foundation).
The Z-Wave device onboarding experience has been improved with the addition of a QR code scanner.
We’ve also improved the speed and stability of the app.
It’s now easier than ever for new contributors to jump in and start helping with the app (much more on that below 👇).
In our latest update of the Android app 2025.7.1, we’ve added a couple of useful features. Including a new basic invite flow, which will be shared between Android and iOS, adding a good layer of consistency between our most-used companion apps. The idea is to make it much more seamless to add new users or set up new devices (no need to type the URL in your Android Automotive device!).
We’ve also made My Links work better. If you’re unfamiliar with My Links, they’re those cool links (that anyone can make) that bring you right to an integration, blueprint, add-on, or settings page. They have always worked great on desktop, but up until recently, they were a bit clunky to use on mobile. Now you can get to the link’s destination with a single click.
Android has many different screen sizes and layouts, and we’re working to better leverage them with edge-to-edge support. Our recent update has edge-to-edge working on Android native UI elements like the settings page, and we’re looking to implement them elsewhere in future updates so we can make the most of your screen real estate.
Important changes for Android users
A huge percentage of our users are on pretty new versions of Android, but we want to support as many older devices as possible.
One significant change on the horizon is ending support for Android 5.0 and 5.1 (also known as Android Lollipop, released in 2014… it had a good run 🫡). Google has announced that starting in June 2025, many AndroidX libraries will require a minimum of Android 6.0 (API 23). Google has already updated Firebase Cloud Messaging to require this as well. This means we will need to stop supporting Android 5.0 and 5.1 (API 21 and 22) to keep up with new features and security updates. Less than 0.3% of installs are on Android versions below API 23 (Android 6.0), and we always work to keep older devices working, but sometimes our hand is forced. If you are using an older device, the app will not be removed, but you will not receive new updates once we make this change. We plan to make one final release for these older versions before support ends. This release is expected before the end of the summer, so you will have the latest updates available for your device before we move on.
Let’s work together
We want to make it easier for you to contribute, whether you are a seasoned developer or just getting started. This includes making the contribution journey smoother and giving people an easy place to start. We’ve even compiled a list of “first issues” to tackle for prospective developers looking to help out. We’ve started work on dedicated Android developer documentation, which will give in-depth information about the inner workings of this app.
We’ve made many behind-the-scenes changes to improve the developer experience (defining best practices, linters for faster/automated feedback, and continuous integration for quicker feedback on PRs). Our focus is always on improving stability, reducing crash rates, and catching issues early. One example of this is our new fail-fast approach, which has already helped us catch and fix issues early.
We want more Android native/exclusive features while also balancing the need to keep parity between the Android and iOS companion apps (the iOS app is excellent, and each app’s community is learning so much from each other).
How you can help
The companion app for Android is a community effort, and your help makes a real difference. Here is how you can get involved:
Join the Android Project thread on Discord. (Head to Channels & Roles and select “I want to contribute developer skills!” to assign yourself the Developer role if you can’t see the thread.)
Our Works with Home Assistant program is expanding once again, and this time we’re excited to announce Zooz is joining us! We have tested many new devices of all different types, ensuring they provide the best experience possible with Home Assistant. As well as classic staples for the smart home, they also bring some very cool flood protection devices to help safeguard your home.
These will be the first certified Z-Wave devices added to the program in some time, and are just part of the exciting future the Home Assistant community and Zooz see for this smart home protocol.
Zooz zooms in
Zooz started out not as a manufacturer, but as a retailer of smart devices. They focused so much on customer support that they soon realized they could do a better job than manufacturers already in the market, and so turned instead to creating their own products. They focus on Z-Wave for its interoperability and security, and they include easy-to-understand installation guides with these devices. They also have a wide knowledge base on their website and a very responsive support team.
As Z-Wave experts, they’re members of the Z-Wave Alliance (where Paulus is also a member as the voice of the open source community). While Zooz is based in the USA, many of their products are available worldwide.
It takes Zooz
Zooz has really embraced the Home Assistant community. Agnes, their VP of Brand and Partnership Support, recently spoke to the team over at the Home Assistant podcast about their startup journey. She also came along to our Community Day in Brooklyn, hosted by our very own Product Lead, Madelena. It’s awesome to see manufacturers get out and connect with our community members.
"Zooz has been contributing quality hardware to the smart home community for over 10 years now and our biggest takeaway is that thoughtful integration is key for our customers. We recognize that our devices are part of an ecosystem and that's why we are so excited to partner with Home Assistant, a platform we highly respect for its commitment to making products work together seamlessly. I especially appreciate how quickly Home Assistant embraced Z-Wave Long Range and how easy it is to set up Z-Wave on a brand new system thanks to hardware like Home Assistant Green. We look forward to connecting with the Home Assistant community, learning together, and creating new devices driven by your feedback."
- Agnes Lorenz, VP, Brand and Partnership Support, Zooz.
Devices
In case you didn’t know, Works with Home Assistant differs from other certification programs as products are rigorously tested in-house to ensure they work seamlessly out of the box. Any company joining also commits to providing long-term support and firmware updates while being a positive force in the Home Assistant community. Works with Home Assistant is operated by the Open Home Foundation, and the support of Home Assistant Cloud subscribers funds this work.
Zooz has had a large group of devices certified, one of the largest number of devices we’ve ever certified for a launch into the program. Kudos to the foundation team, and Zooz for making such a great variety of new devices available to our community.
If you’re based in North America, all new devices will come with Z-Wave Long Range (ZWLR) as standard. If you are based elsewhere, like in Europe, Long Range won’t be enabled quite yet. The reason is that even though the Z-Wave Long Range protocol has been available for some time in North America, it was only released in Europe in April 2025, as certification took a bit longer. The nice thing about Zooz’s North American 700 series and European 800 series Z-Wave, is that ZWLR can be enabled via an over-the-air (OTA) firmware update, so hopefully everyone will be taking part in the Z-Wave Long Range revolution soon. Watch this space for a not-so-secret Home Assistant Z-Wave hardware announcement coming your way…
Z-Wave Long Range opens up a whole new world of options and makes for an even more flexible smart home. Maybe you have a large backyard, or an awkwardly shaped long, but narrow home that is hard to get other protocols to cover adequately. Or perhaps you have devices that are just too far away for other protocols. A common example is wanting a way to get notified when the mailbox at the front of your driveway is opened or closed.
Many of the certified devices can function outdoors or be purchased with accessories to make them waterproof. Speaking on a personal note, we had a leak in our garage a year or so ago after some bad weather. Other protocols couldn’t reach that far, and we had no way to be notified. I cannot wait for an easy way to be notified across that bigger distance, and avoid all the unpleasant clean-up.
It’s great to read stories on social media or our forums where smart home devices have kicked in and saved the day, like getting that all-important notification or cutting off the water supply with something like Zooz’s valve actuator.
Z-Wave, like other open standards we support, works locally, and all of the devices listed above will work locally, without the need for any extra cloud connection or apps. Remember, if you’re also looking for remote access to make sure you don’t miss any critical notifications while you’re away from home, an easy way to get this set up is to subscribe to Home Assistant Cloud. Not only will this help you monitor your smart home remotely, but you’ll also be supporting the development of Home Assistant.
FAQs
Q: If I have a device that is not listed under “Works with Home Assistant” does this mean it’s not supported?
A: No! It just means that it hasn’t gone through a testing schedule with our team or doesn’t fit the requirements of the program. It might function perfectly well, but be added to the testing schedule later down the road, or it might work under a different connectivity type that we don’t currently test under the program.
Q: OK, so what’s the point of the Works with program?
A: It highlights the devices we know work well with Home Assistant and the brands that make a long-term commitment to keeping support for these devices going. The certification agreement specifies that the devices must have the expected functionality within Home Assistant, operate locally without the need for cloud, and will continue to do so long-term.
Q: How were these devices tested?
A: All devices in this list were tested using a standard HA Green Hub with our Z-Wave Integration. If you have another hub integration that’s not a problem, but we test against these as they are the most effective way for our team to certify within our ecosystem.
Q: Will you be adding more Zooz devices to the program?
A: Absolutely! We’re thrilled to foster a close relationship with the team at Zooz to work together on any upcoming releases or add in further products that are not yet listed here.
We’re thrilled to welcome Nuki to the Works with Home Assistant program! Nuki creates some slick-looking smart locks that you can fit to most doors (or even on top of existing locks). They are constantly pioneering new and exciting features, while also using the open standards we support. Nuki is today bringing three different lock types to the program, all certified by our team to provide the best experience possible with Home Assistant.
Unlocking their origin
Nuki started just over 10 years ago, with their first smart lock that was called the ‘magic black box’. It was this award-winning design that evolved into the sleek Nuki Smart Locks that are available today. Keeping everything in the family, the brand was started by brothers Martin and Jürgen. Frustrated with the hassle of carrying a door key in their sports kit, the brothers launched a successful Kickstarter and have been innovating ever since. They design their smart locks in Austria and manufacture them in Europe. Their locks are available across Europe, and in early July, they launched the Nuki Smart Lock in the U.S.
Nuki devices are certified for use with the Home Assistant Matter integration, which is now officially certified. Like all ‘Works with’ certified devices, Nuki locks prioritize local control, so you can manage your day-to-day home security without relying on a cloud connection.
"Joining the 'Works with Home Assistant' program is a logical step for us. We believe strongly in the power of open ecosystems and giving control to our customers. Home Assistant represents a vibrant community dedicated to innovation and customization, and we are thrilled to align our products with this vision. This integration ensures our customers can build the smart home they want, with the products they trust. The 'Works with Home Assistant' certification provides customers with the confidence that Nuki's products have been tested for compatibility and offer a smooth integration experience."
- Matthias Kerstner, Head of Product at Nuki.
Devices
This lock is turning heads faster than it turns bolts
In case you didn’t know, Works with Home Assistant differs from other certification programs as products are rigorously tested in-house to ensure they work seamlessly out of the box. Any company joining also commits to providing long-term support and firmware updates while being a positive force in the Home Assistant community. Works with Home Assistant is operated by the Open Home Foundation, and the support of Home Assistant Cloud subscribers funds this work.
Our team has been busy testing the Nuki locks for some time and has certified the following Matter-over-Thread enabled devices. It’s important to note that to set up the lock, calibrate it, and activate Matter you will need to use the Nuki app. However, there is no hard requirement for a cloud account or account registration in order to use these locks. Once the device is active and connected via Matter, you can manage it purely through Home Assistant, and can even delete the app.
The devices certified include two cylindrical models, the Nuki Smart Lock Pro and the Nuki Smart Lock Ultra, which both feature a brushless motor and three speed settings. The speediest of these is called the ‘Insane’ setting. This ultra-fast setting is ideal for those in a hurry, but you can also pick from ‘standard’ or ‘gentle’ to move at a more leisurely pace. The gentle setting is also perfect for quieter unlocking, so you’re not disturbing others if you’re coming home after a night shift or an early morning jog.
We love that the cylindrical devices come with a rechargeable battery to reduce e-waste. Each cylindrical lock comes with both white and black band options, so you can match your existing hardware or your home’s style. The Nuki Smart Lock Pro can retrofit over a current lock, whereas the Nuki Smart Lock Ultra comes with its own cylinder.
If you’re looking for a solid entry-level choice instead, the Nuki Smart Lock Go is a great option, which uses four AA batteries. Both the Smart Lock Go and Smart Lock Pro can be installed in under five minutes, with no drilling or special tools required, which may mean even if you’re renting you could install a smart lock. Works with Home Assistant is all about providing more choice to the community, and Nuki is expanding the smart lock offerings.
A keyless future
All of the models listed work locally, as this is a requirement of the ‘Works with’ program so that you can ensure you feel safe and secure in your smart home. However, some users may wish to access these devices remotely too, allowing you to unlock the door for guests, contractors, family, or friends. If you’re looking for remote access, this can either be provided by the Nuki App, or via your Home Assistant system with something like Home Assistant Cloud (which supports the development of Home Assistant but also helps bring more ‘Works with’ partners to the program 🤝).
We’re really excited to have Nuki join our certified devices, and see the use cases the community will come up with to integrate their smart locks into the rest of their smart home.
FAQ ON WORKS WITH HOME ASSISTANT
Q: If I have a device that is not listed under ‘Works with Home Assistant’ does this mean it’s not supported?
A: Most Nuki locks will work via Matter with Home Assistant and we have even tried out a couple of older locks with good results. However, we have only officially tested and certified the devices listed above. If there is any other device missing from this list it just means that it hasn’t gone through testing with our team or doesn’t fit the requirements of the program. It might function well, and may be added to the testing schedule later down the road, or it might work under a different connectivity type that we don’t currently test under the program.
Q: Ok, so what’s the point of the Works with program?
A: It highlights the devices we know work well with Home Assistant and the brands that make a long-term commitment to keeping support for these devices going. We look for brands that will bring their key functionality into Home Assistant, operate locally without the need for cloud logins, and continue to do so long-term.
Q: How were these devices tested?
A: All devices in this list were tested using a standard Home Assistant Yellow with the built-in Thread border router and our certified Matter Integration. If you have another hub, border router setup, or integration, that’s not a problem. We test against these as they are the most effective way for our team to certify within our ecosystem.
Q: Will you be adding more Nuki devices to the program?
A: All of the locks Nuki currently sells are now represented here in the ‘Works with’ program. We’re thrilled to foster a close relationship with the team at Nuki to work together on any upcoming releases or add in further products that are not yet listed here.
Whew! It’s hot out there! 🌡️ While most of Europe is dealing with a heat wave right now, we’re here to cool things down with an exciting July release that’s packed with features I’m genuinely excited about.
Before we dive in, if you missed it, we recently published Voice Chapter 10 where we explored moving beyond reactive voice assistants that only respond when you talk to them. Instead, we envisioned a future where your voice assistant can be conversational and initiate conversations. Speaking of that, this release delivers on that vision in a big way!
I’m absolutely stoked about the new Ask Question action for Assist! 🗣️ This is something that sets Home Assistant apart from every other voice assistant out there. Finally, your voice assistant can take the initiative and ask you what your smart home should do. No more waiting for wake words, your assistant can start the conversation when it makes sense. It’s the kind of feature that gets me really excited thinking about all the possibilities.
The redesigned Area card is another winner! 🏠 I’ll probably be replacing a few tile cards I’ve been using to navigate to my area dashboards with this new, more flexible version. It integrates beautifully with the Sections dashboard and gives you so many more options for controlling your spaces.
And that’s just the beginning! We’ve got integration sub-entries making integrations even more extensible, full-screen code editors for those lengthy YAML and template edits, and tons of quality-of-life improvements throughout.
In our latest roadmap, we shared our goal to make Assist more conversational. Until now, Assist was mostly transactional, meaning when you would say something, you would get a response or it would perform an action, and that would be the end of it (unless some LLM magic jumped in). With this release, we’re taking a big step forward: meet the new Ask Question action.
This lets you build custom conversations from the comfort of our automation engine. Ask a question, handle the answer, and keep the interaction going.
This action even allows you to define expected answers so that our extremely fast speech engine, Speech-to-Phrase, can train on them. Yes, fully local, custom conversations!
To help you get started, we have provided a blueprint that covers the most common use case — Asking a closed Yes/No question:
This blueprint allows you to focus on what you want to do if you answer positively or negatively to any question that your voice assistant will ask. The blueprint supports 50 different ways of saying “Yes” and “No” (including phrases like “Make it so” and “Let’s not”). Here it is in action!
In case you want to dive deeper into conversation building, here is an example on how to ask a question and process the different answers:
Example YAML automation actions
This example asks the user what kind of music they want to listen to, and then plays the selected genre or artist on a media player.
Originally introduced a few years ago, the Area card offered a way to display an areaAn area in Home Assistant is a logical grouping of devices and entities that are meant to match areas (or rooms) in the physical world: your home. For example, the living room area groups devices and entities in your living room. [Learn more] overview within the dashboard. However, it wasn’t fully compatible with the Sections dashboard, which limited its practical use in that context.
The card has now been completely redesigned with a look and feel similar to the Tile card. It integrates seamlessly into the Sections dashboard thanks to its flexible layouts. You can choose between a compact version that shows only an icon and the area name, or a more detailed view featuring elements like your camera feed and buttons to toggle your lights or fans.
The control section itself has also been revamped, allowing you to choose which controls to include and rearrange them as you want. As a result of these changes, if you’re currently using the area cards, you’ll need to reconfigure the controls on them.
Additionally, the card now supports controlling coverentitiesAn entity represents a sensor, actor, or function in Home Assistant. Entities are used to monitor physical properties or to control other entities. An entity is usually part of a device or a service. [Learn more].
Improving the Areas dashboard overview
The April release introduced an experimental Areas dashboard, designed to automatically generate a ready-to-use interface based on the configured areas within the home. However, the preview could become cluttered if you had a lot of devices in a room.
This release introduces an all-new overview that leverages the redesigned Area card, making it easy to view and control your main devices by room with a single click. It also acts as a navigation hub, giving you quick access to detailed views of each area.
Please note that this is experimental, meaning it is subject to change and may not always work as intended. We would love your feedback if you notice some aspects we can improve. The community’s dashboards, shared over the years, have helped shape this design, and we would love to see how it works with a wide variety of your homes. Even if you already have the perfect dashboard built for your home, try it!
Ever wondered why you had to enter your API keys for every AI agent you created, even though they all used the same key? Or why you had to authenticate for every calendar you added, regardless of the fact that they all shared the same account? Or why you couldn’t add MQTT devices from the UI?
This release solves that with the introduction of integration sub-entries. This allows you to add a sub-entry to an existing integrationIntegrations connect and integrate Home Assistant with your devices, services, and more. [Learn more] entry. In practice, this means that your integrationIntegrations connect and integrate Home Assistant with your devices, services, and more. [Learn more] entry has your credentials, and all the sub-entries use these credentials. In the sub-entry, you can then configure what should be done with these credentials, such as fetching a specific calendar, adding three AI agents with different prompts using the same OpenAI account, or in the case of MQTT, configuring devices that are connected to your MQTT broker.
The integrationIntegrations connect and integrate Home Assistant with your devices, services, and more. [Learn more] page got a big overhaul! It now has support for sub-entries, allowing you to easily add a sub-entry to an integrationIntegrations connect and integrate Home Assistant with your devices, services, and more. [Learn more] entry along with being able to see which devices and services belong to which sub-entry.
But we took the opportunity to do more. Instead of just showing your integrationIntegrations connect and integrate Home Assistant with your devices, services, and more. [Learn more] entries, it now also shows the devices and services provided by that configuration entry. This makes it much easier to manage your devices and see the relationship between your devices and their integrationsIntegrations connect and integrate Home Assistant with your devices, services, and more. [Learn more] at a glance.
Integrations
Thanks to our community for keeping pace with the new integrationsIntegrations connect and integrate Home Assistant with your devices, services, and more. [Learn more]
and improvements to existing ones! You’re all awesome 🥰
New integrations
We welcome the following new integrations in this release:
Altruist, added by @LoSk-p
Monitor air quality and environmental conditions with the Altruist sensor, providing local data for temperature, humidity, PM2.5/PM10, CO2, noise levels, and more.
PlayStation Network, added by @JackJPowell
Integrate with the PlayStation Network to track your currently playing games and display game information on your dashboard.
Tilt Pi, added by @michaelheyman
Monitor your Tilt Pi hydrometer for brewing temperature and specific gravity measurements during your brewing process.
VegeHub, added by @Thulrus
Monitor and control your garden with the Vegetronix VegeHub, gathering sensor data and controlling irrigation relays for automated plant care.
Noteworthy improvements to existing integrations
It is not just new integrationsIntegrations connect and integrate Home Assistant with your devices, services, and more. [Learn more] that have been added; existing
integrations are also being constantly improved. Here are some of the noteworthy
changes to existing integrations:
Love that song? @marcelveldt added a button entityAn entity represents a sensor, actor, or function in Home Assistant. Entities are used to monitor physical properties or to control other entities. An entity is usually part of a device or a service. [Learn more] to Music Assistant that lets you add the currently playing item to your favorites with a single click. It works with queues, external sources, and even radio stations!
ESPHome now supports sub-devices! Thanks to @bdraco, you can now represent multiple logical devices with a single ESP device in Home Assistant. This is particularly useful for RF bridges, Modbus gateways, and other devices that can control multiple devices. This feature requires the soon-to-be-released ESPHome 2025.7. Awesome addition!
Paperless-ngx now includes an update entityAn entity represents a sensor, actor, or function in Home Assistant. Entities are used to monitor physical properties or to control other entities. An entity is usually part of a device or a service. [Learn more] to keep your document management system up to date. Thanks, @fvgarrel!
Battery management control has been added to HomeWizard with @DCSBL implementing battery group mode, allowing you to modify the charging and discharging behavior of your HomeWizard batteries!
Reolink cameras received a ton of love (again) from @starkillerOG! New features include IR brightness control, baby cry sensitivity adjustment, privacy mask switches, and full support for both PoE and WiFi floodlights with multiple command ID pushes. Impressive!
@mib1185 added an update entityAn entity represents a sensor, actor, or function in Home Assistant. Entities are used to monitor physical properties or to control other entities. An entity is usually part of a device or a service. [Learn more] to the ImmichintegrationIntegrations connect and integrate Home Assistant with your devices, services, and more. [Learn more]. Nice!
The HomeeintegrationIntegrations connect and integrate Home Assistant with your devices, services, and more. [Learn more] expanded significantly! @Taraman17 added a siren platform for security alerts and support for the HeatIt Thermostat TF056. Nice!
Energy monitoring got better in Adax with @parholmdahl adding energy sensors, so you can track your heating consumption!
@ViViDboarder made Ollama more flexible by adding a config option for controlling the think parameter. More control over your local AI!
Samsung refrigerator owners! @mswilson added ice bites control and water filter replacement/usage sensors to the SmartThingsintegrationIntegrations connect and integrate Home Assistant with your devices, services, and more. [Learn more].
Russound RIO got a major upgrade from @noahhusby, adding sub-device support plus new number and switch entitiesAn entity represents a sensor, actor, or function in Home Assistant. Entities are used to monitor physical properties or to control other entities. An entity is usually part of a device or a service. [Learn more] for enhanced zone control.
@chemelli74 expanded Alexa Devices with sensor platforms and additional binary sensors. Now you can get more data from your Echo devices!
Matter keeps growing! @lboue added dishwasher alarm support and battery storage capabilities. Thanks!
YAML fans will appreciate @frenck adding unique ID support to TrendintegrationIntegrations connect and integrate Home Assistant with your devices, services, and more. [Learn more] configuration.
The LaMetric Time got an update entityAn entity represents a sensor, actor, or function in Home Assistant. Entities are used to monitor physical properties or to control other entities. An entity is usually part of a device or a service. [Learn more] as well, thanks @joostlek!
Google Generative AI now defaults to the newer, faster Gemini 2.5 Flash model. A noteworthy performance boost by @tronikos!
Google Generative AI now supports text-to-speech (TTS) with 30 voices and 24 languages. It supports fine-grained control over style and sound, for example, “Say cheerfully: Have a wonderful day!”. Thanks @lanthaler!
Enphase Envoy users get detailed DC voltage and current readings from their solar panels thanks to @Bidski. This is perfect for monitoring individual panel health and optimizing production!
@zerzhang brought evaporative humidifier support to SwitchBot, expanding your climate control options.
Integration quality scale achievements
One thing we are incredibly proud of in Home Assistant is our
integration quality scale. This scale helps us and our contributors to ensure
integrations are of high quality, maintainable, and provide the best possible
user experience.
This release, we celebrate several integrationsIntegrations connect and integrate Home Assistant with your devices, services, and more. [Learn more] that have improved
their quality scale:
This is a huge achievement for these integrations and their maintainers. The
effort and dedication required to reach these quality levels is significant,
as it involves extensive testing, documentation, error handling, and often
complete rewrites of parts of the integration.
A big thank you to all the contributors involved! 👏
Now available to set up from the UI
While most integrationsIntegrations connect and integrate Home Assistant with your devices, services, and more. [Learn more] can be set up directly from the Home Assistant
user interface, some were only available using YAML configuration. We keep moving
more integrations to the UI, making them more accessible for everyone
to set up and use.
The following integration is now available via the Home Assistant UI:
The following integrationsIntegrations connect and integrate Home Assistant with your devices, services, and more. [Learn more] are also no longer available as
of this release:
JuiceNet has been removed as they shut down their API services.
Other noteworthy changes
There are many more improvements in this release; here are some of the other noteworthy changes:
Shopping list now has a complete intent function that allows you to check off or mark items on your shopping list as completed, making it easier to interact with your shopping lists using voice commands. Thanks, @Lesekater!
Device and entityAn entity represents a sensor, actor, or function in Home Assistant. Entities are used to monitor physical properties or to control other entities. An entity is usually part of a device or a service. [Learn more] management got better! @emontnemery made it so Home Assistant now restores user customizations when you re-add deleted devices or entitiesAn entity represents a sensor, actor, or function in Home Assistant. Entities are used to monitor physical properties or to control other entities. An entity is usually part of a device or a service. [Learn more]. No more losing your carefully crafted names and settings!
The TemplateintegrationIntegrations connect and integrate Home Assistant with your devices, services, and more. [Learn more] received a major boost from @Petro31! You can now use variables, icons, and pictures across all compatible template platforms, create trigger-based template alarm control panels, locks, vacuum entitiesAn entity represents a sensor, actor, or function in Home Assistant. Entities are used to monitor physical properties or to control other entities. An entity is usually part of a device or a service. [Learn more], and fans. Plus, there’s a new label_description template method that allows you to dynamically fetch the description you’ve added to a label from your templates. This is a noteworthy enhancement for better template organization.
Camera snapshots just got better! @edenhaus added support for taking snapshots via go2rtc. There is nothing for you to do on this one, it works out of the box, but it is nice to know snapshots are now faster and take fewer resources from your system.
Object selectors now support fields and multiple selections, thanks to @piitaya. These additions are particularly interesting for integrationIntegrations connect and integrate Home Assistant with your devices, services, and more. [Learn more] and blueprint developers, as they provide much more flexibility in your UI representations.
Wind direction sensors got a visual upgrade with @edenhaus adding range icons for the wind_direction sensor device class. Different icons are now shown depending on the state of wind direction sensors, which is indeed a nice visual upgrade!
Full-screen code editors
Working with snippets of YAML or templates in Home Assistant just got a BIG improvement! We’ve added a new full-screen mode for all code editors throughout the interface.
Whether you’re editing automations, scripts, templates, or any other YAML configuration, you can now expand the code editor to take up your entire screen. This is especially helpful when working with longer configurations or when you need more space to see your code clearly.
Simply click the maximize button in the top-right corner of any code editor to enter full screen mode. Press the button again to return to the normal view.
This makes building a more complex and advanced smart home more comfortable and productive, especially on smaller mobile or tablet screens where every pixel of editing space counts!
Improved dashboard creation experience
The dialog for adding a new dashboard has been redesigned with a cleaner interface that matches recent redesigns we’ve seen to other dialogs. This improvement was designed by @marcinbauer85 and implemented by @quinnter. Great teamwork!
Patch releases
We will also release patch releases for Home Assistant 2025.7 in July.
These patch releases only contain bug fixes. Our goal is to release a patch
release every Friday.
Home Assistant has a great community of users who are all more than willing
to help each other out. So, join us!
Our very active Discord chat server is an excellent place to be,
and don’t forget to join our amazing forums.
Found a bug or issue? Please report it in our issue tracker
to get it fixed! Or check our help page for guidance on more
places you can go.
Are you more into email? Sign up for the Open Home Foundation Newsletter
to get the latest news about features, things happening in our community, and other projects that support the Open Home straight into your inbox.
Backward-incompatible changes
We do our best to avoid making changes to existing functionality that might unexpectedly impact your Home Assistant installation. Unfortunately, sometimes, it is inevitable.
We always make sure to document these changes to make the transition as easy as
possible for you. This release has the following backward-incompatible changes:
Google Calendar
The previously deprecated Google Calendar add_eventactionActions are used in several places in Home Assistant. As part of a script or automation, actions define what is going to happen once a trigger is activated. In scripts, an action is called sequence. [Learn more] has been removed and replaced by the create_event entity-based actionActions are used in several places in Home Assistant. As part of a script or automation, actions define what is going to happen once a trigger is activated. In scripts, an action is called sequence. [Learn more].
If you use the add_eventactionActions are used in several places in Home Assistant. As part of a script or automation, actions define what is going to happen once a trigger is activated. In scripts, an action is called sequence. [Learn more] in your automations or scripts, you will need to update them to use the new create_eventactionActions are used in several places in Home Assistant. As part of a script or automation, actions define what is going to happen once a trigger is activated. In scripts, an action is called sequence. [Learn more] instead.
The previously deprecated plex.scan_for_clientsactionActions are used in several places in Home Assistant. As part of a script or automation, actions define what is going to happen once a trigger is activated. In scripts, an action is called sequence. [Learn more] has been removed in favor of the “Scan Clients” buttonentityAn entity represents a sensor, actor, or function in Home Assistant. Entities are used to monitor physical properties or to control other entities. An entity is usually part of a device or a service. [Learn more]. If you use this actionActions are used in several places in Home Assistant. As part of a script or automation, actions define what is going to happen once a trigger is activated. In scripts, an action is called sequence. [Learn more] in your automations or scripts, you will need to update them to use the new entityAn entity represents a sensor, actor, or function in Home Assistant. Entities are used to monitor physical properties or to control other entities. An entity is usually part of a device or a service. [Learn more] instead.
If you are a custom integration developer and want to learn about changes and
new features available for your integration: Be sure to follow our
developer blog.
Please welcome the latest addition to the Works with Home Assistant program, SwitchBot! This year has seen a lot of ‘firsts’ within the program, and this launch certainly keeps up this trend. Read on to see the first Air Purifiers and Vacuums / Cleaning Robots! What’s more, SwitchBot is bringing this first set of devices into the program with multiple connectivity options. Pick from their Bluetooth integration, Matter via a hub, or standalone Matter devices as well. All this gives you even more choice in how you set up your smart home, while providing the best experience with Home Assistant.
Making the Switch…Bot
SwitchBot quickly gained traction in the smart home industry with their original finger bots, which sit over non-smart switches and physically press them down on your behalf. Since then, they’ve expanded to include many other smart home devices like curtain robots, hubs, air purifiers, and cleaning robots. We were excited to see these new products in person at CES earlier this year and meet up with their team.
SwitchBot even got involved with Community Day, hosting a meet-up in Shenzhen, China. We love that the ‘Works with’ partners show that they’re passionate about engaging with our community, taking the partnership much further than just a label on a box.
"At SwitchBot, we're committed to empowering users with seamless and intelligent home automation. By collaborating with Home Assistant's passionate, tech-savvy community, we're able to push boundaries and deliver more integrated, intuitive experiences. Together, we aim to expand what's possible, offering users greater flexibility to connect, control, optimize their homes, and to make it simple."
- Richard Mou - Co-Founder, SwitchBot
Devices
In case you didn’t know, Works with Home Assistant differs from other certification programs as products are rigorously tested in-house to ensure they work seamlessly out of the box with Home Assistant. Any company joining also commits to providing long-term support and firmware updates while being a positive force in the Home Assistant community. Works with Home Assistant is operated by the Open Home Foundation, and the support of Home Assistant Cloud subscribers funds this work.
The SwitchBot team have put special focus on integrating specifically for Home Assistant and have been working hard on their Bluetooth integration. Though the community played a central role in the development of the integration, and SwitchBot is very thankful for this work, they took a more active role in its development.
One of the terms of the ‘Works with’ program is that Bluetooth devices must connect over an integration that is kept up to a certain code quality (we call this our ‘Gold tier’ on our quality scale). It also must be maintained by the manufacturers themselves, rather than overly relying on community members to do the hard work. This puts the responsibility on the shoulders of the manufacturers to make sure they’re responding to bugs and keeping the integration up long term. If you’re interested in SwitchBot’s Bluetooth products but your Home Assistant system doesn’t have built-in Bluetooth, the easiest way to connect them is by using a Bluetooth Proxy.
If you prefer Matter, SwitchBot also has devices that are certified for use with one of their Matter hubs: either the SwitchBot Hub 2 or the Hub 3. There are also some that can work via Matter-over-WiFi as standalone devices. We are currently testing even more of SwitchBot’s Matter devices for the program.
Note:Home Assistant Container does not support Matter, and requires Home Assistant OS.
A smart home is a clean home
Eat your heart out Wall-E
SwitchBot’s K20 is the first cleaning robot in the Works with Home Assistant program as well as the world’s first multi-tasking household robot. This wacky robot can be paired with lots of other items in the range, including the certified air purifiers, to make some really cool Home Assistant use cases. Just imagine, you’re making some delicious dinner, but oh no, you’ve left a pan alone for too long and it starts to smell and burn. You could summon the K20 with an air purifier on top using the Home Assistant Voice Preview Edition. A few moments later, it’s found its way to you and gets started on clearing the air in your kitchen. Plus, as these can both work via Matter, there’s no need for cloud involvement. Some of the items also come with a table top so this device has some great applications for anyone with limited mobility.
Bot to the future
These devices are the first certified items, but SwitchBot is working to get many more tested and fully feature-rich with Home Assistant. We’re excited to keep expanding this list over time, but if you can’t wait (and this work is only possible with the support of our Home Assistant Cloud subscribers), you can see the list of the other devices they are working on here.
FAQs
Q: If I have a device that is not listed under ‘Works with Home Assistant’ does this mean it’s not supported?
A: No! It just means that it hasn’t gone through a testing schedule with our team or doesn’t fit the requirements of the program. It might work fine and be added to our testing later down the road. Though it might only have limited functions that are being worked on, or use a connectivity type we don’t currently test for in the program.
Q: Ok, so what’s the point of the Works with program?
A: It highlights the devices we know work well with Home Assistant and the brands that make a long-term commitment to keeping support for these devices going. The certification agreement specifies that the devices must have full functionality within Home Assistant, operate locally without the need for cloud, and will continue to do so long-term.
Q: How were these devices tested?
A: The Bluetooth devices in this list were tested using a standard Home Assistant Green Hub, the SwitchBot Bluetooth Integration, a USB Bluetooth adapter, and an ESPHome Bluetooth Proxy. The Matter-over-WiFi devices were also tested with Home Assistant Green and our certified Matter Integration. If you have another hardware setup or integration, that is often not a problem, but we test against these as they are the most effective way for our team to certify within our ecosystem.
Q: Will you be adding more SwitchBot devices to the program?
A: Absolutely! SwitchBot has a quickly growing set of product lines that we’re working to certify together, subject to the integrations fully covering all the functions.
Welcome to Voice chapter 10 🎉, a series where we share all the key developments in Open Voice. This chapter includes improvements across every element of Open Voice. Improvements that allow it to support more languages, be used on more hardware, make it easier to contribute to, all while making it faster and more reliable.
Help steer Open Voice
Before we get going, we just want to say that Voice Chapter 10 isn’t just a broadcast; it’s an invitation ✉️. Our public Voice project board lives on GitHub, and it shows what we’re fixing, currently building, and what we’ll work on next. Every card is open for comments, so please feel free to have a look and participate in the discussion.
When we began designing and building the firmware for our open voice assistant hardware, the Home Assistant Voice Preview Edition, we had several specific features in mind:
Run wake words on the device.
Use a fully open-sourced media player platform that can decode music from high-quality sources.
Wake words can be enabled and disabled on the fly; for example, “stop” is only activated when a long-running announcement is playing or when a timer is ringing.
Mix voice assistant announcements on top of reduced volume (a.k.a. “ducked”) music.
These features needed to run within ESPHome, the software that powers the device. In the beginning, ESPHome could only do 1 and 2, but not even at the same time!
To include all these features, we initially built them as external components, allowing us to iterate fast (and of course break many things along the way). We always intended to bring these components into ESPHome, and the process of bringing them in is called upstreaming. This would allow anyone to easily build a voice assistant that includes all the features of Voice Preview Edition, and that’s what we’ve been working on since its launch last December.
No device left behind!
ESPHome version 2025.5.0 has all these components included! We didn’t just spend this time copying the code over, but we also worked hard to improve it by making it more generalizable, easier to configure, and much faster.
As an example of these speed improvements, the highest CPU load on the Voice Preview Edition happens when music is being mixed with a long announcement. In this situation, it is decoding two different FLAC audio streams while also running three microWakeWord models (a Voice Activity Detector, “Okay Nabu”, and “Stop”). With the original December firmware, this used 72% of the CPU 😅. With the new optimizations, which are all now available in ESPHome, the current Voice Preview Edition firmware only uses 35%❗ These improvements even allow the extremely resource-constrained ATOM Echo to support many of these features, including media playback and continuing conversations.
Make your own Voice Preview Edition
I'll just pretend I understand all this
Speaking of voice hardware becoming more like Voice Preview Edition, why not use that class-leading hardware as the basis for your own creations? We’ve now got the KiCad project files, which include the electrical schematic and circuit board layout, along with other helpful documents available for download on GitHub. Combined with our open source firmware files, this will allow anyone to build on the work we’ve done and make the open voice assistant of their dreams. Bigger speaker, built-in presence sensor, a display featuring a smiling Nabu mascot — the options are nearly endless. Building Voice Preview Edition was always meant to bootstrap an entire ecosystem of voice hardware, and we’re already seeing some amazing creations with this open technology.
Now you’re speaking my language
Speech-to-Phrase gets more fluent
In case you missed it, we built our own locally run speech-to-text (STT) tool that can run fast even on hardware-constrained devices. Speech-to-Phrase works slightly differently from other STT tools, as it only accepts specific predetermined phrases, hence the name. We have been making large strides in making this the best option for local and private voice control in the home.
The sentence format for Speech-to-Phrase is getting an upgrade! Besides making it simpler for community members to contribute, it now allows for more thorough testing to ensure compatibility with existing Home Assistant commands.
We have also begun experimenting with more precise sentence generation, restricting sentences like “set the {light} to red” only to lights that support setting color. Another improvement is making Speech-to-Phrase more careful about combining names and articles in certain languages. For instance, in French, a device or entity that starts with a vowel or an “h” will have an “l” apostrophe at its beginning, such as l’humidificateur or l’entrée. Allowing Speech-to-Phrase to understand this avoids it guessing pronunciations for nonsensical combinations.
Speech-to-Phrase currently supports six languages, namely English, French, German, Dutch, Spanish, and Italian. We are now engaging with language leaders to add support for Russian, Czech, Catalan, Greek, Romanian, Portuguese, Polish, Hindi, Basque, Finnish, Mongolian, Slovenian, Swahili, Thai, and Turkish — this takes our language support to 21 languages 🥳!
These new models were originally trained by community members from the Coqui STT project (which is now defunct, but luckily their work was open source — another example of FOSS saving the day), and we are very grateful for the chance to use them! Performance and accuracy vary heavily by language, and we may need to train our own models based on feedback from our community.
Piper is growing in volume
Piper is another tool we built for local and private voice in the home, and it quickly turns text into natural-sounding speech. Piper is becoming one of the most comprehensive open source text-to-speech options available and has really been building momentum. Recently, we have added support for new languages and provided additional voices for existing ones, including,
Dutch - Pim and Ronnie - new voices
Portuguese (Brazilian) - Cadu and Jeff - new voices
Persian/Farsi - Reza_ibrahim and Ganji - new language
Welsh - Bu_tts - new voices
Swedish - Lisa - new voices
Malayalam - Arjun and Meera - new language
Nepali - Chitwan - new voices
Latvian - aivar- new voices
Slovenian - artur - new voices
Slovak - lili - new voices
English - Sam (non-binary) and Reza_ibrahim - new voices
This brings Piper’s supported languages and dialects from 34 to now 39 🙌! This allows a nice majority of the world’s population (give or take 3 billion people) the ability to generate speech in their native tongue 😎!
Scoring language support
This is the score sheet for just intents... it can get complicated
Home Assistant users, when starting their voice journey, typically ask one question first: “Is my language supported?” Due to how flexible voice assistants in Home Assistant are, this seemingly simple question is quite complicated to answer! At a high level, a voice assistant needs to convert your spoken audio into text (speech-to-text), figure out what you want it to do (intent recognition), and then respond back to you (text-to-speech). Each part of this pipeline can be mixed and matched, and intent recognition can even be augmented with a fallback to a large language model (LLM), which is great at untangling misunderstood words or complex queries.
Considering the whole pipeline, the question “Is my language supported?” becomes “How well does each part support my language?” For Home Assistant Cloud, which uses Microsoft Azure for voice services, we can be confident that all supported languages work well.
Local options like Whisper (speech-to-text) and, to a lesser extent, Piper (text-to-speech), may technically support a language but perform poorly in practice or within the limits of a user’s hardware. Whisper, for example, has models with different sizes that require more powerful hardware to run as they get larger. A language like French may work well enough with the largest Whisper model (which requires a GPU), but is unusable on a Raspberry Pi or even an N100-class PC.
Our own Speech-to-Phrase system supports French well and runs well on a Raspberry Pi 4 or Home Assistant Green. The trade-off is that only a limited set of pre-defined voice commands are supported, so you can’t use an LLM as a fallback (because unexpected commands can’t be converted into text for the LLM to process).
Finally, of course, not everyone wants to (or can) be reliant on the cloud, and they need a fully local voice assistant. This means that language support depends as much on the user’s preferences as their hardware and the available voice services. For these reasons, we have split out language support into three categories based on specific combinations of services:
Cloud - Home Assistant Cloud
Focused Local - Speech-to-Phrase and Piper
Full Local - Whisper and Piper
Each category is given a score from 0 to 3, with 0 meaning it is unsupported and 3 meaning it is fully supported. Users who choose Home Assistant Cloud can look at the Cloud score to determine the level of language support. For users wanting a local voice assistant, they will need to decide between Focused Local (limited commands for low-powered hardware) and Fully Local (open-ended commands for high-powered hardware). Importantly, these scores take into account the availability of voice commands translated by our language leaders. A language’s score in every category will be lowered if it has minimal coverage of useful voice commands.
With these language scores, we hope users will be able to make informed decisions when starting on their voice journeys in Home Assistant. They’re currently featured in our voice setup wizard in Home Assistant, and on our language support page.
What’s in a name
Voice commands in Home Assistant trigger intents, which are flexible actions that use names instead of IDs. Intents handle things like turning devices on or off, or adjusting the color of lights. Until now, sentence translations focused on whether a language supported an intent (like turning devices on/off) but didn’t clearly show whether the command supported device names, areas names, or both. This can change from language to language, which made gaps hard to spot. We’re switching to a new format that highlights these combinations, making it easier for contributors to see what names are supported, which should make for simpler translations.
Continued conversation updates
Since the last voice chapter, the voice team has worked on making Assist more conversational for LLM-based agents. We started with LLM-based agents because it was simpler to iterate on. If the LLM returns with a question, we will detect that and keep the conversation going, without the need for you to say “Ok Nabu” again.
On top of that, you can now initiate a conversation with a new action called start_conversation directly from an automation, or a dashboard. This provides the full spectrum of conversation to LLM-based agents.
Here is a quick demonstration of two features working hand-in-hand:
Media Search and Play intent
What’s great about Home Assistant and open source is that sometimes the best ideas come from other projects in the community. Early on, many people were interested in driving Music Assistant with voice, but central pieces were missing on Home Assistant, such as the ability to search a media library.
We worked hard on bringing this functionality to the core experience of Home Assistant and created a new intent, the Search and Play intent. You can now speak to your voice assistant and ask it to play music in any room in your home.
The intent can be used by an LLM-based conversation agent, but we also have sentences that work without any LLM magic. You can find the English sentences here. As it’s a new feature, support may vary based on your language, and please be patient while our amazing language leaders make these translations.
Future work - Assist will have something to say
Talking to your home should feel as natural as chatting with a friend across the kitchen counter. Large-language models (LLMs) already prove how smooth that back-and-forth can be, now we want every Home Assistant installation to enjoy the same experience. We’re therefore zeroing in on three key use-cases for the default conversation agent, which include critical confirmations, follow-ups, and custom conversations. Just note these are still at the early stages of development and it may be some time before you see some of these features.
Critical confirmations
Some actions are too important to execute without a quick double-check. Unlocking the front door, closing shutters, or running a “leaving home” script. We want you to be able to mark those entities as protected. Whenever you speak a command that touches one of those entities, Assist will ask for verbal confirmation before acting:
Ok Nabu, unlock the front door Are you sure?
Yes Unlocked
Because every household is different, we are thinking about managing these confirmations per entity and making them fully user-configurable.
Follow-up on missing parameters
Sometimes Assist grasps what you want, but needs more detail to carry it out. Instead of failing, we want Assist to ask for the missing piece proactively. Here is an example to illustrate.
Ok Nabu, set a timer For how long?
15 minutes Timer started
For now, we are still assessing the relevant sentences for that use case. We’re implementing follow-ups with timers, though finding more is not currently our top priority. We are, however, open to suggestions.
Custom conversations
As with any other part of Home Assistant, we want the conversation aspect of Assist to be personalized. Simple voice transactions can already be created with our automation engine using the conversation trigger and the set_conversation_response action.
We want to bring the same level of customization to conversations, allowing you to create fully local, predefined conversations to be triggered whenever you need them, such as when you enter a room, start your bedtime routine, etc.
We are focusing first on making custom conversations possible, so that you can show us what you are building with this new powerful tool. We will then tackle the critical confirmations use case, and finally, the follow-ups when parameters are missing.
Let’s keep moving Open Voice forward
Only a couple of years ago, voice control was the domain of data-hungry corporations, and basically none of this open technology existed. Now, as a community, we’ve built all the parts needed to have a highly functional voice assistant, which is completely open and free for anyone to use (or even build on top of).
Every chapter, we make steady progress, which is only possible with your support. Whether from those who fund its development by supporting the Open Home Foundation (by subscribing to Home Assistant Cloud, and buying official Home Assistant hardware) or those who contribute their time to improving it. As always, we want to support every language possible, and if you don’t see your native tongue on our supported list, please consider contributing to this project.
Our first Home Assistant Community Day was a humbling success — we knew that the community had a desire to have something coordinated like this, but we really did not expect just how widely this would spread. 💖
So much happened in such a short window of time, so let’s talk about how this year’s event went and what the future looks like for Home Assistant meetups.
It started with a question…
Home Assistant Community Day was born from a conversation last year where we asked, “Would the community even want this?” We dropped hints here and there to test how y’all would react to a worldwide event, and after weeks of planning, the response to the event announcement was overwhelmingly positive. 🤩
First, THANK YOU 🙏🏻 to all the hosts for their local coordination, community members who showed up, and the venues that made all this possible. I learned so much with your help, and it will make next year’s Community Day one to remember.
…that turned into a movement…
When I announced Home Assistant Community Day, I didn’t give hosts a lot to work with. I didn’t want the community to think they had to fit into a specific format, and wanted it to be unique to their region. It became clear pretty quickly what information was missing and what people wanted guidance on. For example, some asked for suggestions on what types of venues to book or which activities could make the event more interactive, such as quizzes or presentations. Your questions helped us make it easier for hosts to build cool events, thank you for those!
All around the world, everyone came together to talk about Home Assistant (and its related projects). You swapped hardware, you showed off your automations or dashboards, you participated in quizzes, and you formed new bonds with people in your area who share your passion for Home Assistant. Some people had custom swag printed, others received hardware from a couple of our Works With Home Assistant partners, and one group had a Hackathon event the day before! So many great photos were shared from the events that we can’t possibly include them all here! You can find plenty more by searching #HADay2025 on social media or by checking the Discord meetup thread for this event. It was seriously one of the most uplifting things I’ve had the pleasure to not only facilitate, but also witness. 🥰
…but not without complications
Swag was an unexpected complication. When I first announced the day, we planned to have me order the merch and then send it off to the hosts. This would require collecting addresses and sending packages to people around the world, and we realized quickly that the logistics of that would end up a mess. Instead, we made the sticker designs (along with the Luma calendar invite graphic) publicly available for the hosts to print something locally.
When we did this, we (as the Open Home Foundation) committed to reimbursing the hosts for these swag purchases, along with venue fees or other reasonable expenses they might have on the day. The idea being that no host should be out of pocket for supporting their local Home Assistant community. You support us (by contributing time or by being Home Assistant Cloud subscribers), and we want to give back to the community in any way we can.
I’m excited to share that we plan on using those same guidelines for any community meetup, not just the ones that happen on Community Day! 👏🏻 We’re building a new community page where all of these details will be available, so stay tuned for more information.
Some stats for the nerds
We had 82 events with over 1,600 registered guests, spanning nearly every corner of the globe. The events started in New Zealand and ended on the West Coast of North America. This meant we had meetups held from 10 pm May 23 to midnight May 25 (UTC time), that’s over 26 hours of constant partying! 🥳
We had events in every major region except Australia! Most meetups were in Europe and North America — probably not too surprising for most. The smallest events had 2 registered guests, and the event that had the largest number of registered guests was Utrecht, with 200!
With an average of 20 people attending a meetup, we know that we can advise a lower capacity limit for future events. This will be included as part of the guidelines we’ll have on that new community page I mentioned above.
Keep the fun going!
Many hosts told me that they’ve created a new space for the attendees to chat or that they were going to start doing some regular meetups (some have done both!). Since Luma worked so well for us for Community Day, I’ve created a general calendar for meetups! I also have graphic assets publicly available for your Luma event and any social media you’d like to post your event on — use the 1:1 ratio image for the invite image on Luma. There are two events live there now, way to go Chile (Santiago) and Belgium (Hasselt)! 🤩
While we don’t have a solid date for next year’s Home Assistant Community Day, I can at least let you know that it will not be in May and instead later in the year. I’m aiming to give you at least a two-month heads-up for when it will be this time. We’re planning on doing something bigger and I can’t wait to do it all again with y’all next year. 😌
We are already half way through 2025, can you believe it? I personally can’t, as it feels like we just started the year. Not just that, there are so many exciting things to still come this year, and I can’t wait to share them with you!
Anyway, the June release is here! A week later than usual, but it also means we had an extra week to polish and beta test this release. Like the previous release, this release is packed with quality-of-life improvements!
Last release my favorite feature was the new entity picker; this release, we improved ALL other pickers! No surprise that this, again, makes it to my top favorite this release. Although the ability to group media players directly from the media player card is a close second. It is so nice to see how Home Assistant keeps getting better and better, and how our community keeps contributing to it. 😍
If you are leveraging Bluetooth in your Home Assistant setup, you will also love the new Bluetooth connection graph that shows how your Bluetooth devices are connected, including Bluetooth proxies. Troubleshooting Bluetooth has become so much easier now!
Enjoy the release!
../Frenck
PS: We will pick up the regular release schedule again now, so expect the next release on the first Wednesday of July (July 2nd).
Pickers are those dropdowns you use to select entities, devices, areas, and more. Pickers are everywhere in Home Assistant, being used in automations, scripts, and configuration options.
Last release, we introduced a new entity picker, which was a big hit! This release takes things further by refining the search experience based on your feedback.
Even better, that same improved search experience now comes to the area, category, floor, label, user, and device pickers too! They are consistent, fast, and easy to use, no matter what you’re selecting.
And the device picker? It now has a fresh look to match, complete with manufacturer logos and styling inspired by the entity picker.
Making sense of Bluetooth
Home Assistant has powerful Bluetooth capabilities, and with the use of something like ESPHome Bluetooth proxies, you can extend your Bluetooth network to cover your entire home. This release brings some improvements to the Bluetooth integration that will help you understand your Bluetooth network better.
The Bluetooth integration now provides a visualization that shows how your Bluetooth devices are connected to your Home Assistant instance, whether that’s directly to your system or through a Bluetooth proxy.
It not only shows the actively connected devices, but also the devices that are in range, but not yet known to Home Assistant. This is a great way to see what devices are around you and where they can be potentially connected.
Oh! And now that the Bluetooth integration has a sleek new visualization, the Zigbee integration, which already has a similar feature, has been given a visual update. This makes visualizations consistent across Home Assistant.
Iterations of the experimental area dashboard
In the April release, we introduced a new experimental Areas dashboard, which automatically generates a ready-to-use dashboard based on the areas you’ve set up in your home. It uses sections and tile cards for a modern, clean, and intuitive look — all built for you in a couple of clicks.
As this is experimental, it is being continuously iterated on. This release brings some nice changes, based on your feedback, to subtly refine the experience.
We added a new “Actions” section that includes scripts, automations, and scenes. We also added number entities (and number helpers), button entities (and button helpers), counters, and timer helpers to the “Others” section. This makes it easier to find and manage your automations and scenes in the context of your areas.
Finally, we renamed the “Entertainment” section to “Media players”. This makes it clearer that this section is specifically for your players, and may not include your DIY arcade machine 👾.
Deprecating installation methods and 32-bit architectures
This release introduces important deprecation announcements, and though they only affect a small percentage of users, it is important that they understand the impacts. We’ve written a detailed blog that explains the rationale, timeline, and tips on how to migrate — which I highly suggest reading if you think you’re affected.
Installation Methods: The Core and Supervised installation methods are now officially deprecated. These are advanced setups that are only used by a small portion of users, as they involve running Home Assistant in a Python environment or installing the Supervisor on top of your own operating system. Moving forward, we are focusing our support on the more streamlined and maintainable installation methods: Home Assistant OS and Home Assistant Container.
32-bit Architectures: Support for legacy 32-bit CPU architectures (i386, armhf, and armv7) is also being deprecated. These architectures are increasingly uncommon and pose challenges for maintaining compatibility and performance.
To assist you during this transition, Home Assistant will now raise a repair issue after upgrading if your system is affected by these deprecations. This notification will appear in the repair dashboard, providing information about the deprecation along with guidance on how to migrate to a supported setup.
It’s important to note that while these methods and architectures are deprecated, they will continue to receive support for the next six months, until the release of Home Assistant 2025.12. You can continue to use them after this point, but we would highly recommend migrating. After this 6-month period, they will become unsupported, meaning they will no longer receive updates or official assistance.
If you don’t receive this repair message, you’re not affected. However, you can double-check using our guide if you’d like. We also have specific information on what becoming deprecated and unsupported means for your installation. Lastly, we have detailed information on how best to migrate to a supported system.
Integrations
Thanks to our community for keeping pace with the new integrationsIntegrations connect and integrate Home Assistant with your devices, services, and more. [Learn more]
and improvements to existing ones! You’re all awesome 🥰
New integrations
We welcome the following new integrations in this release:
Alexa Devices, added by @chemelli74
Connect to and control your Amazon devices like Echo, Fire TV, and Alexa-enabled devices.
Immich, added by @mib1185
Integrates with Immich App, a self-hosted photo and video backup solution that puts you in control of your personal media.
Probe Plus, added by @pantherale0
Integrate wireless Bluetooth meat thermometers compatible with the PROBE PLUS app, bringing real-time temperature monitoring during cooking into Home Assistant.
This release also has new virtual integrations. Virtual integrations are stubs that are handled by other (existing) integrations to help with findability. These ones are new:
It is not just new integrationsIntegrations connect and integrate Home Assistant with your devices, services, and more. [Learn more] that have been added; existing
integrations are also being constantly improved. Here are some of the noteworthy
changes to existing integrations:
@bdraco added support for updating ESPHome devices that are in deep sleep.
A very welcome improvement for battery-powered devices!
The Homee integration now supports fans and provides alarm control panels.
Thanks for expanding its capabilities, @Taraman17!
Teslemetry keeps getting better—@Bre77 added a hazard lights binary sensor,
a valet mode switch, and a credit balance sensor. Nice!
@bieniu improved the Shelly integration to use sub-devices for multi-channel devices.
A notable change for complex setups!
The SmartThings integration saw a huge round of improvements by @joostlek, including:
support for cooktops, hobs, water heaters, hood fan speeds, Steam closet modes,
freezer and cooler temperatures, washer spin and soil levels, valve positions,
heat pump zone climates, and atmospheric pressure. Amazing!
Miele keeps on shining with new features from @astrandb, like vacuum support,
drying step sensors, washer-dryer program phases, and hob plate sensors.
@generically-named added energy and water forecasts too—very cool!
And finally, @chemelli74 added preset mode support to the Comelit climate integration.
Another nice quality-of-life addition!
Integration quality scale achievements
One thing we are incredibly proud of in Home Assistant is our
integration quality scale. This scale helps us and our contributors to ensure
integrations are of high quality, maintainable, and provide the best possible
user experience.
This release, we celebrate several integrationsIntegrations connect and integrate Home Assistant with your devices, services, and more. [Learn more] that have improved
their quality scale:
This is a huge achievement for these integrations and their maintainers. The
effort and dedication required to reach these quality levels is significant,
as it involves extensive testing, documentation, error handling, and often
complete rewrites of parts of the integration.
A big thank you to all the contributors involved! 👏
Farewell to the following
The following integrationsIntegrations connect and integrate Home Assistant with your devices, services, and more. [Learn more] are also no longer available as
of this release:
RTSPtoWebRTC has been removed as it has been replaced by the go2rtc integration.
Other noteworthy changes
There are many more improvements in this release; here are some of the other noteworthy changes:
A small but neat one: @balloob made it so discoveries shown on an integration page are now sorted by title. Helpful!
The Home Assistant Cloud integration will now raise a repair issue when your subscription has expired, helping make sure you’re aware and not caught off guard. Nice one, @ludeeus!
More backup improvements! 🎉
Home Assistant will now raise a repair issue if not all add-ons or folders were successfully backed up. Thanks, @emontnemery!
@agners made it so that when an add-on is auto-updated, a backup is now correctly created as an “add-on”-backup. Great!
A new automatic backup event entity has been added to track automatic backups made by the system. Great addition by @mib1185!
@lboue added support for the Matter pump device type. Another one
added to the list—awesome!
The Template integration got a big boost!
@Petro31 added modern-style YAML support for template fans, locks, alarm control panels, vacuums, and covers. So clean!
You can now create trigger-based template covers. Yep, also by @Petro31!
The trigger_variables option is now supported when using for in a trigger. A small but powerful feature. Thanks, @Petro31!
New template filters! You can now use from_hex, and base64_encode now supports both bytes and strings. Handy additions from @Petro31!
New sensor capabilities:
@Passific added a new device class and units for reactive energy. Nice!
A new unit for energy distance (Wh/km) has been added. Thanks, @frenck!
Sensors now support mg/m³ as a concentration unit—another nice addition by @frenck!
@Arnie97 added support for liters as a unit for gas sensors. Much appreciated!
The new recorder.get_statistics action lets you query statistics directly
from the recorder. Powerful stuff, @Hypfer!
Sidebar improvements
If you didn’t know yet, you can actually adjust the contents of your Home Assistant sidebar. You can change the order and show/hide items by pressing and holding the “Home Assistant” text at the top of the sidebar, or by going to your user profile page and selecting “Change the order and hide items from the sidebar”.
This release brings a couple of much-needed improvements to this feature. When you customize the sidebar, it will now bring up a nice and clean dialog that allows you to drag and drop items to change their order, or hide them by clicking the eye icon next to them.
The biggest improvement is actually found somewhere else! Previously, the customization of the sidebar was only applied to the device you made the changes on; and even more annoying, sometimes it would lose the changes, or it would magically forget your settings on our [mobile companion apps] when you switched between your home network (and thus the internal URL). 🥲
In this release, this annoyance has been fixed! The sidebar customization is now stored in your user profile, so your personalized layout follows you across all devices you use with Home Assistant!
Join/unjoin groups of media players
Media players in Home Assistant can provide actions for media players to join or unjoin a group of media players. This is a great way to dynamically control your media players and the groups they are in. However, this feature was somewhat limited, as it could only be used as actions within things like automations or scripts.
You can now use the media player card to join or unjoin groups of media players. This is a great way to control your media players and their groups directly from the UI.
Please note that, you can only join or unjoin groups of media players that support this feature. Unfortunately, not all media players support this, so it might not be available for all your media players.
Anyhow, amazing contribution Alex! 👏
Reset/restore entity IDs
You can now restore the ID of an entity to its original value. This is useful if you have renamed an entity and want to revert it back to its original entity ID.
This feature is available in the entity configuration dialog, where you can now find a “Reset” icon on the entity ID field. When clicked, it will restore the entity ID to its original value. Additionally, there is the option called “Recreate entity IDs” in the top right three-dotted menu on the device page, to reset all entity IDs of a device to their original values.
Patch releases
We will also release patch releases for Home Assistant 2025.6 in June.
These patch releases only contain bug fixes. Our goal is to release a patch
release every Friday.
Home Assistant has a great community of users who are all more than willing
to help each other out. So, join us!
Our very active Discord chat server is an excellent place to be
at, and don’t forget to join our amazing forums.
Found a bug or issue? Please report it in our issue tracker,
to get it fixed! Or, check our help page for guidance for more
places you can go.
Are you more into email? Sign-up for our Building the Open Home Newsletter
to get the latest news about features, things happening in our community and
other news about building an Open Home; straight into your inbox.
Backward-incompatible changes
We do our best to avoid making changes to existing functionality that might
unexpectedly impact your Home Assistant installation. Unfortunately, sometimes,
it is inevitable.
We always make sure to document these changes to make the transition as easy as
possible for you. This release has the following backward-incompatible changes:
To keep using this integration, you will need to provide a new API key, which can be obtained by signing up for DataHub and subscribing to Global spot dataset. The free subscription provides 360 calls per day, which is enough for this integration to work.
Some sensors have changed due to the new data source:
Hourly forecast provided by the weather entity now has actual hourly entries as opposed to 3-hourly in the old version
Instead of visibility and visibility_distance sensors showing a range and qualitative description (such as “1-4 km” and “Poor”), the integration now exposes a single visibility sensor with precise visibility distance in meters
The integration no longer exposes “daily” and “3-hourly” sensors; there is a single set of them now
The integration sensors no longer expose Site ID, Site name and Sensor ID attributes as these don’t provide any additional value
If you are a custom integration developer and want to learn about changes and
new features available for your integration: Be sure to follow our
developer blog. The following changes are the most notable for this release:
We are today officially deprecating two installation methods and three legacy CPU architectures. We always strive to have Home Assistant run on almost anything, but sometimes we must make difficult decisions to keep the project moving forward. Though these changes will only affect a small percentage of Home Assistant users, we want to do everything in our power to make this easy for those who may need to migrate.
Beginning with Home Assistant 2025.6, affected systems will display a notification after updating, indicating that support will end in six months (with release 2025.12) and include a recommendation to migrate to a supported system. In this post, we’ll go into our thinking on these deprecations and our findings after consulting the community on these changes.
We have deprecated the following installation methods:
Home Assistant Core installation method, where you run your system in a Python environment, not to be confused with Container (for example, running your system in Docker).
Home Assistant’s Supervised installation method, which involves running your own operating system, then installing the Supervisor and other requirements on top of that.
These are advanced installation methods, with only a small percentage of the community opting to use them. If you are using these methods, you can continue to do so (you can even continue to update your system), but in six months time, you will no longer be supported, which I’ll explain the impacts of in the next section. References to these installation methods will be removed from our documentation after our next release (2025.6). Going forward Home Assistant OS and Home Assistant Container will become the only supported installation methods.
In the future, only the currently supported 64-bit architectures (aarch64 and amd64) will be used. The following legacy architectures are being deprecated:
i386 (32-bit x86) is an architecture used by Intel and AMD predominantly before 2003, but some later processors still utilized it (e.g., early Intel Atom models).
armhf (32-bit ARM hard-float) was used by very early single-board computers, notably the original Raspberry Pi.
armv7 (32-bit ARM) was used by a number of early single-board computers, most notably the Raspberry Pi 2.
If you are one of the few with a system using these architectures, you will receive a notification after updating to 2025.6, and it will describe how to migrate your system. In six months, your system will become unsupported and will no longer receive updates.
In the simplest terms, deprecation is where you stop recommending a certain feature to users as you intend to remove it soon. As we deprecated the Core and Supervised installations methods today, that means we are now working to remove all references to them from our documentation. The goal is to guide new users towards installation methods we plan to support long term, and discourage the use of those that are being phased out.
Even though they are being deprecated, we are committing to support them for a further six months (until release 2025.12), giving existing users time to migrate to Home Assistant OS or Container. During this time we will ensure these installation types keep functioning as normal during the deprecation period. However, after those six months have elapsed, these methods will become unsupported, which means issue reports will no longer be accepted. As these installation methods are used for the development of Home Assistant, it will still be technically possible to update them. We still would recommend migrating to a supported method, but that’s your choice.
As i386, armhf, and armv7 architectures have also been deprecated, we are currently removing references to them from our documentation. More importantly, they will also be subject to a six-month support window. After that support ends (from release 2025.12 onwards), we will no longer build or release distributions or containers targeting these platforms. This will mean that in six months’ time, there will be no more updates for these systems, and if users encounter issues, they will no longer be able to ask for support from Home Assistant maintainers.
The Core and Supervised installation methods are not only complex for users to install and maintain — they’re also challenging for the Home Assistant team to support. In the past, there were compelling reasons, outside Home Assistant development, to run these installation methods, but for most people those reasons are disappearing. Home Assistant OS is very capable with a rich ecosystem of add-ons, while also being easy to run in a virtual machine. Container adoption has become mainstream, now being widely available along with systems having more resources to run them. Steadily, we’ve seen year-on-year reductions in the percentage of Core and Supervised installations (currently standing at 2.5% and 3.3% respectively).
As Core and Supervised are more complex to maintain, they generate more issues that are more difficult to solve. This complexity places a disproportionate burden on our community-driven support system, where volunteers generously give their time to help others. It also takes time away from assisting the vast majority of users who are on the simpler to maintain installation methods. Along with this, new users could sometimes be swayed into running Core or Supervised, and have a bad experience that could cause them to give up on the best way to automate their home. By focusing our support and documentation on OS and Container methods, we can greatly improve the onboarding experience and ensure a smoother start for new users.
Legacy 32-bit architectures
Though Home Assistant is very lean and can run great on older or low-spec hardware, the architectures we’re deprecating are definitely on the leaner side of the spectrum. That probably explains why we see such low usage figures, with i386 and armhf architectures representing less than 0.5% of installations each, and armv7 at only 0.95% of installations. More than half of Home Assistant systems using armv7 have hardware that is capable of running 64-bit operating systems, like Raspberry Pi 3 and 4. This hardware can actually upgrade and migrate to a supported 64-bit version of our Home Assistant Operating System
The broader software and hardware industries have also shifted away from these older 32-bit systems. Most have adopted 64-bit architectures such as amd64 and aarch64, and we are seeing more projects we depend on no longer supporting these 32-bit architectures. There have already been several instances where keeping support for these architectures has held back the development of new features.
Your feedback
For any major change, it is our goal to make sure the community guides this decision-making. When our maintainers initially proposed these deprecations, we shared this plan with the community (in our forum, GitHub, Discord, Reddit, and other social channels), using it to gather feedback. It was a constructive, civil discussion, and we learned a couple of interesting things that have helped us move this decision forward.
First, our current wording is confusing to the community. Core and Supervisor are components of Home Assistant OS, but are also similar—or the same—as the names of installation methods, which is not super clear for new users. We also found these installation methods being used in ways we never expected, and there are a good number of people who were already running Home Assistant in custom and unsupported ways, not even realizing they were unsupported.
Many of those impacted asked for better guidance on how to migrate. A good number were unaware of our expansion of backup and restore features to all installation methods, significantly smoothing their transition to a new platform.
Check if you’re affected
The blue arrow shows your installation type, and the red arrow displays the architecture.
If you are unsure which installation method you are running:
Select this link OR Navigate to Settings > System > Repairs, select the three-dotted menu in the top right corner, and select System information.
Check the Installation type field. If you are running Home Assistant OS, or Container, you are fine as the installation method deprecation doesn’t apply to you.
In this same window, you can find the architecture as well:
The CPU architecture field will tell you exactly which architecture you are using. If you are seeing aarch64 or x86_64 here, you are fine as the architecture deprecation doesn’t apply to you.
How to migrate
Green are staying, and red are deprecated.
If it’s been a while since you’ve migrated Home Assistant systems, a lot has improved over the past several years. Switching systems is as easy as making a backup, downloading it, and restoring it during the initialization of your new system (Home Assistant Cloud subscribers using off-site backups can restore with just their password). Every Home Assistant installation method now has backups, and you can restore backups from any method onto another regardless of the differences in architecture. In many cases, very little needs to be done once the restore is successful (to the dismay of tinkerers online). Our documentation has a full list of guides on how to install Home Assistant on different hardware.
Before you think about migrating to a different installation method, you can always choose to stick with what you have. Just because it becomes unsupported by the Home Assistant project, it doesn’t mean you can’t keep running it like you do today. That choice is up to you.
Need
Currently using
Migrate to
Home Assistant with add-ons
Supervised
Home Assistant OS
A system without Home Assistant OS support
Supervised
Container (many add-ons can be run as containers alongside Home Assistant)
Full control of the host system
Supervised
Run Home Assistant OS in a VM, or Container (alongside add-on containers)
Lightweight solution
Core
Container
For Home Assistant Core users, the closest alternative is Home Assistant Container, which is most commonly used with Docker. If you can dedicate a device exclusively to Home Assistant, the recommended installation method is Home Assistant OS, which gives an appliance-like setup.
For Home Assistant Supervised users, we recommend migrating to Home Assistant OS—it supports everything Supervised does, including add-ons. If you want more control over the OS, you can also run Home Assistant OS in a virtual machine, like with Proxmox, or go the Home Assistant Container path alternatively.
For deprecated architectures, there is generally no supported migration path using your existing hardware. You will therefore need to find alternative hardware compatible with Home Assistant OS or Container. Second-hand single-board computers and recycled small-form-factor office machines are affordable and sustainable options. In some cases, your system may be running a 32-bit operating system, but is capable of running a 64-bit one (Raspberry Pi 3 and 4 are examples of systems often running a 32-bit OS despite being capable of running 64-bit). In this case, you will need to install a 64-bit capable operating system and restore Home Assistant on that system.
Frequently asked questions
If Home Assistant Core is used for development, and part of the developer docs, why not just offer it to end-users?
This is not just about technical viability, it is also about helping and supporting people with their issues, problems, and questions, in our forums and chat. Having these options available to less technical people leads to support queries, and if they have a bad first experience that reflects poorly on the project. Users are free to continue running their systems the way they would like.
No support for Core or Supervised—can I still use them?
You can still use them even if we no longer support them. There are many users running Home Assistant in all kinds of unofficial ways. This change just means we are removing it from our end-user documentation and will no longer recommend using these installation methods from an official standpoint.
Will the developer documentation on these things remain?
Yes, those will remain. The developer documentation for running Home Assistant’s Core Python application directly in a Python virtual environment will remain. This is how we develop. This proposal is about removing end-user documentation and support.
Can I start maintaining these installation methods?
While maintaining these methods will require effort, the community is free to move documentation and code to new independent projects. Our maintainers will no longer accept issues or provide end-user documentation, but that shouldn’t stop anyone passionate about them from continuing to run them, or helping others to do the same.
Can I reproduce any of the installations you offer?
Yes, of course! All our pipelines are open source and transparent, you can always recreate any of our pipelines and release artifacts; either automated or manual.
Is this the first step towards making Home Assistant closed source/proprietary/commercial?
No, that is impossible. Home Assistant will always remain open source. Home Assistant is owned by the Open Home Foundation, a Swiss non-profit foundation that is audited and governed, and—by law—bound by its mission. This means it will always be open source and cannot be bought or sold.
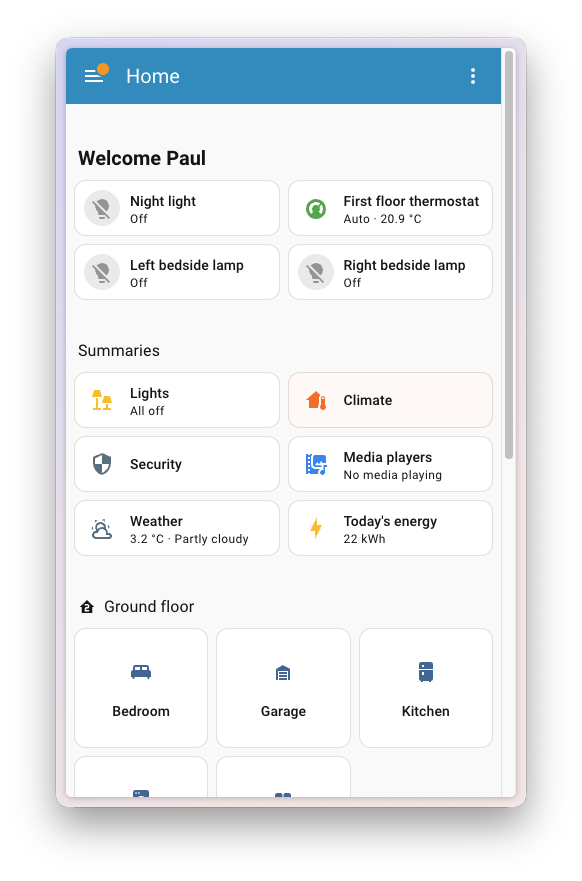
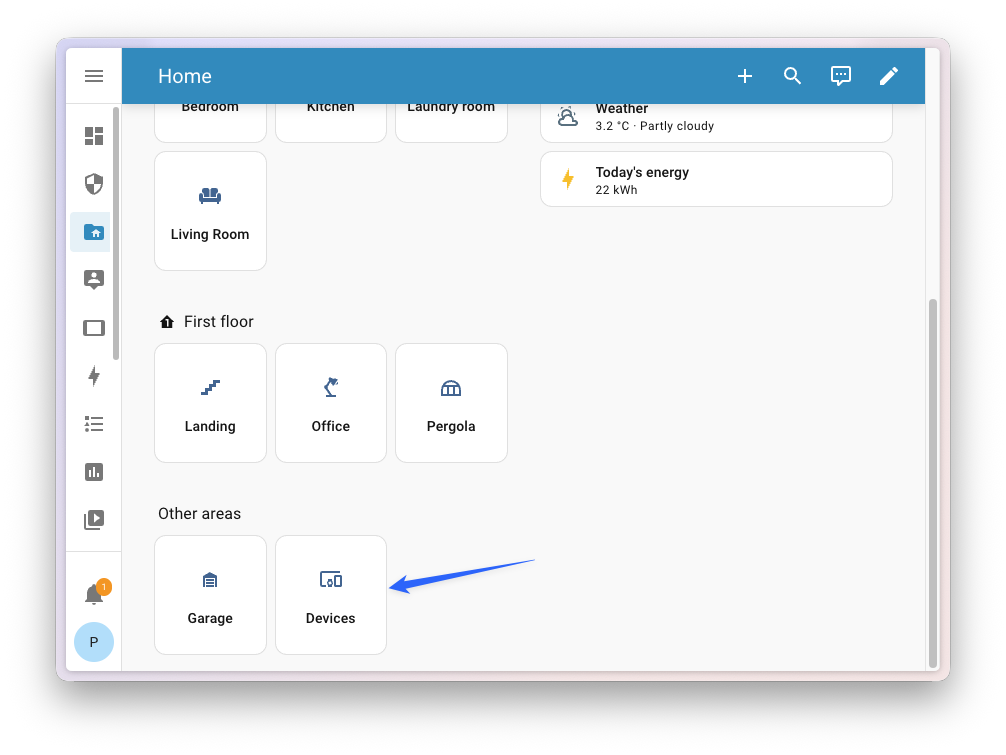 The new Devices page shows devices not assigned to any area.
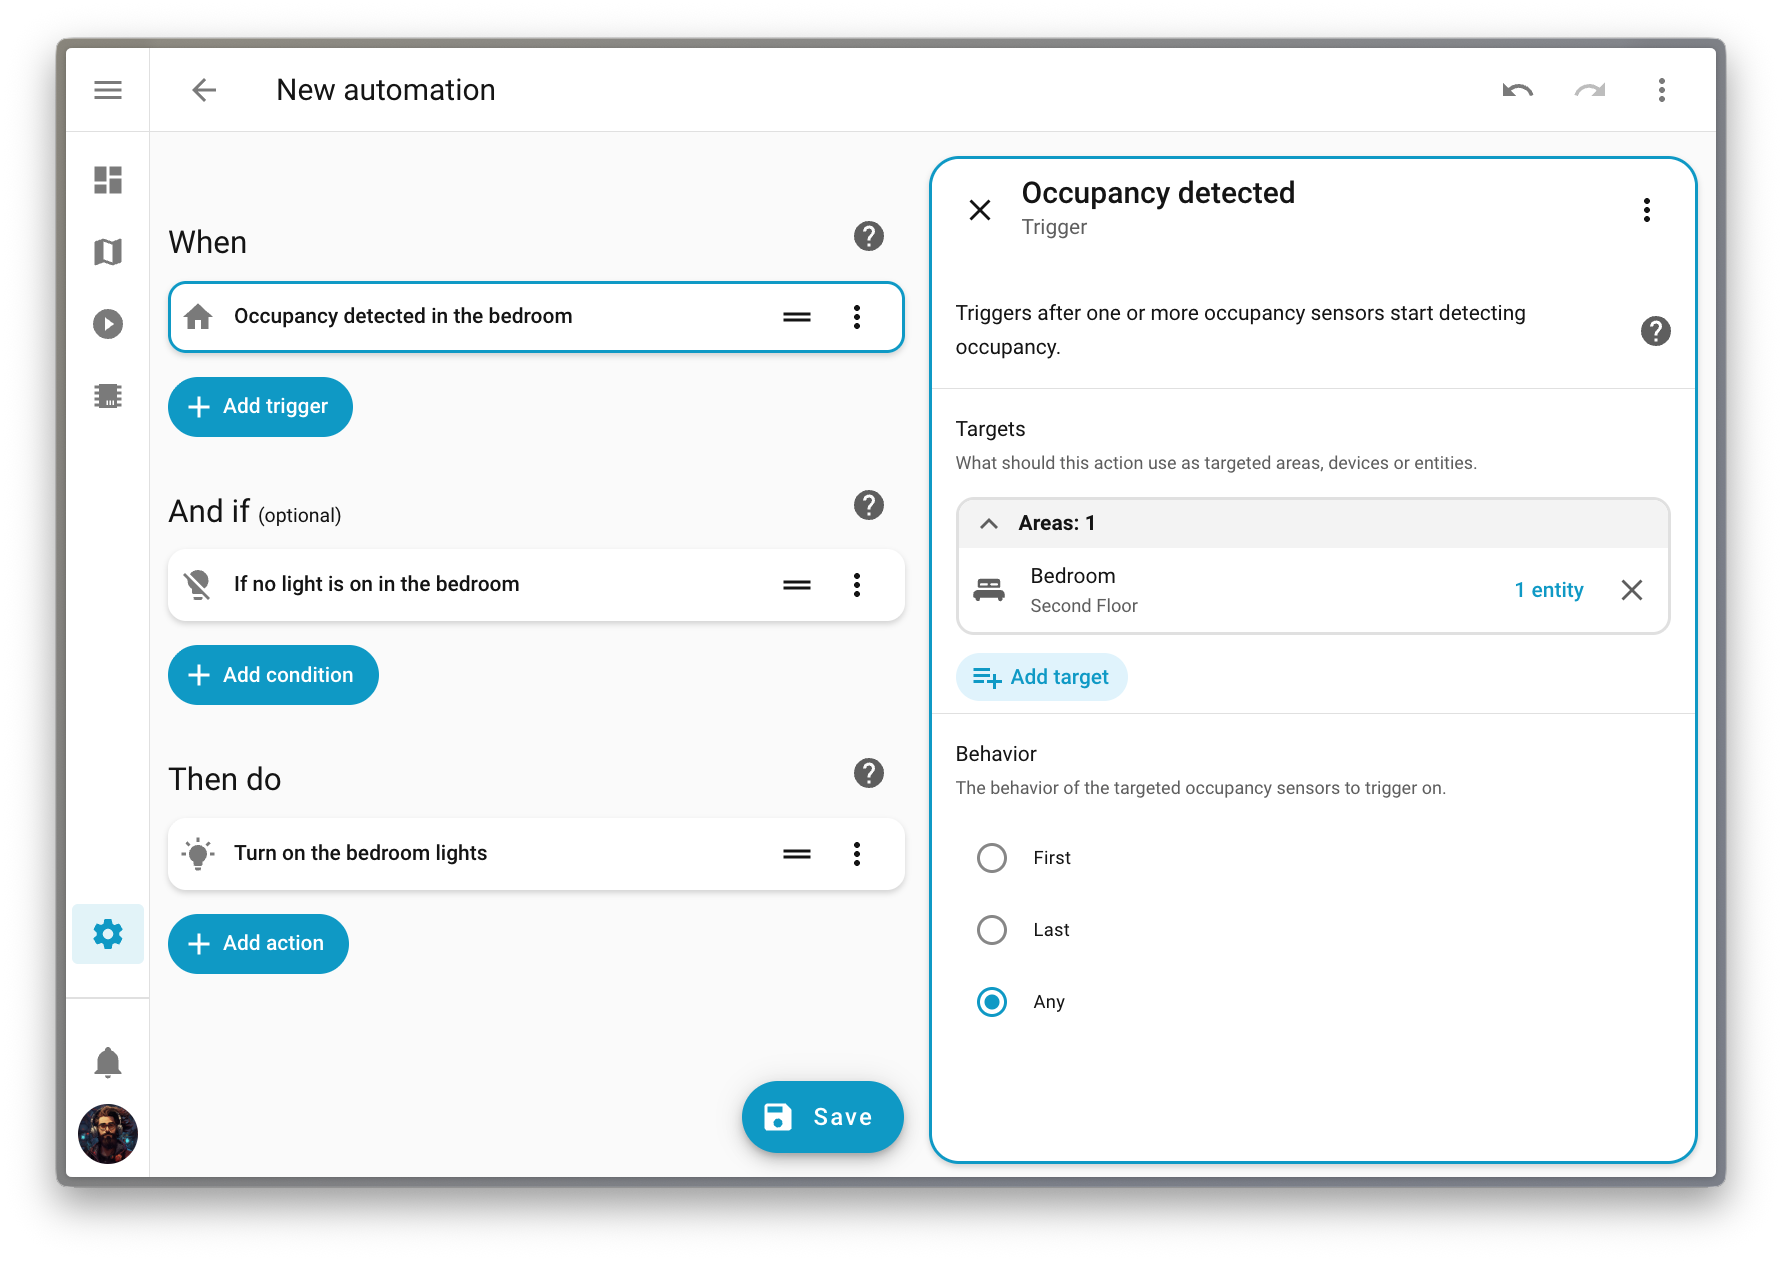
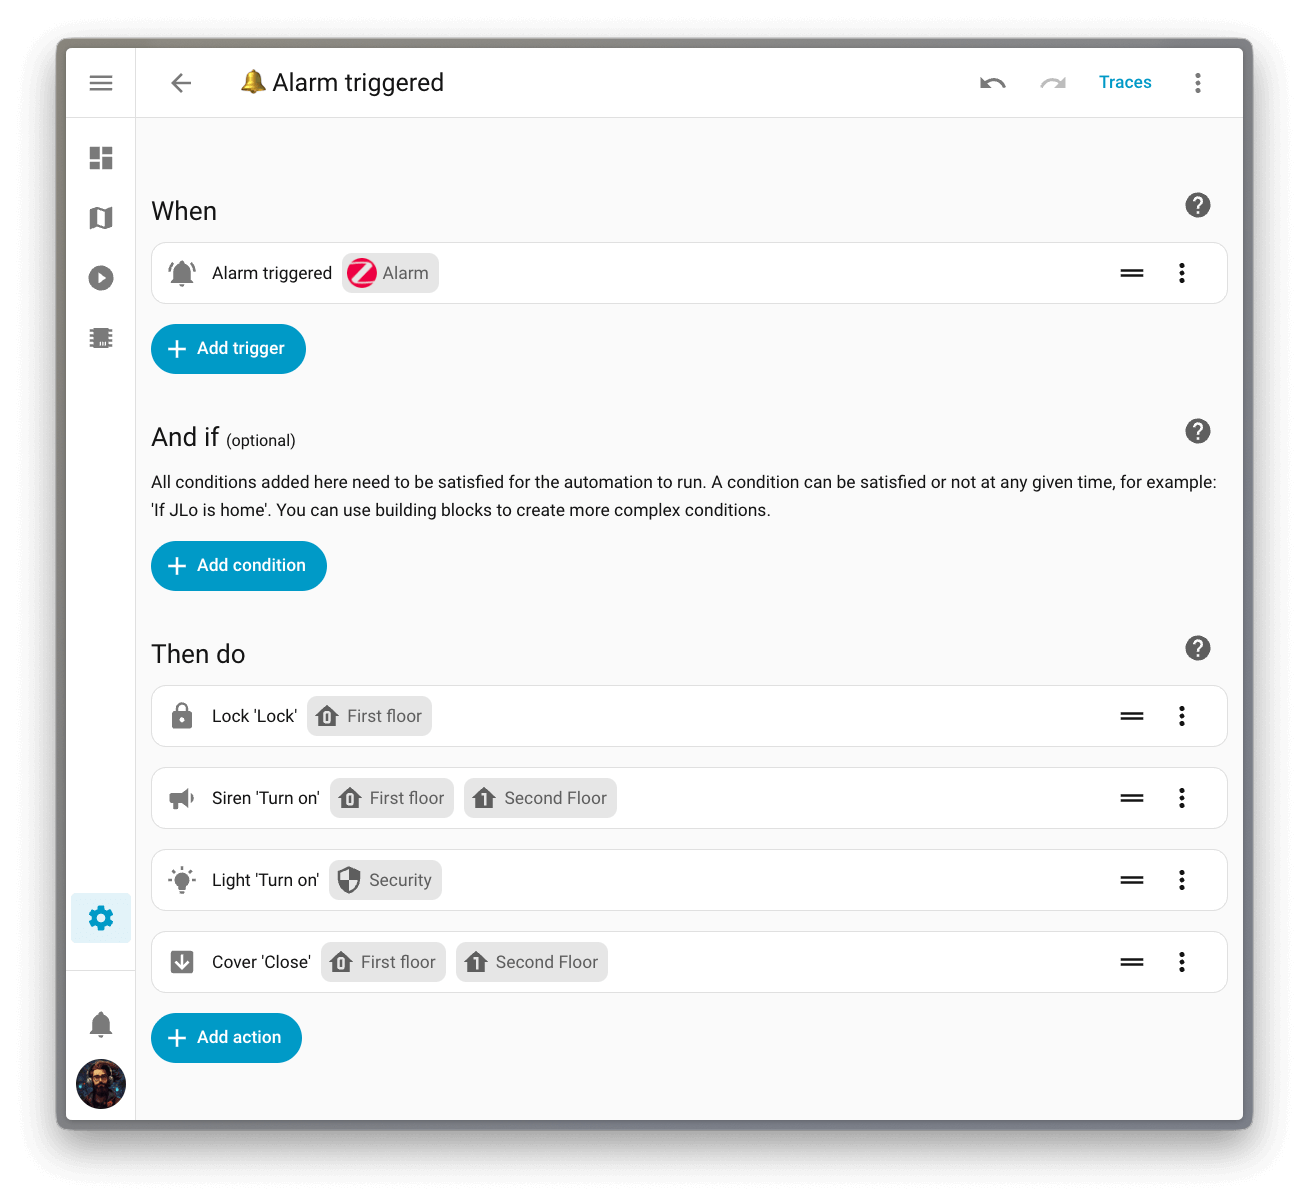
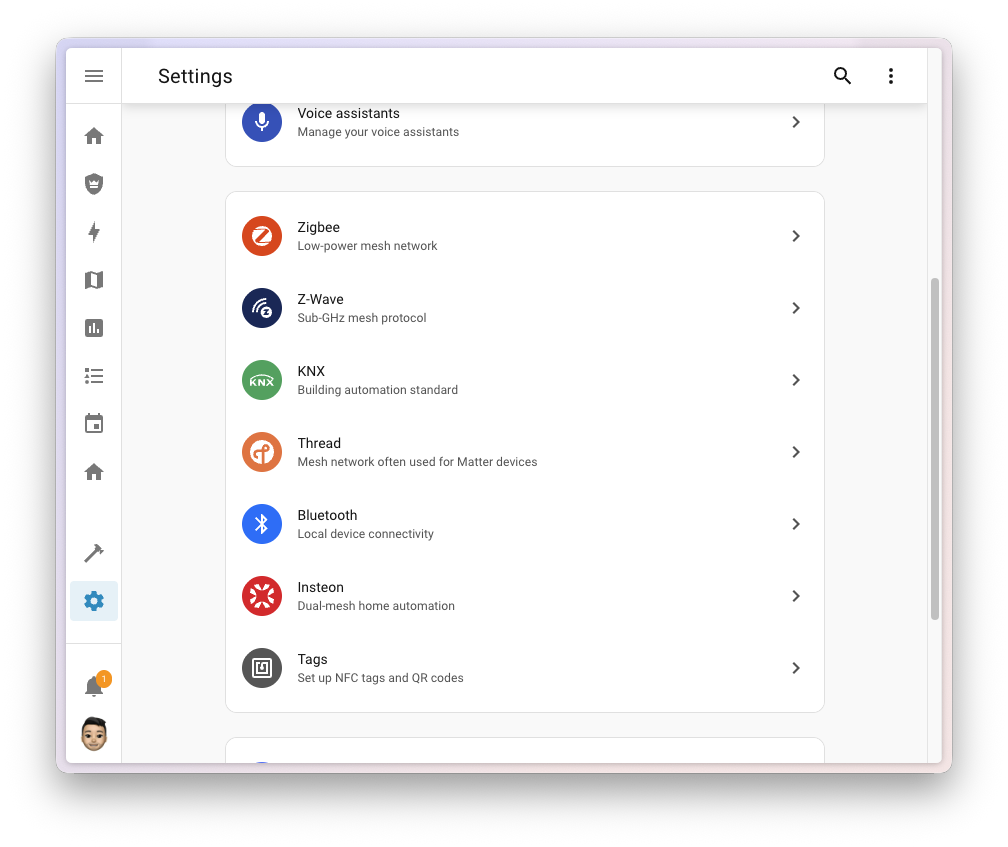
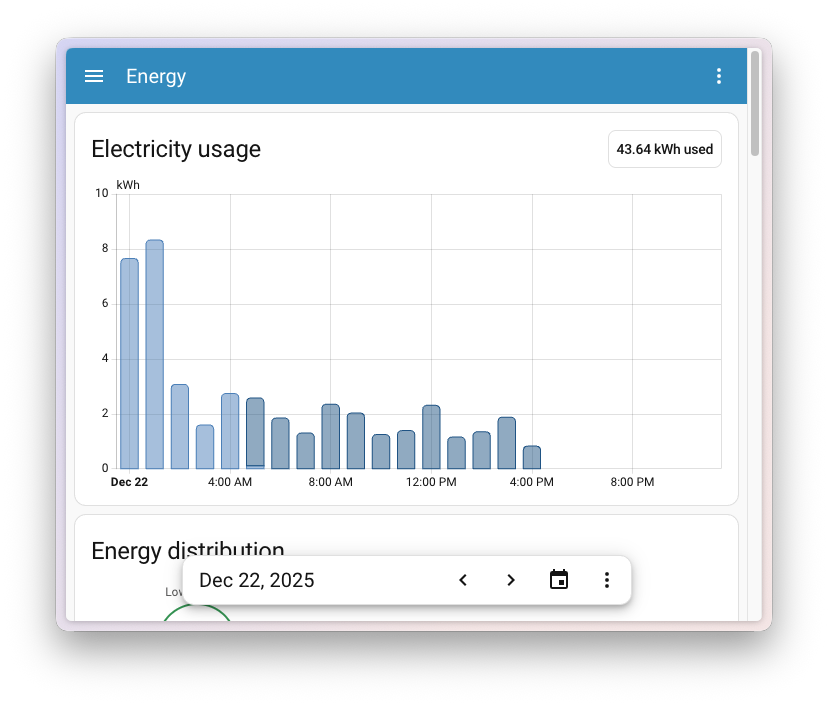
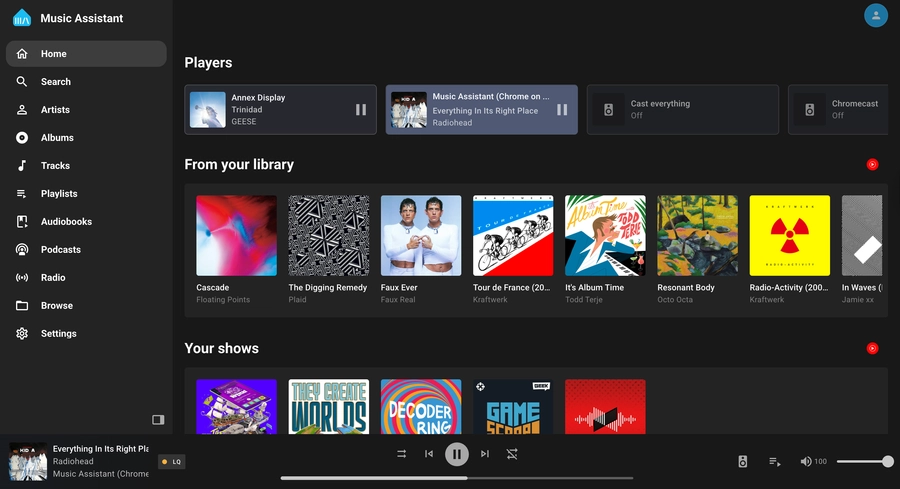 A well deserved visual refresh
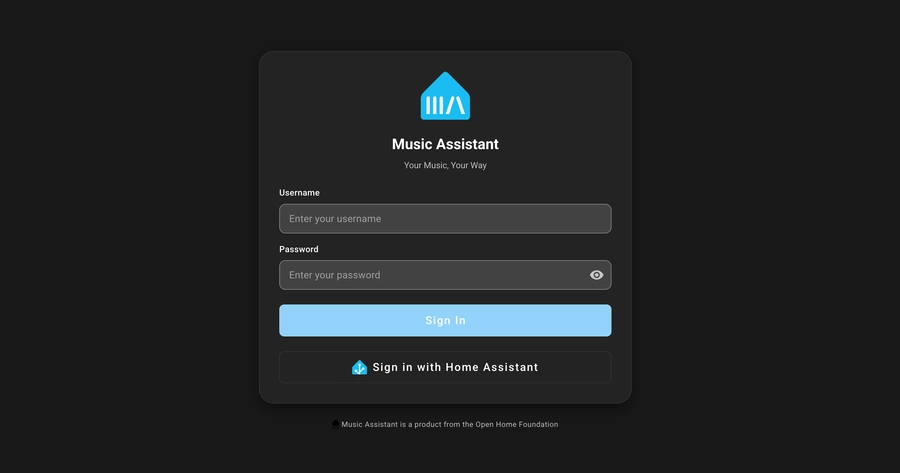 User profiles for the whole family!
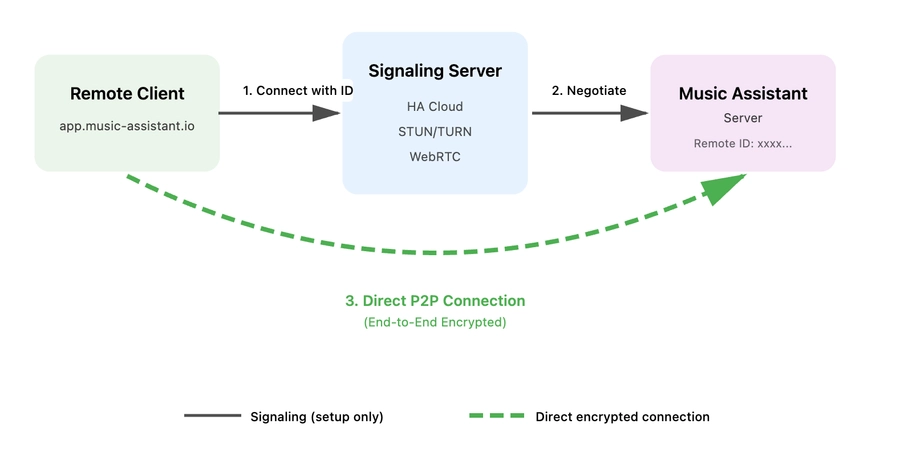 No matter where, no matter when
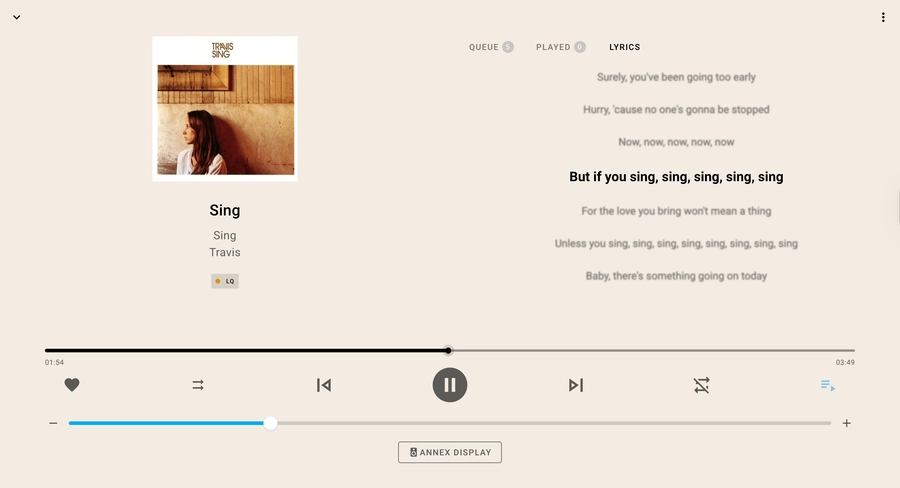 It's time for karaoke!
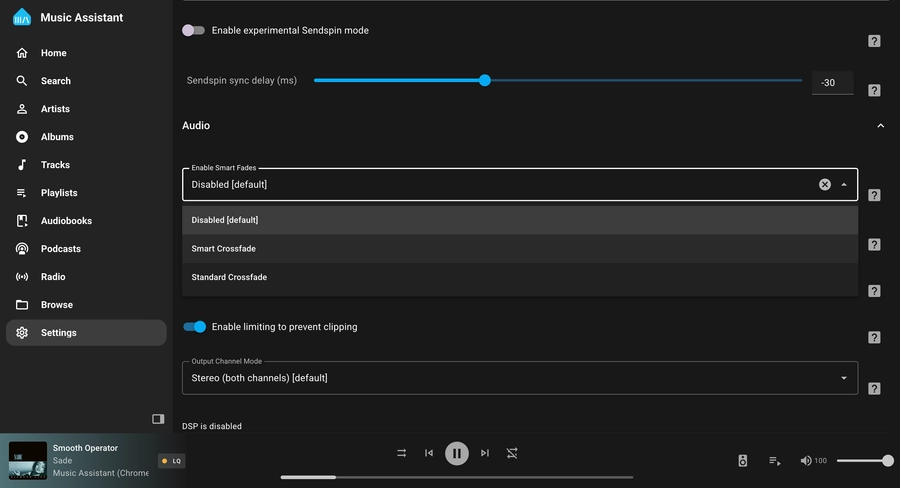 Making your playlists seamless
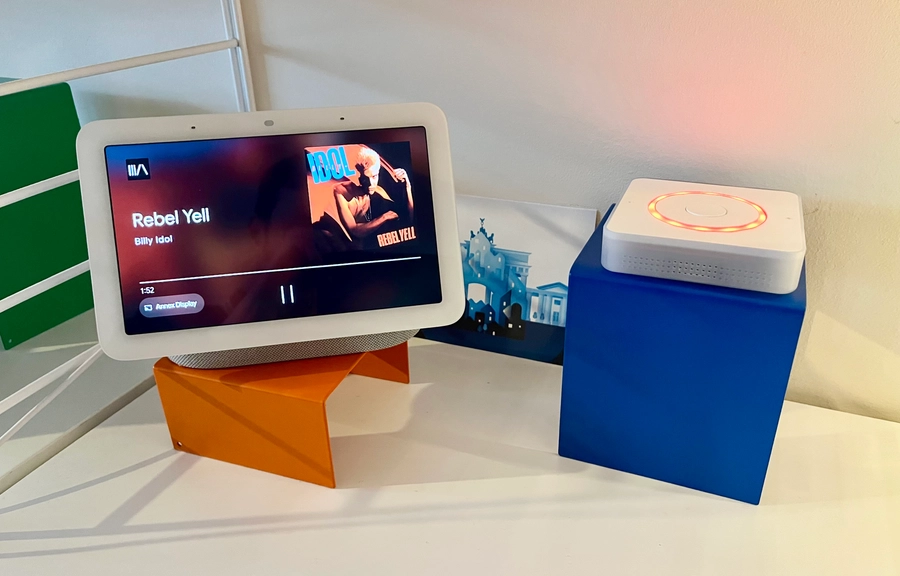 Music Assistant is also cast compatible!
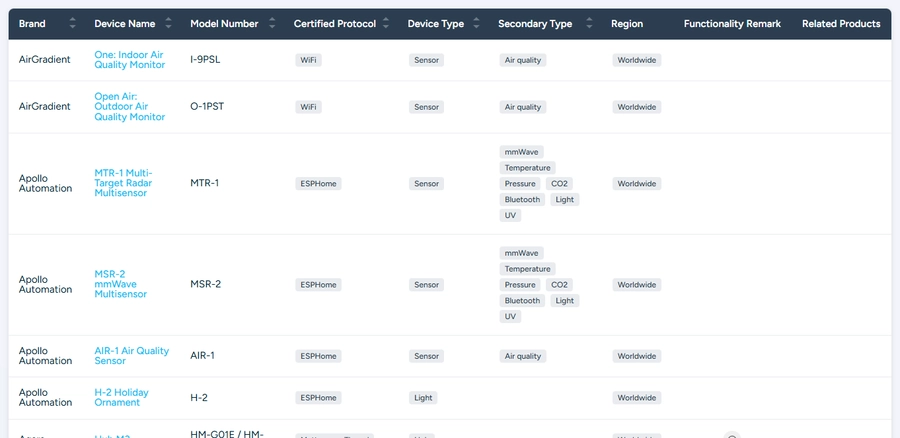 So many (useful) columns!
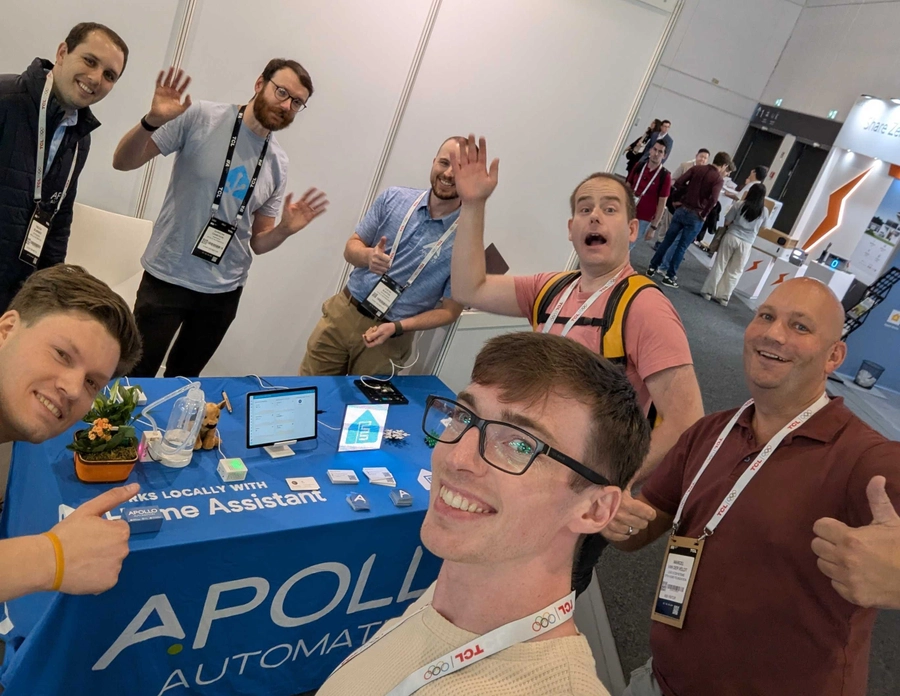 Some of our team visiting the Apollo booth at IFA Berlin in September.
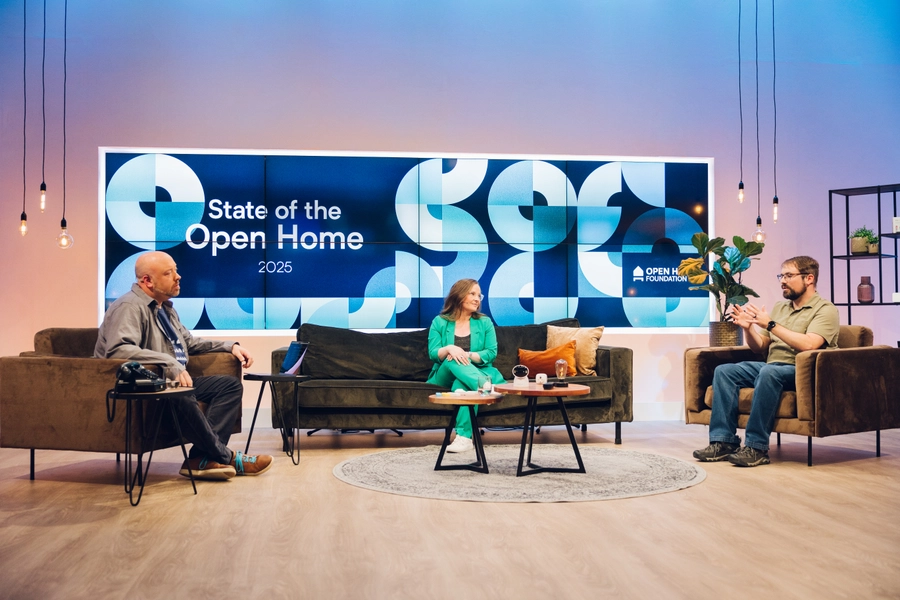 Spot one of the certified cameras in our State of the Open Home segment
 San Diego Meetup
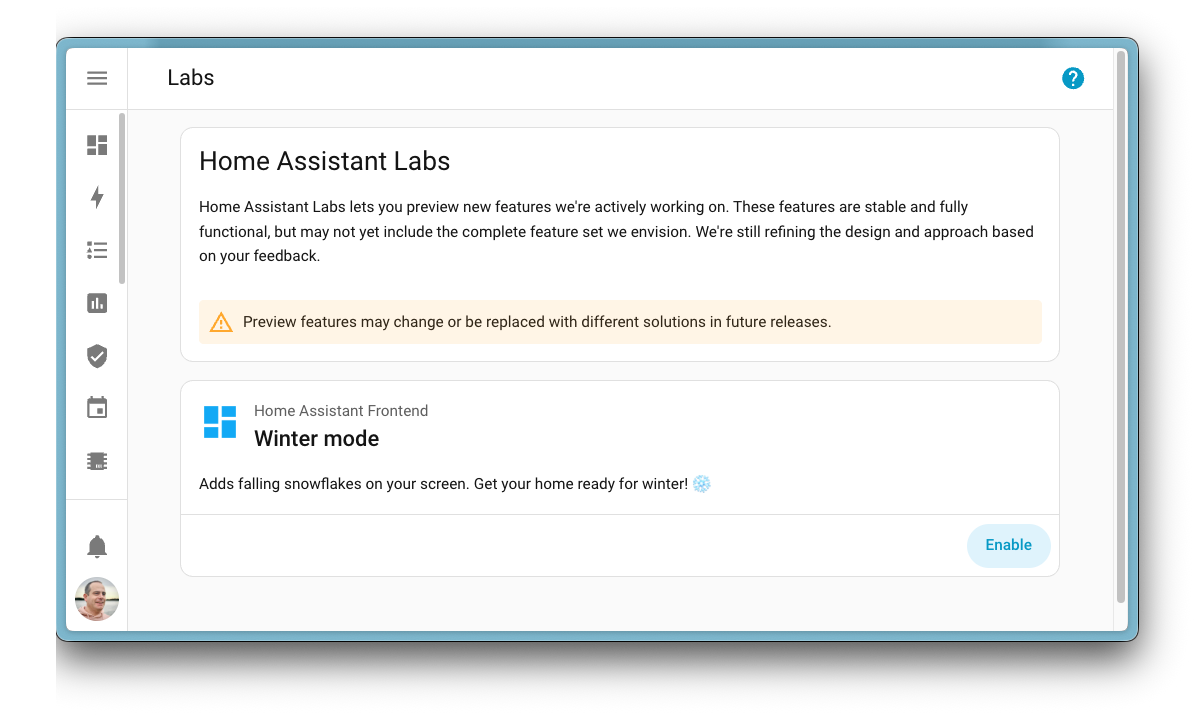
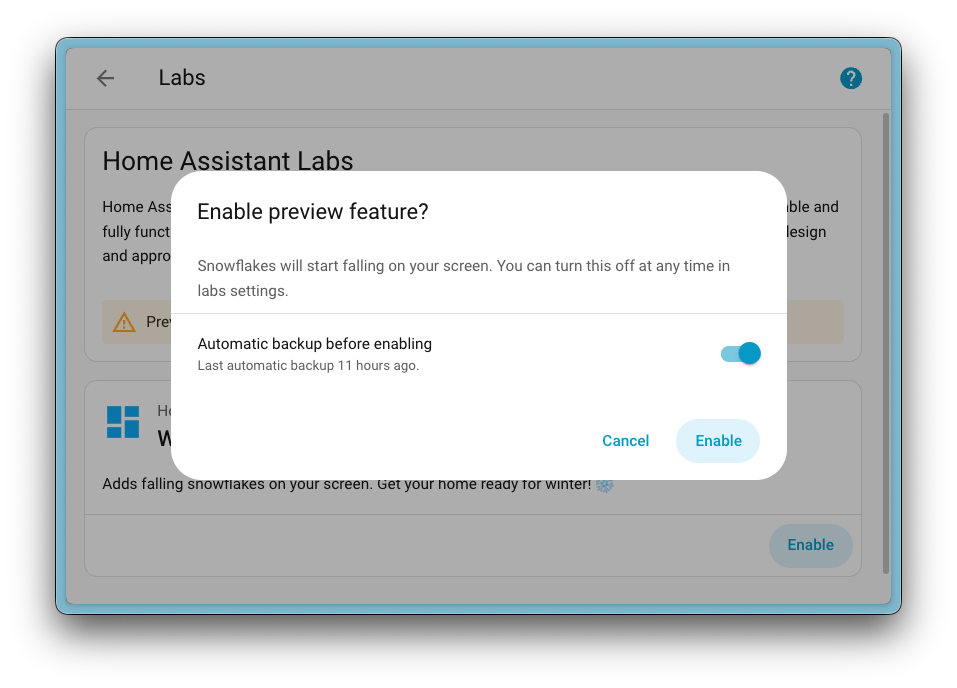

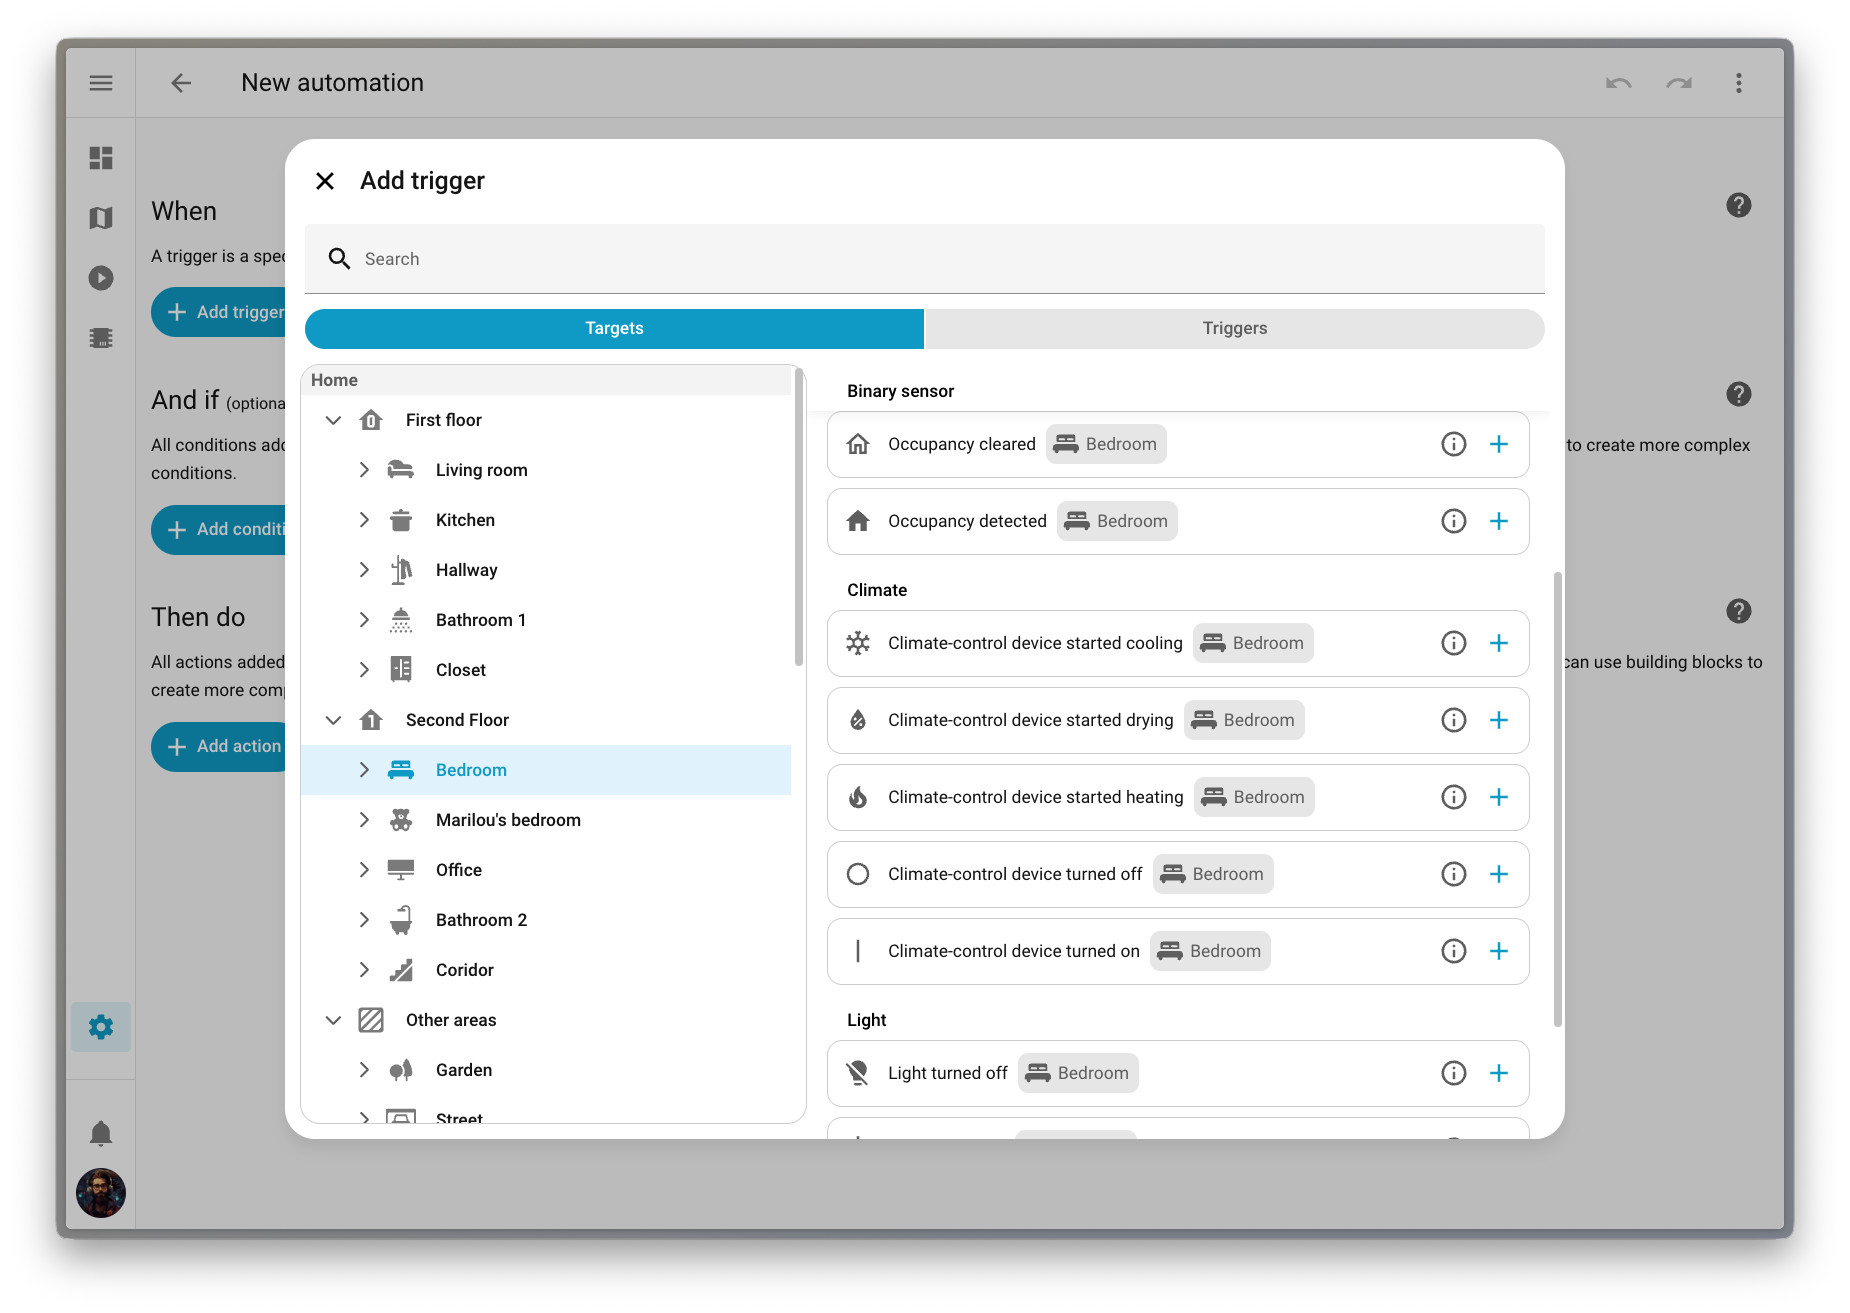
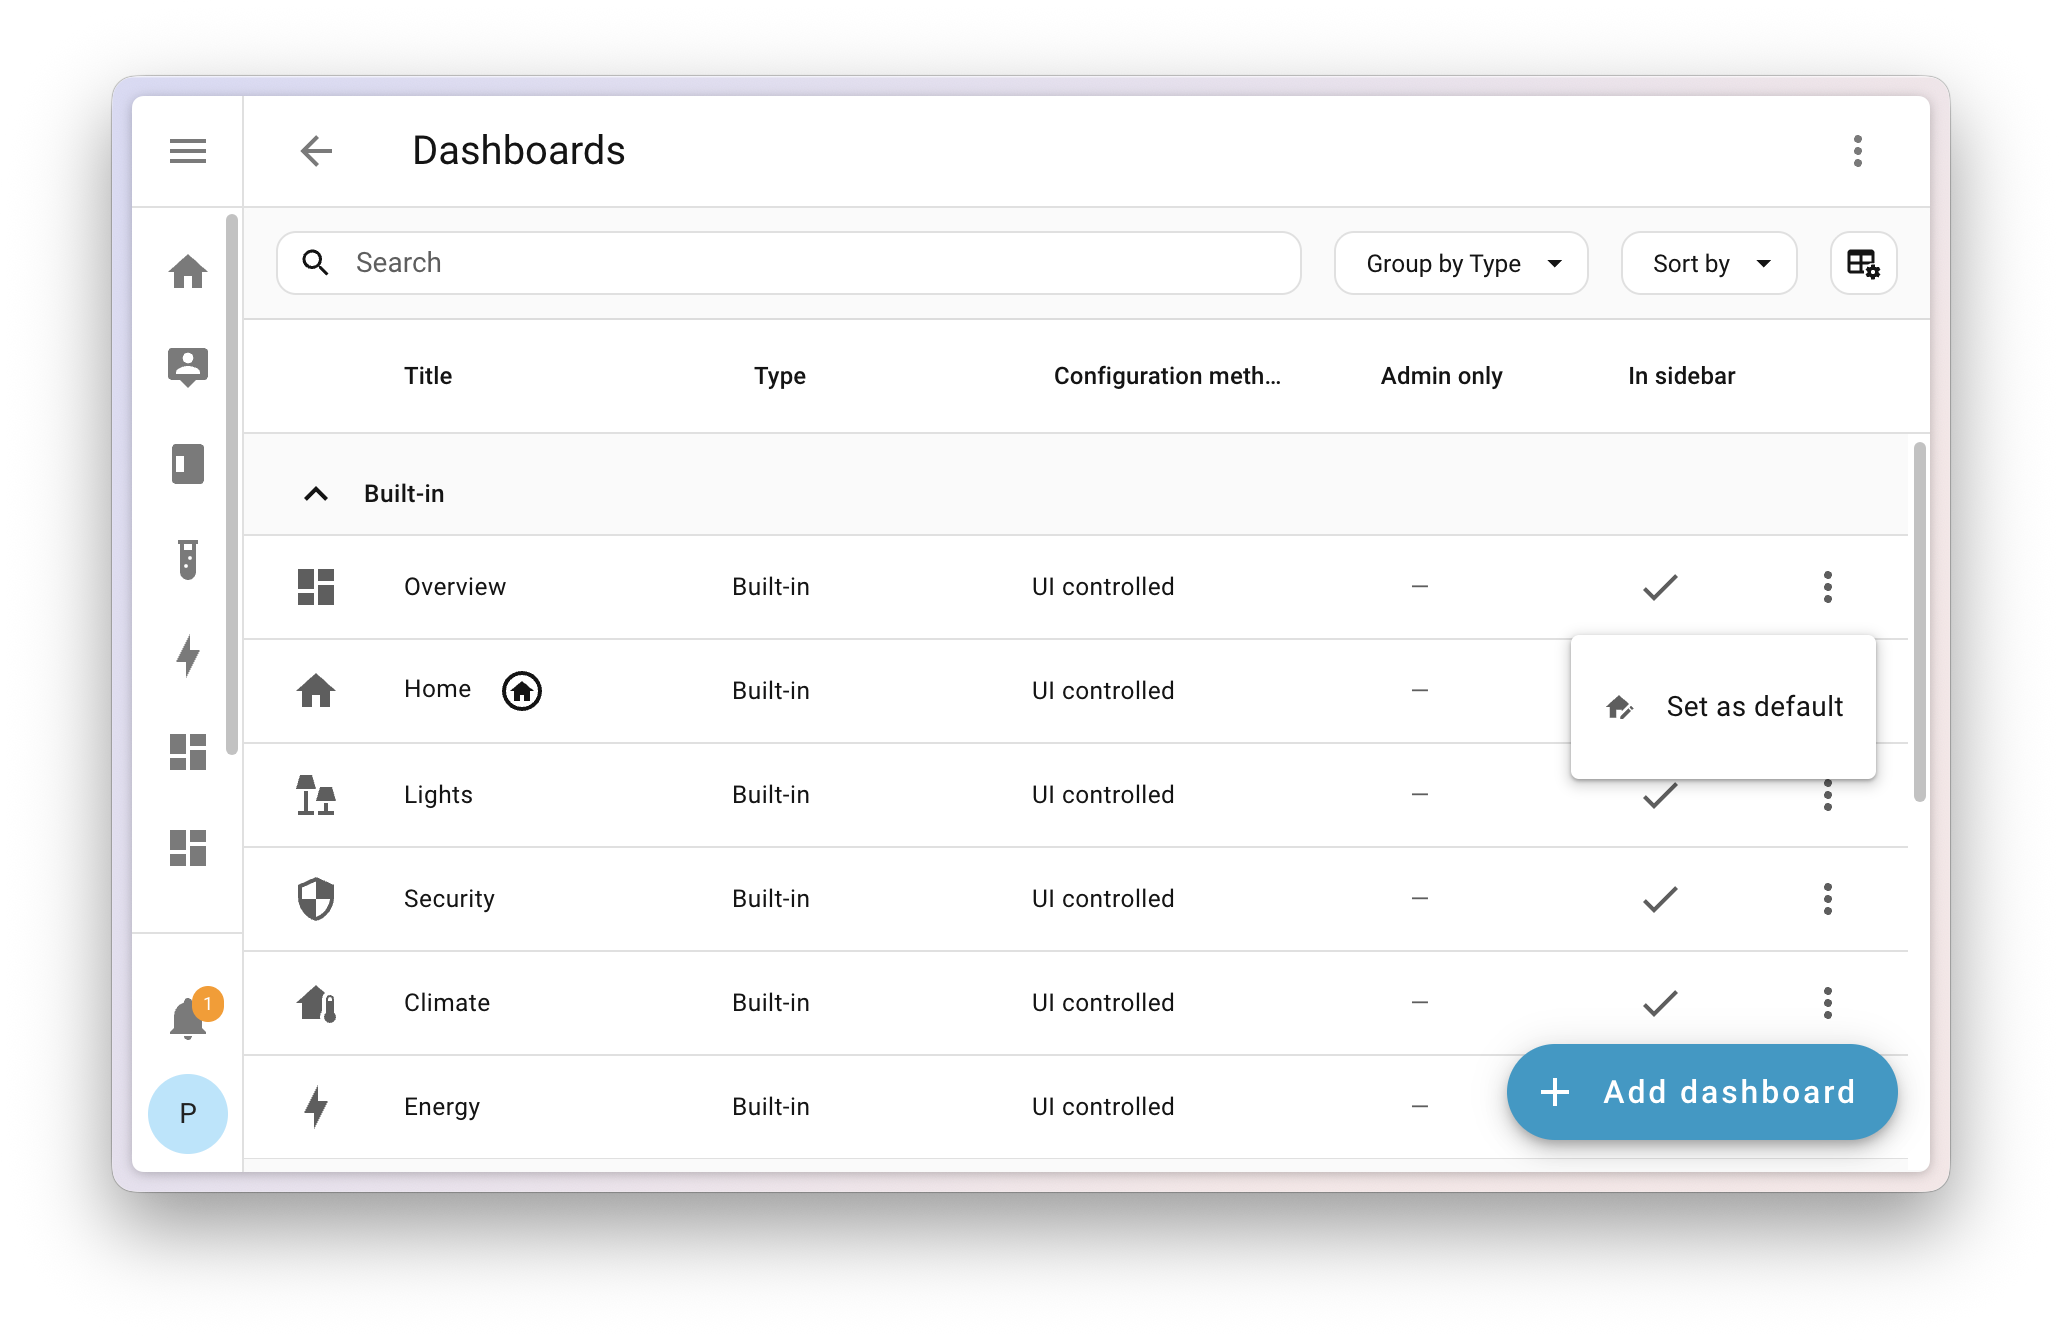
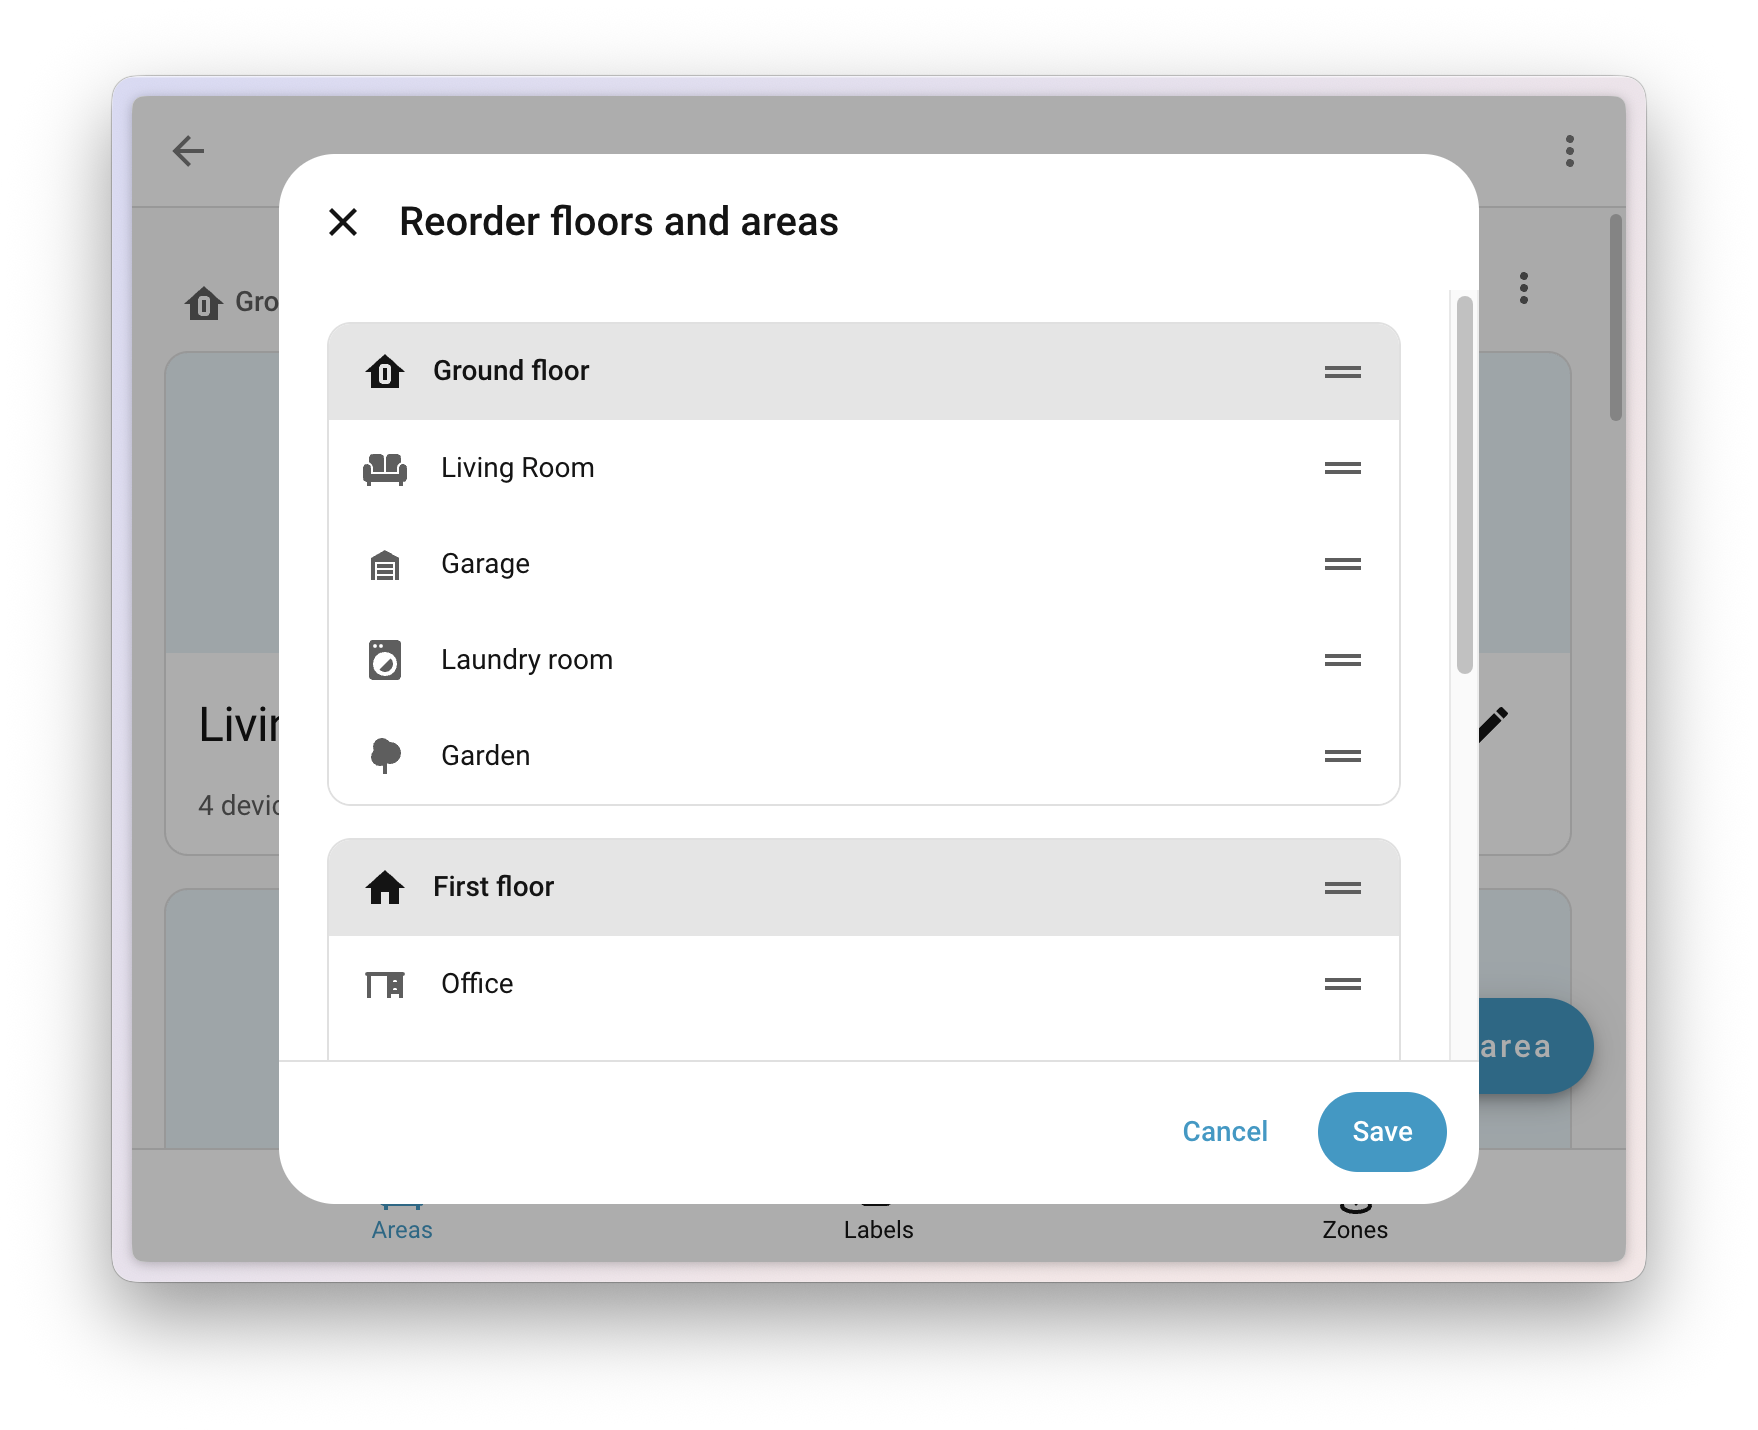
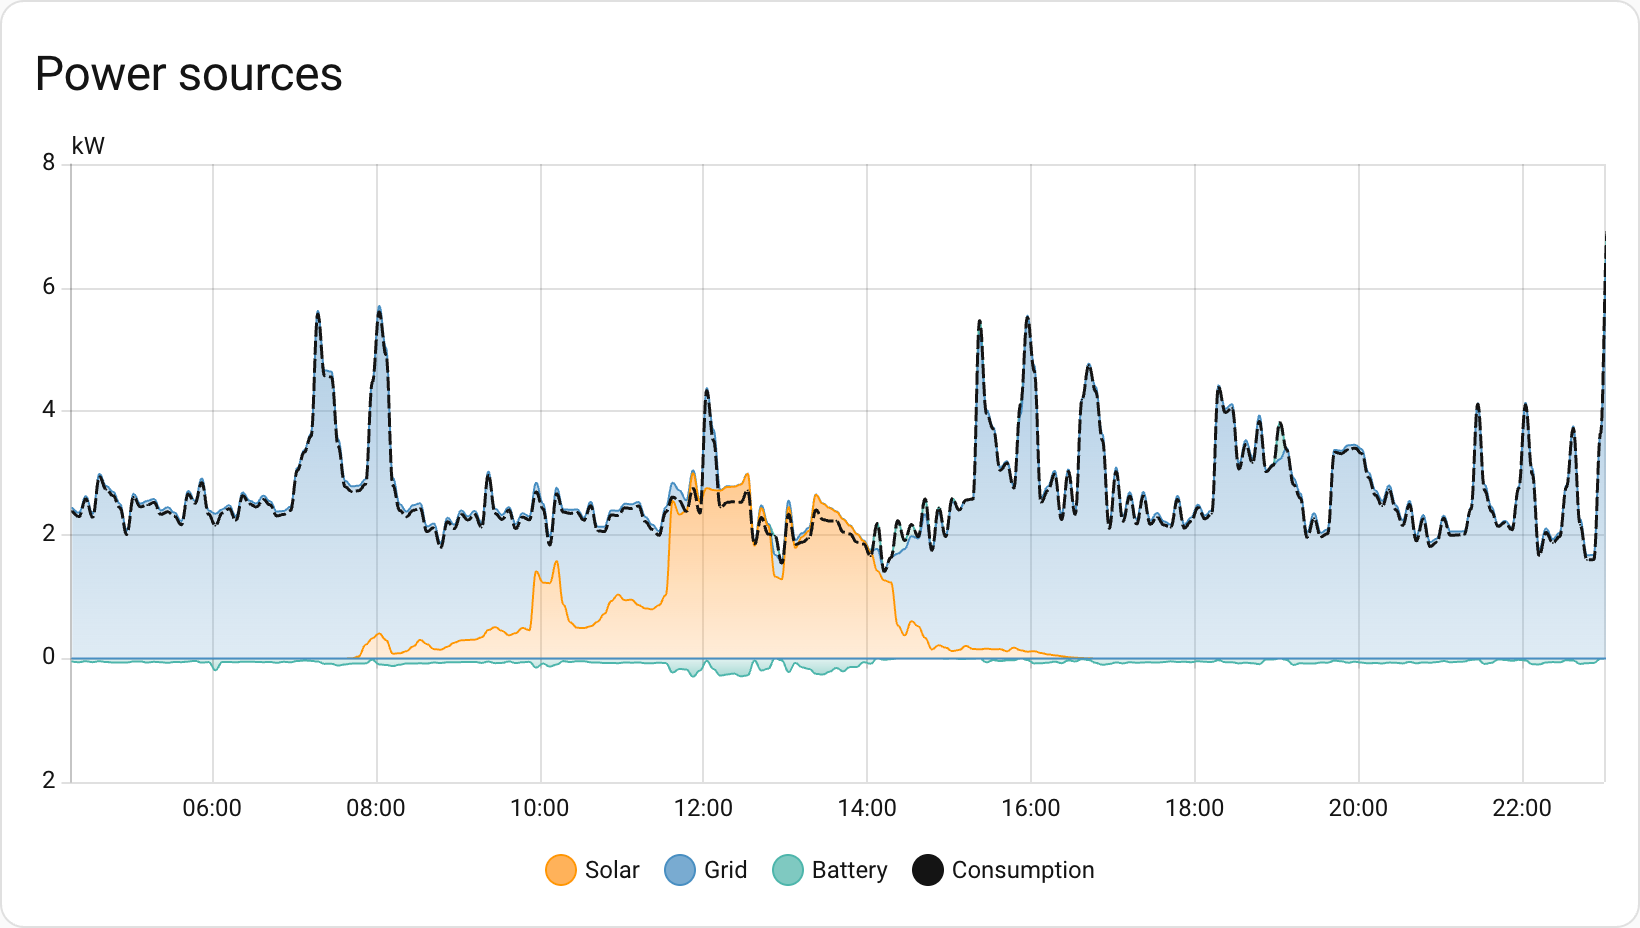

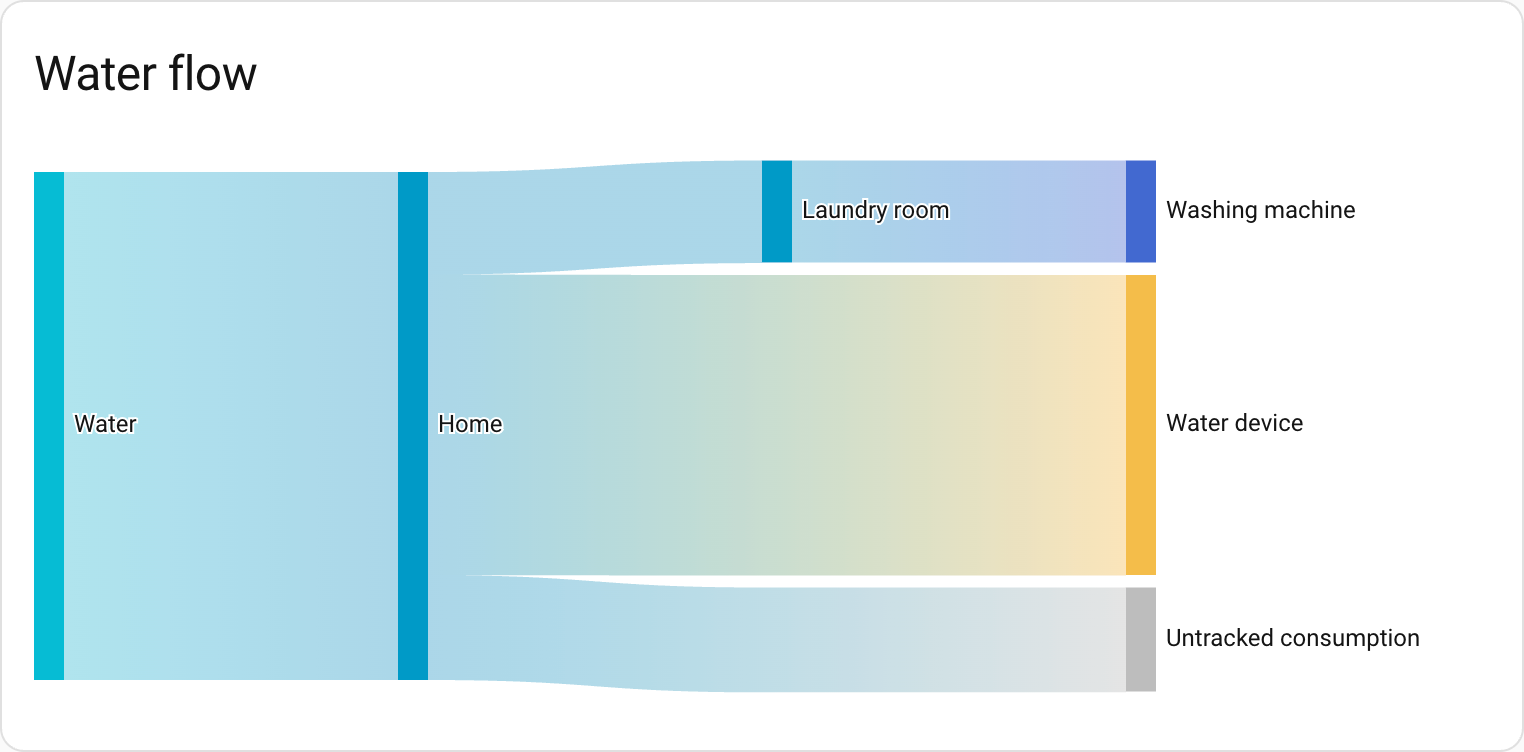 The new water sankey card shows where your water is going at a glance.
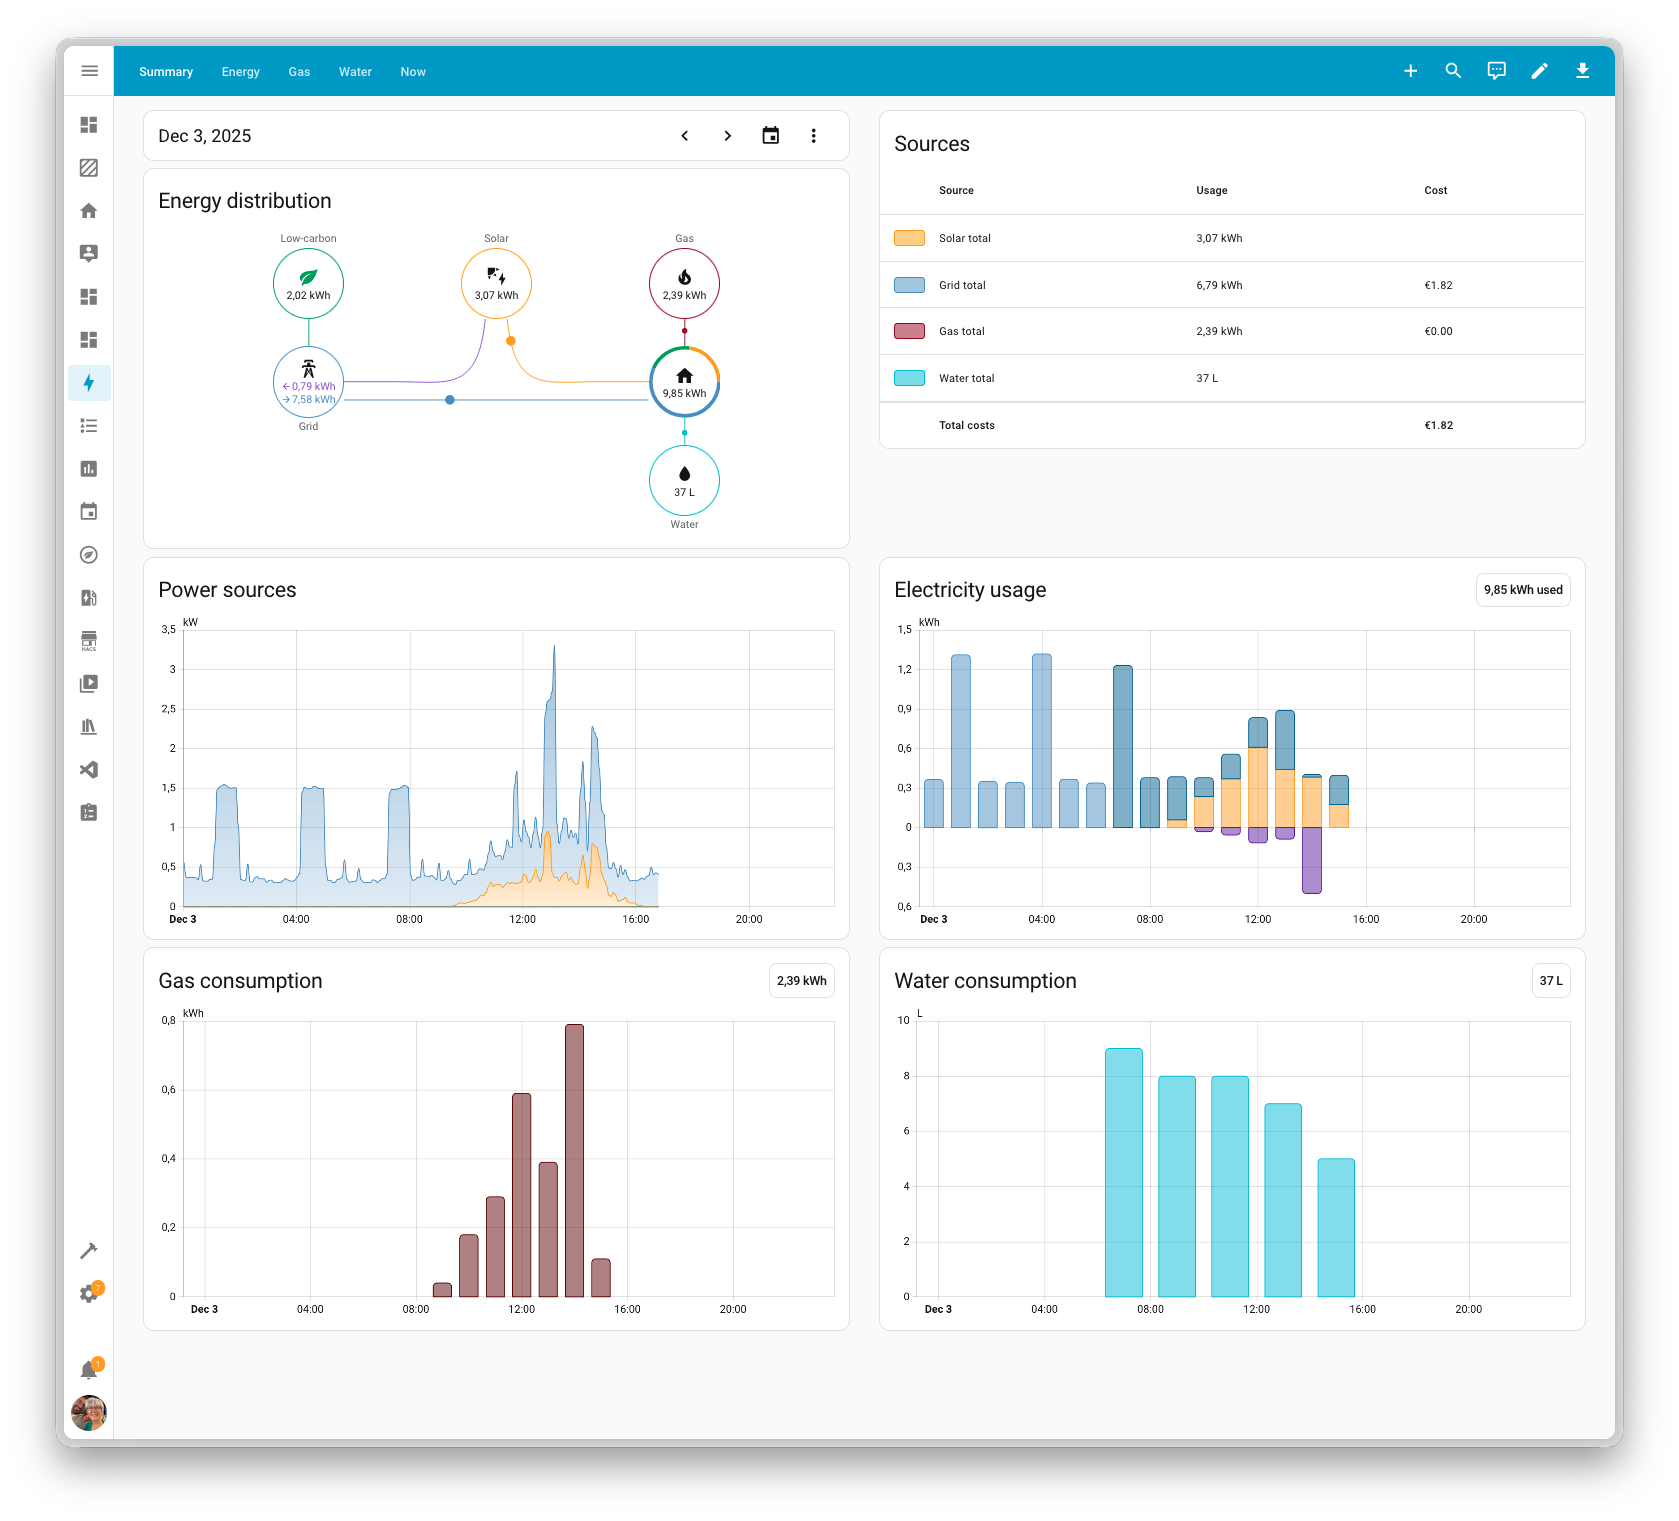
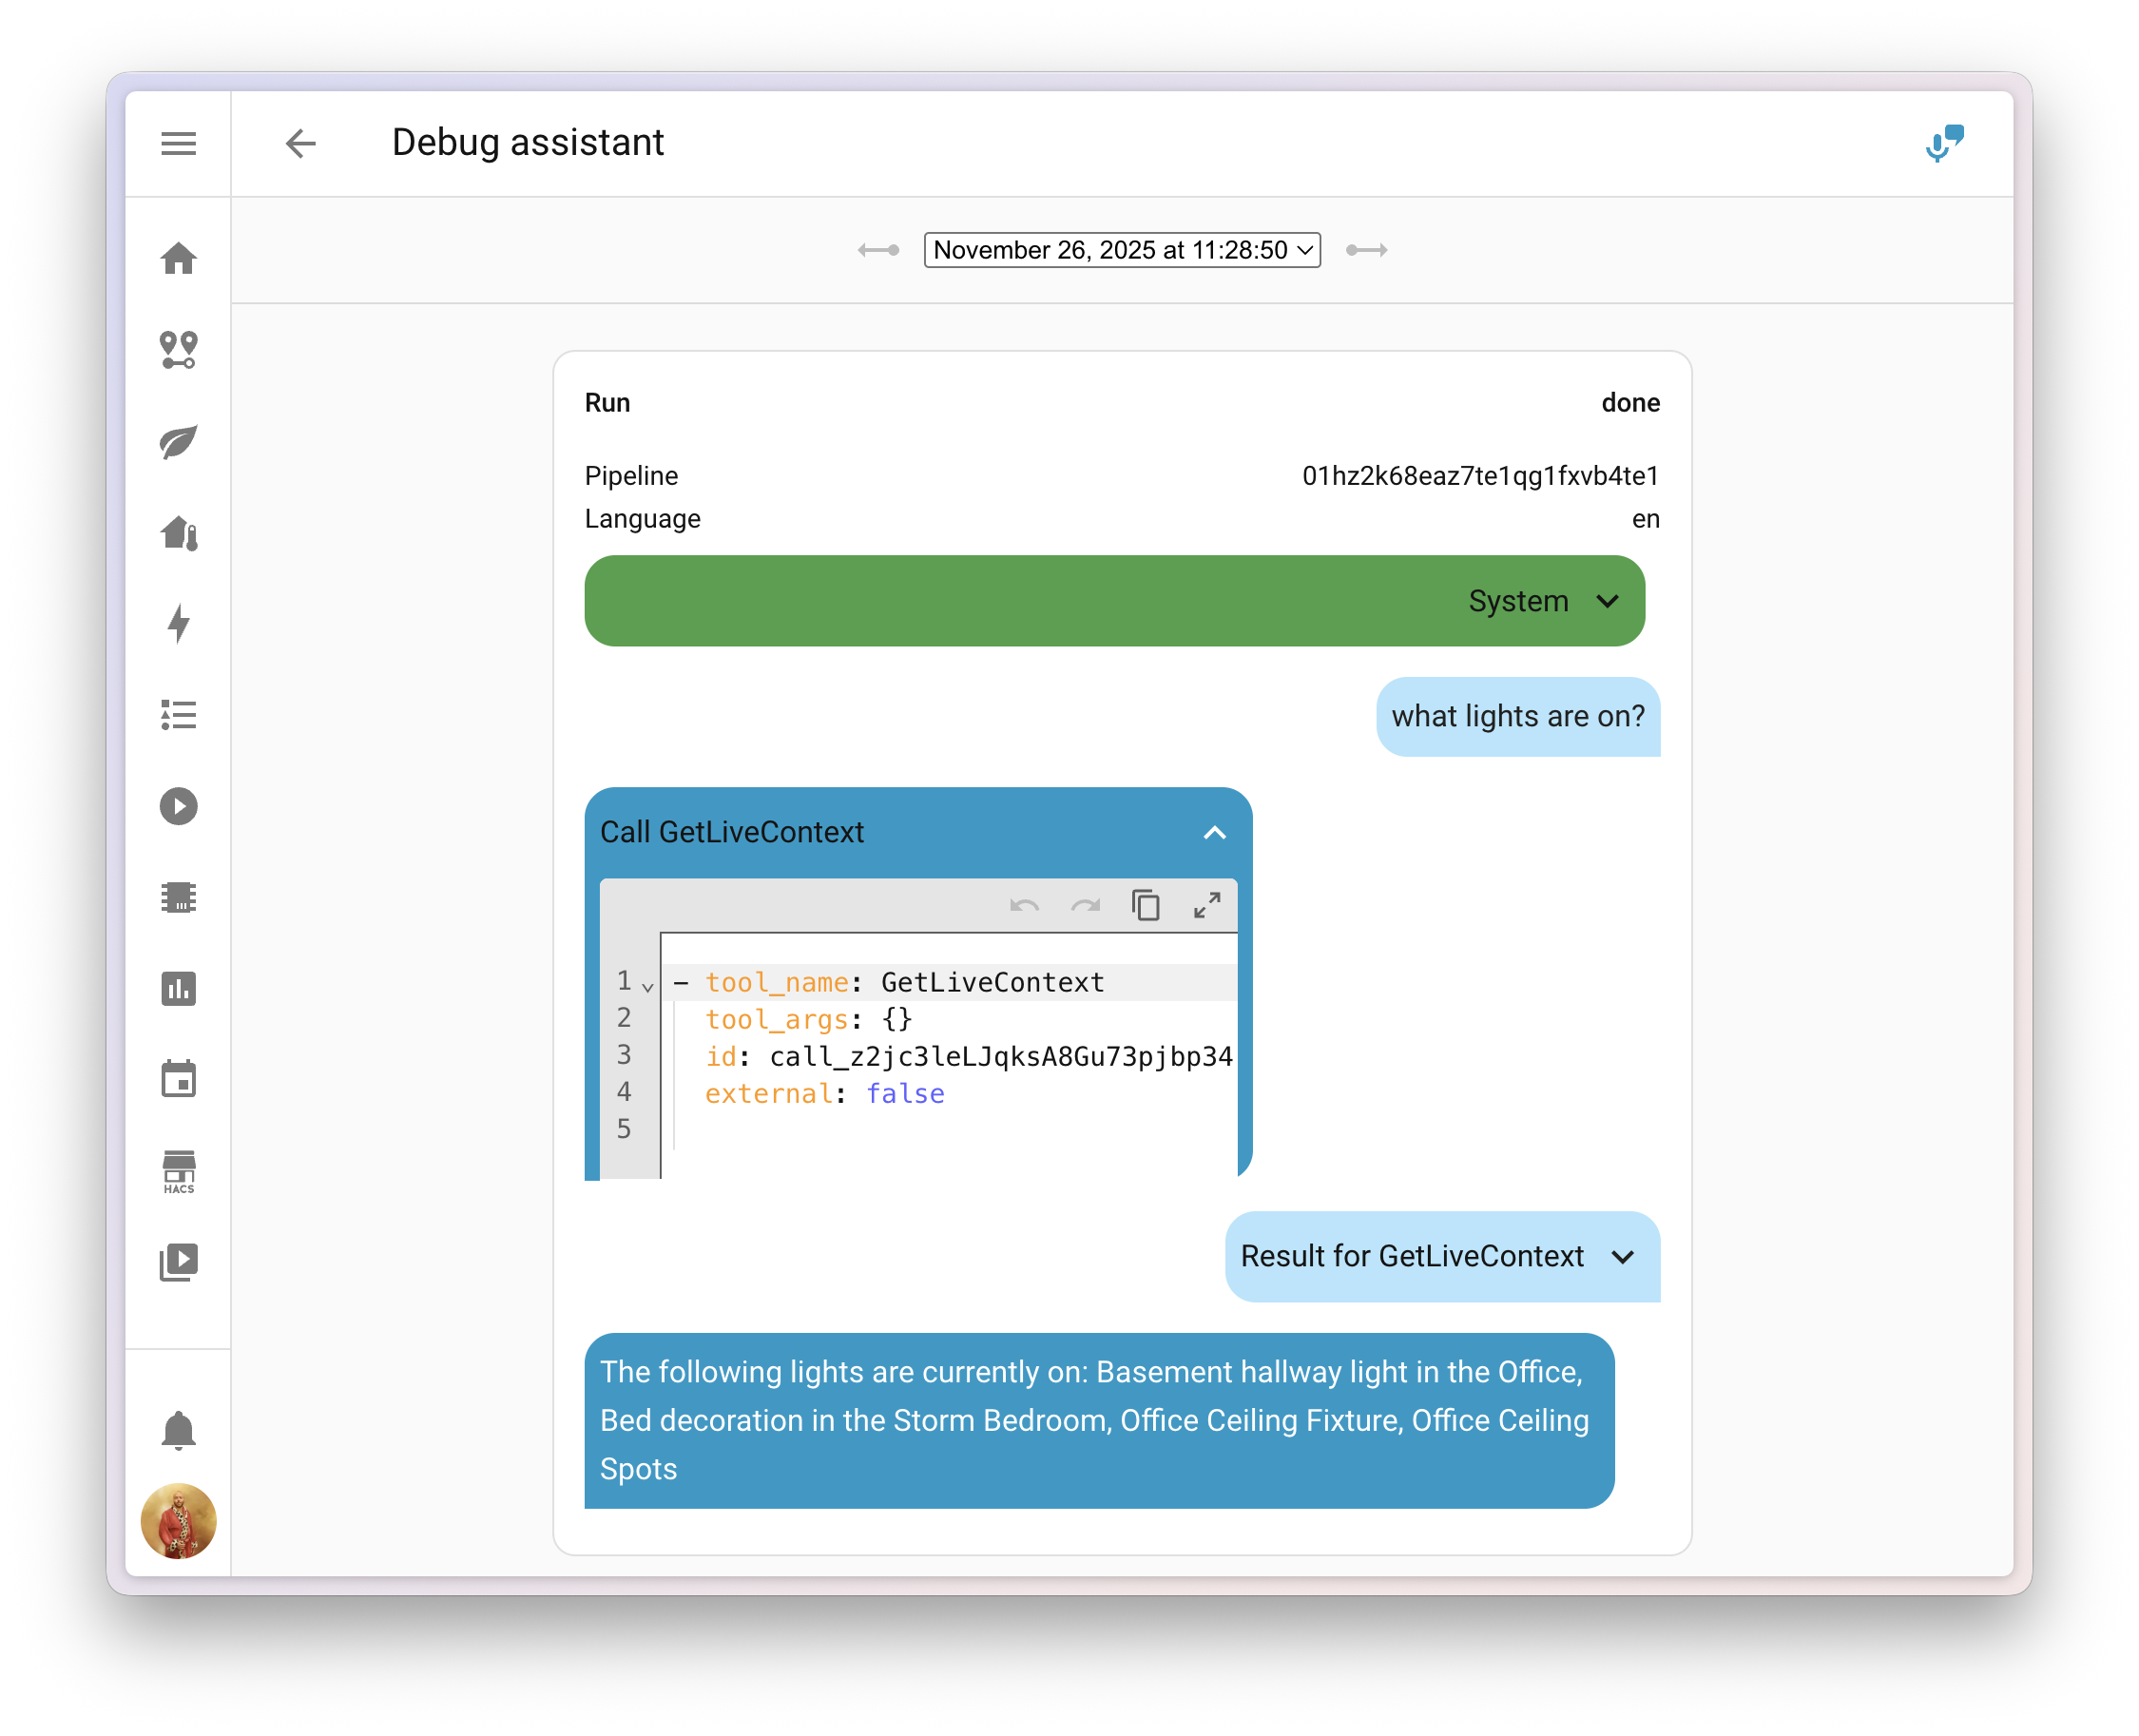
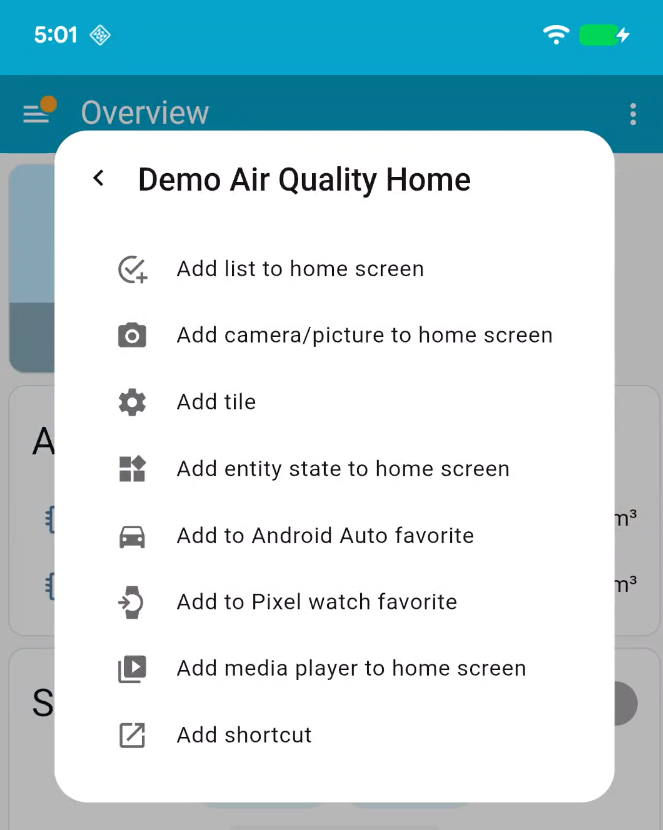

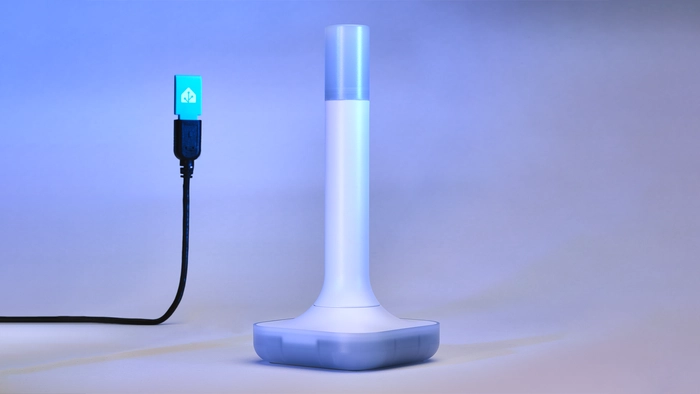
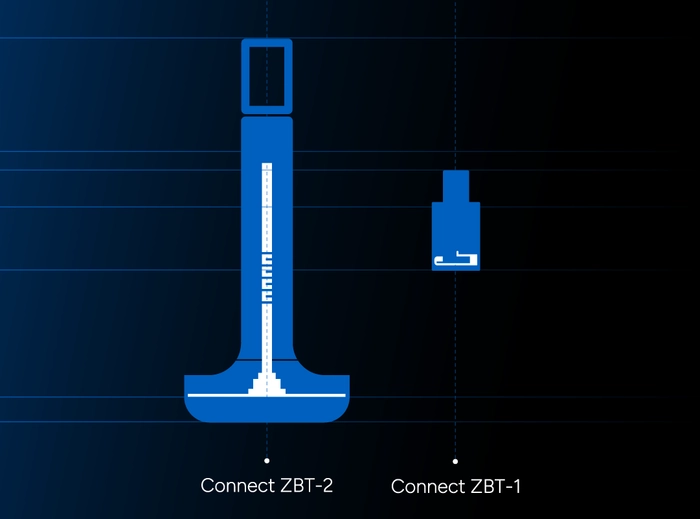 The antenna has gone from safety pin-sized 🧷, to tablespoon-sized 🥄
 More baud, the better 😜
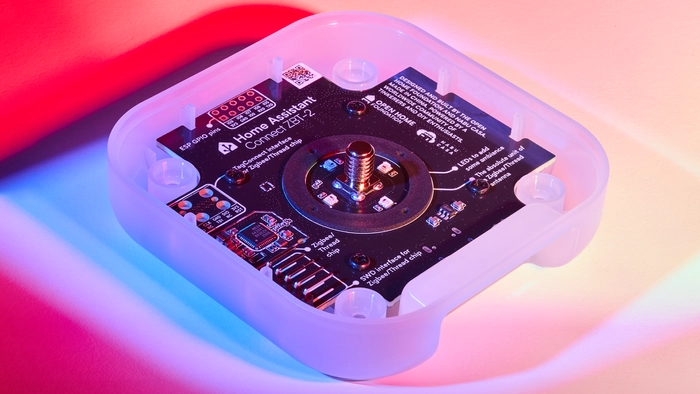 Look at all those exposed pins and pads 🤤
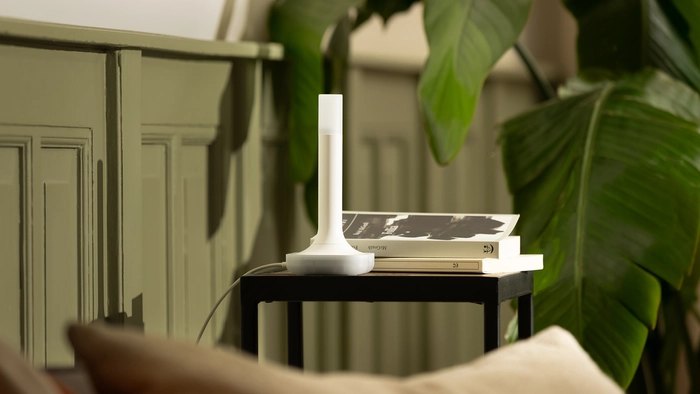
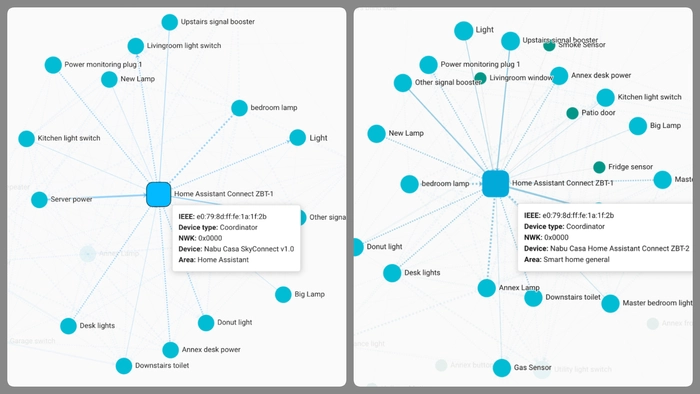 Not science, but an interesting before-and-after of just one network, about a 60% increase in direct connections 🤩
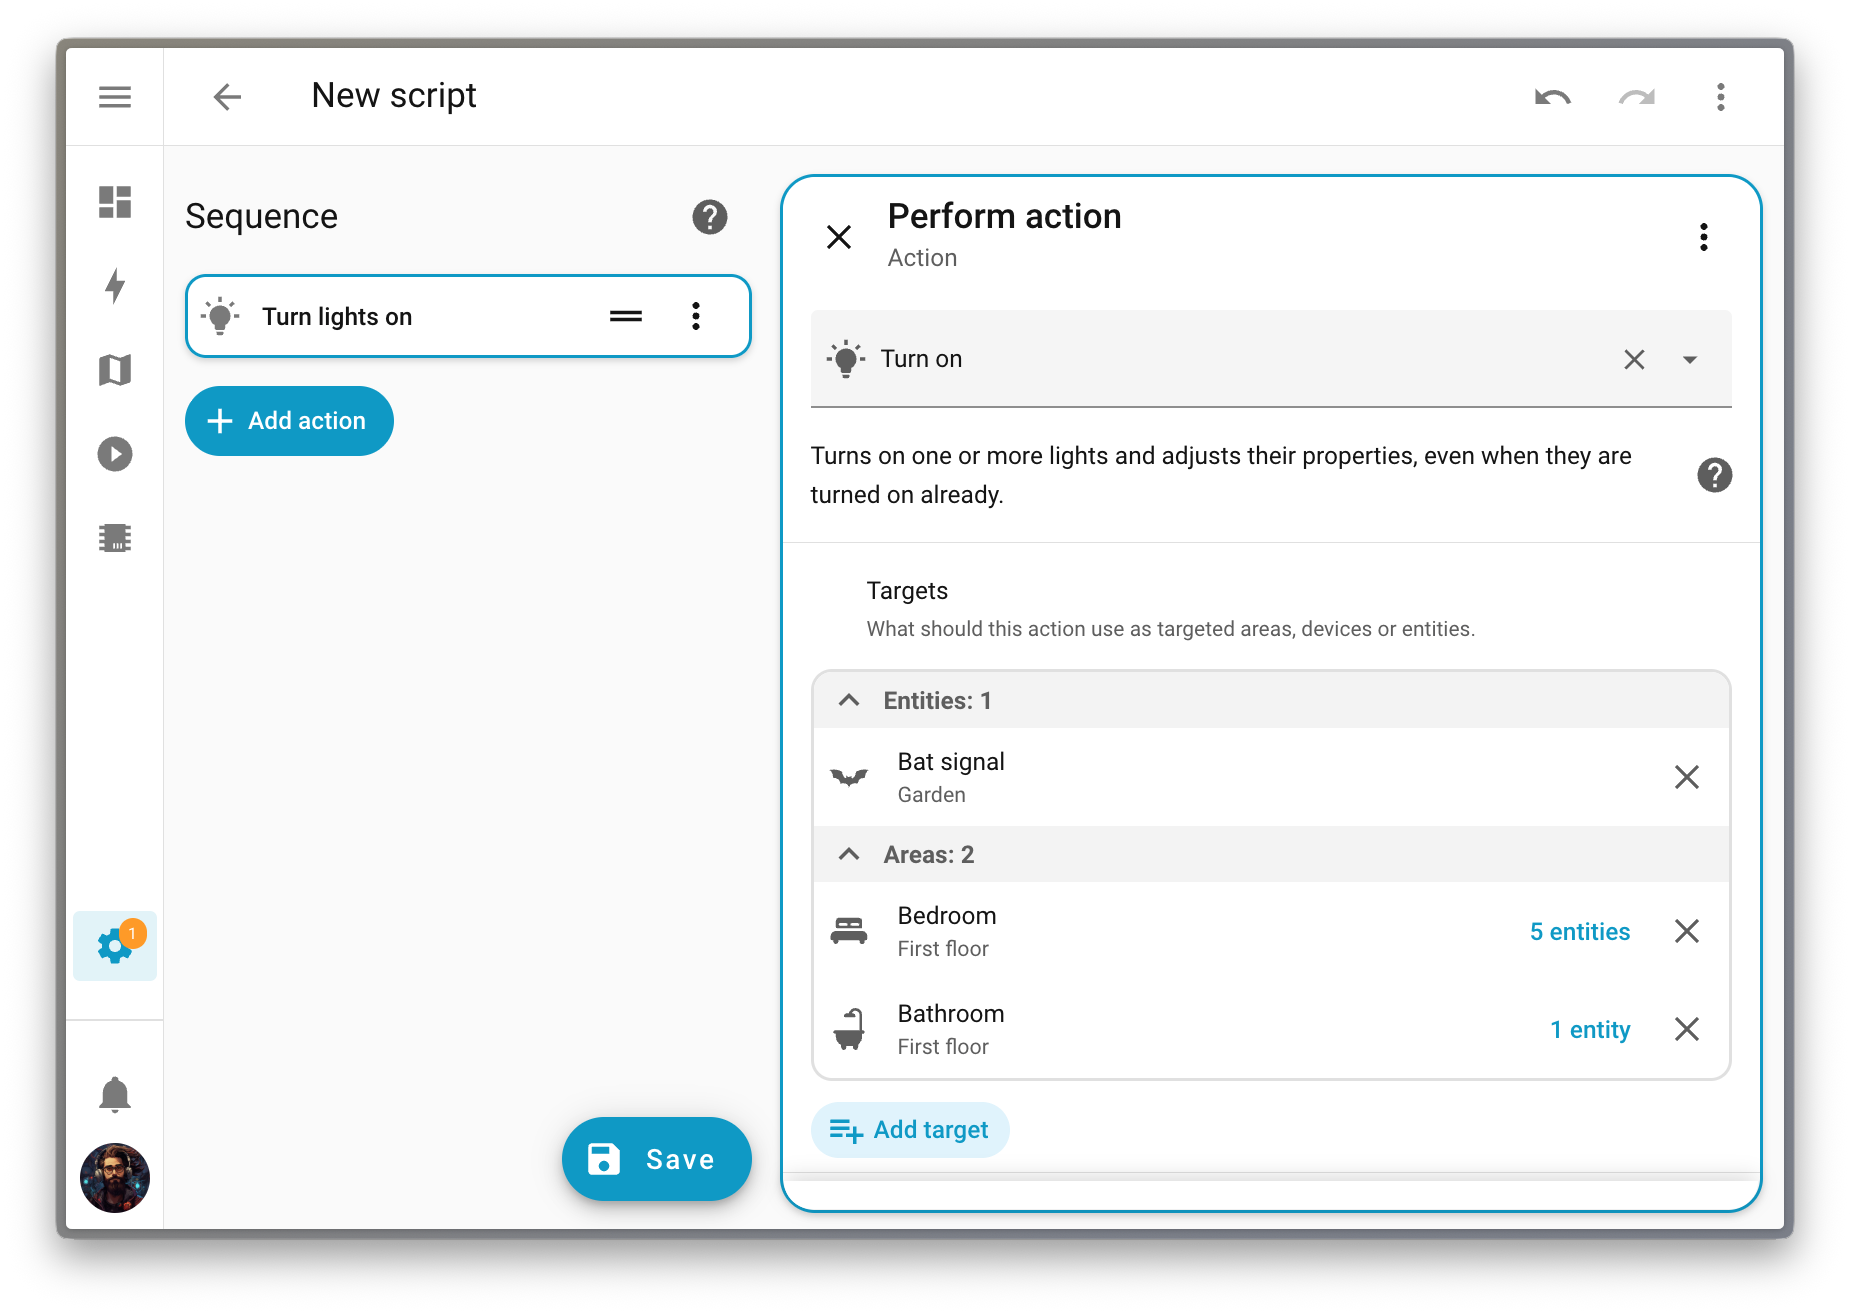

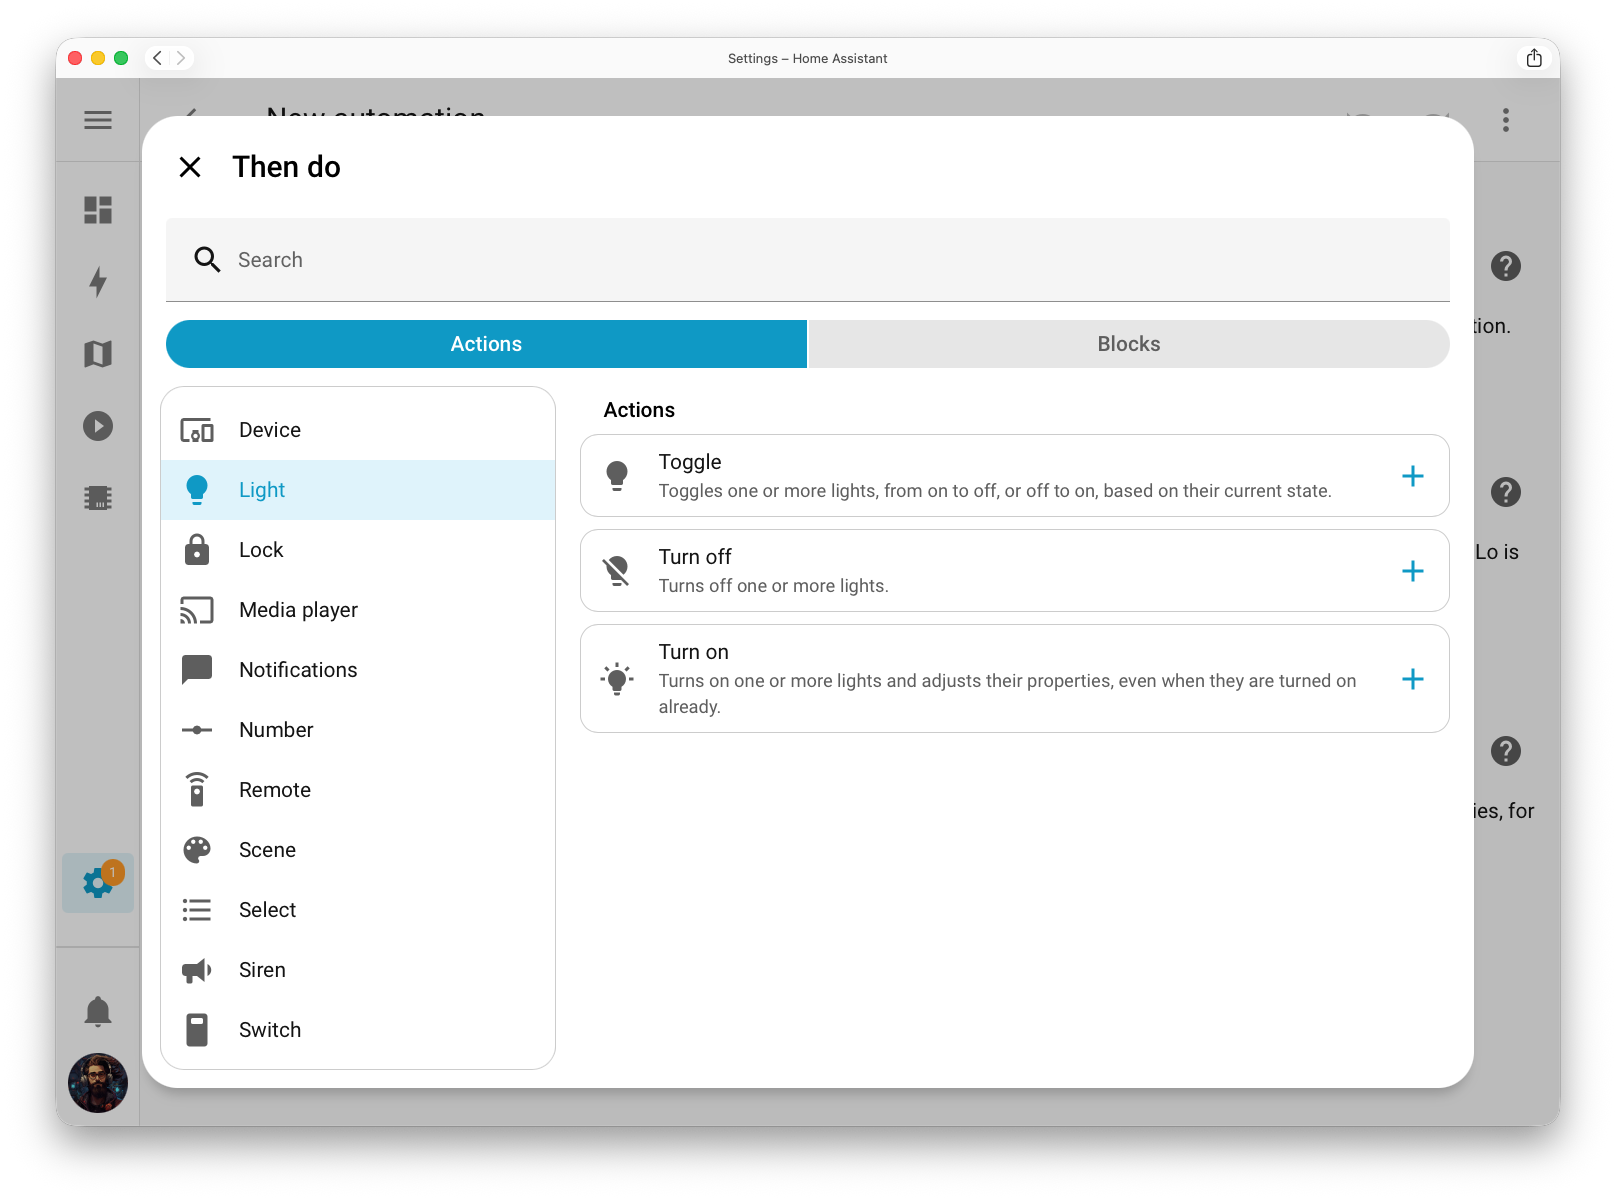
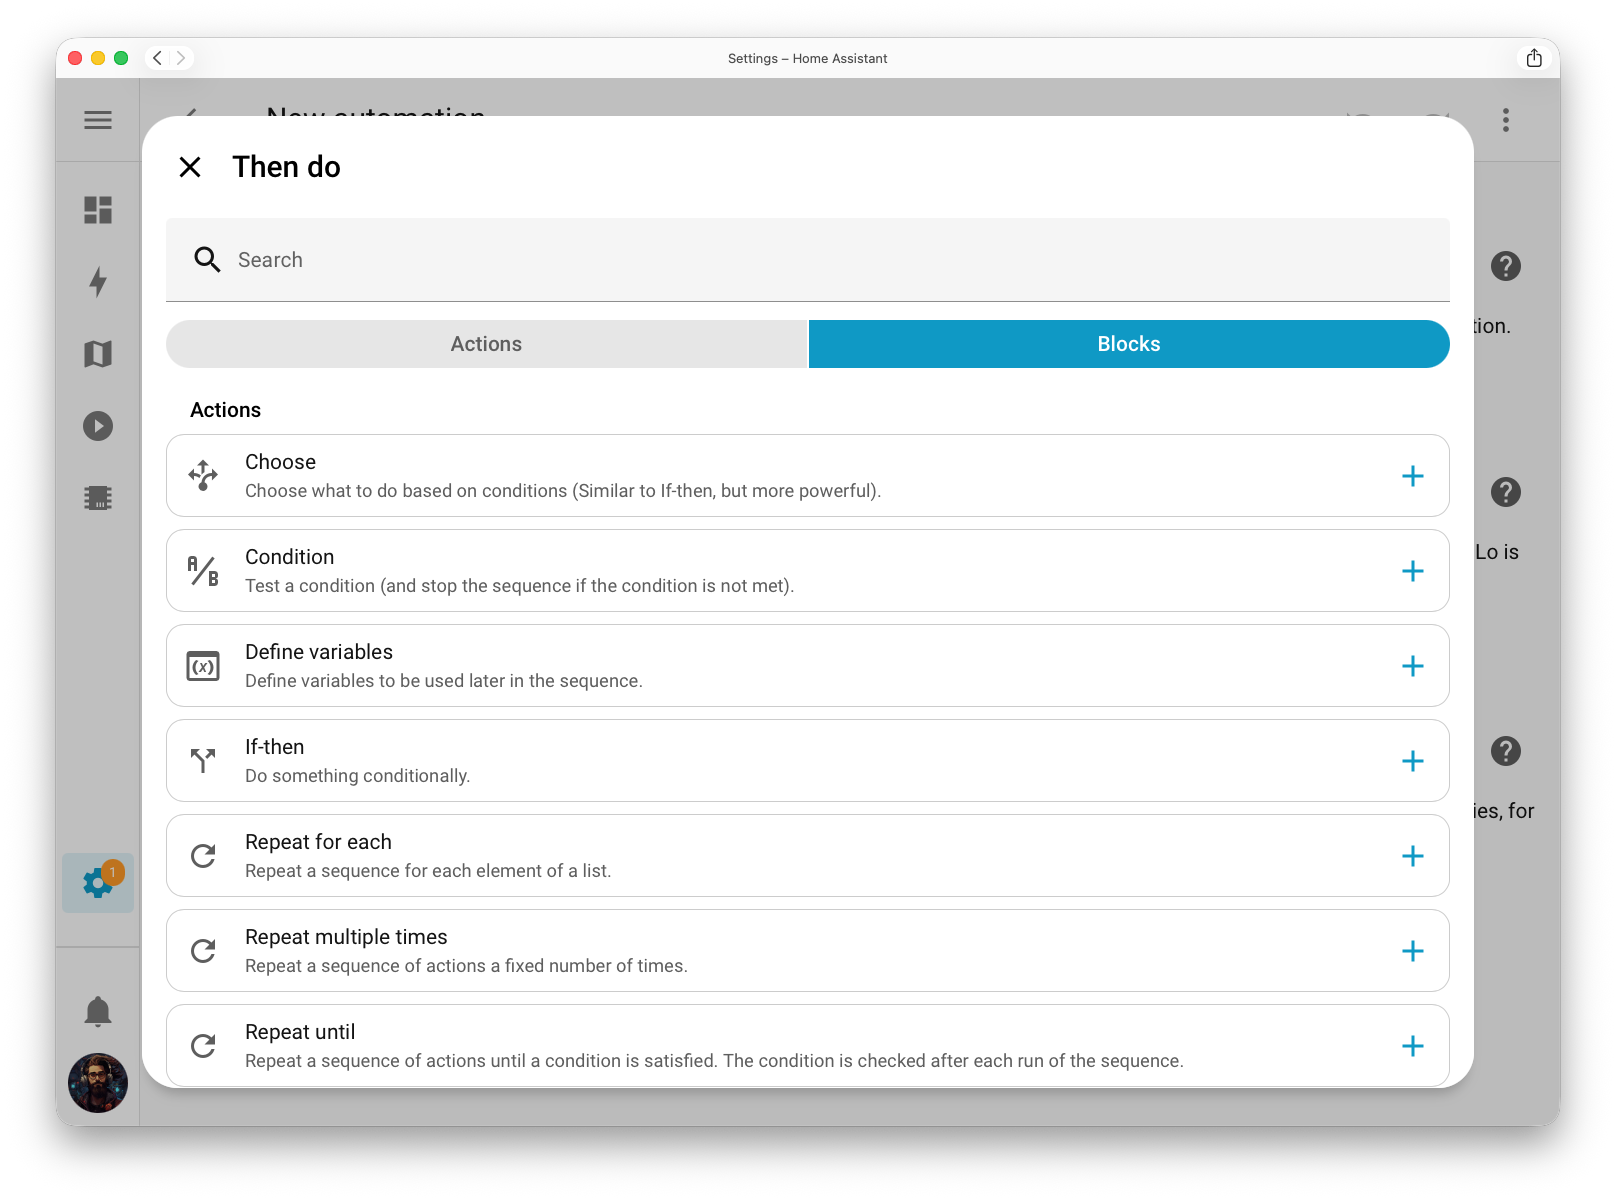
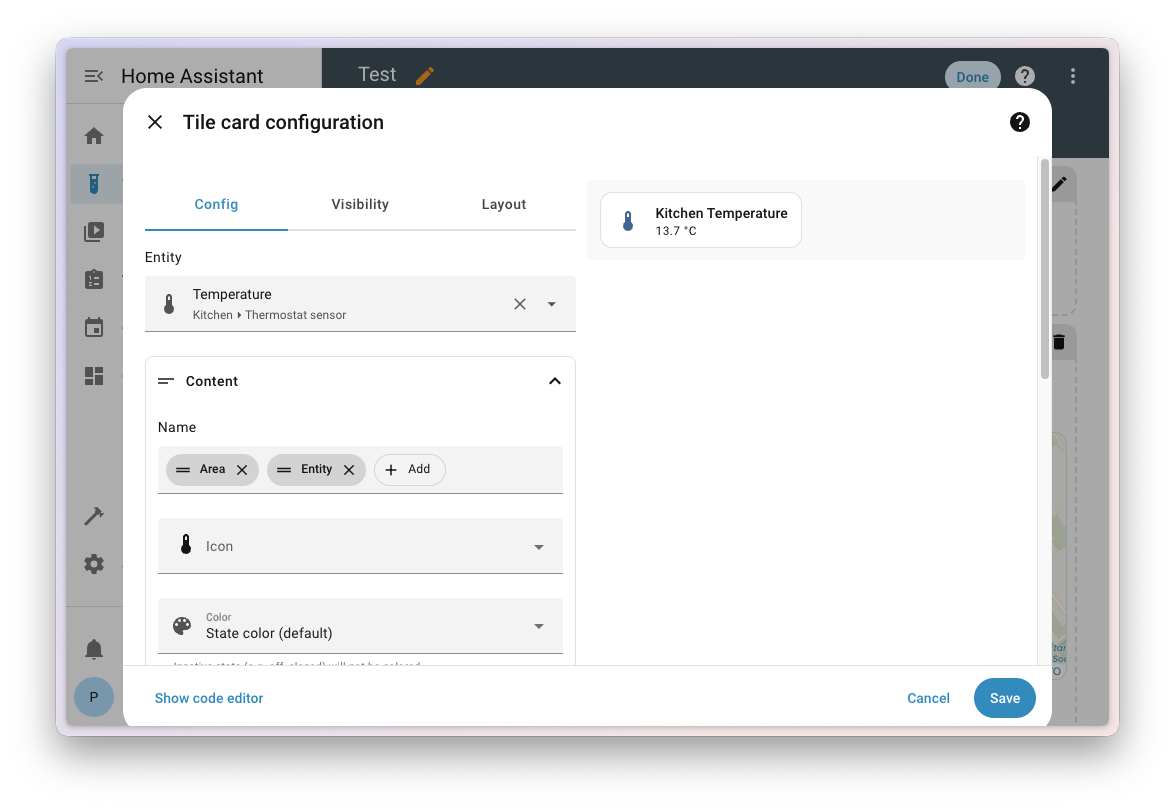
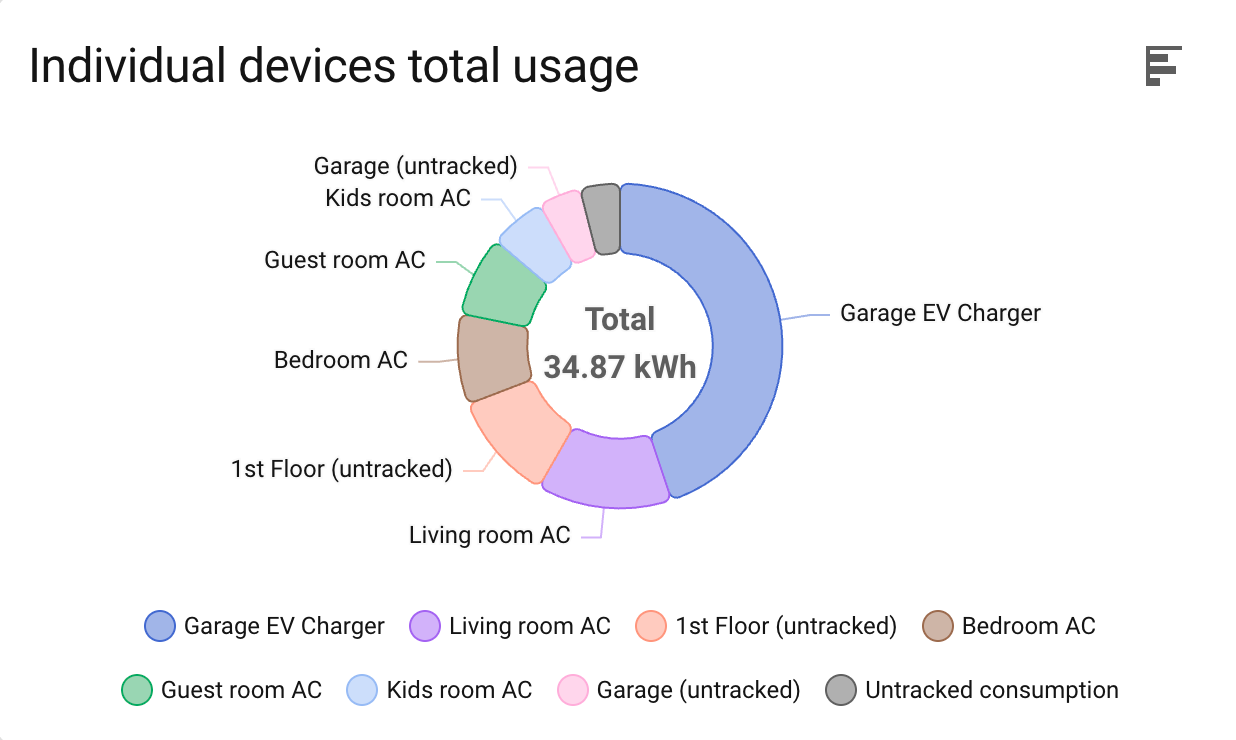
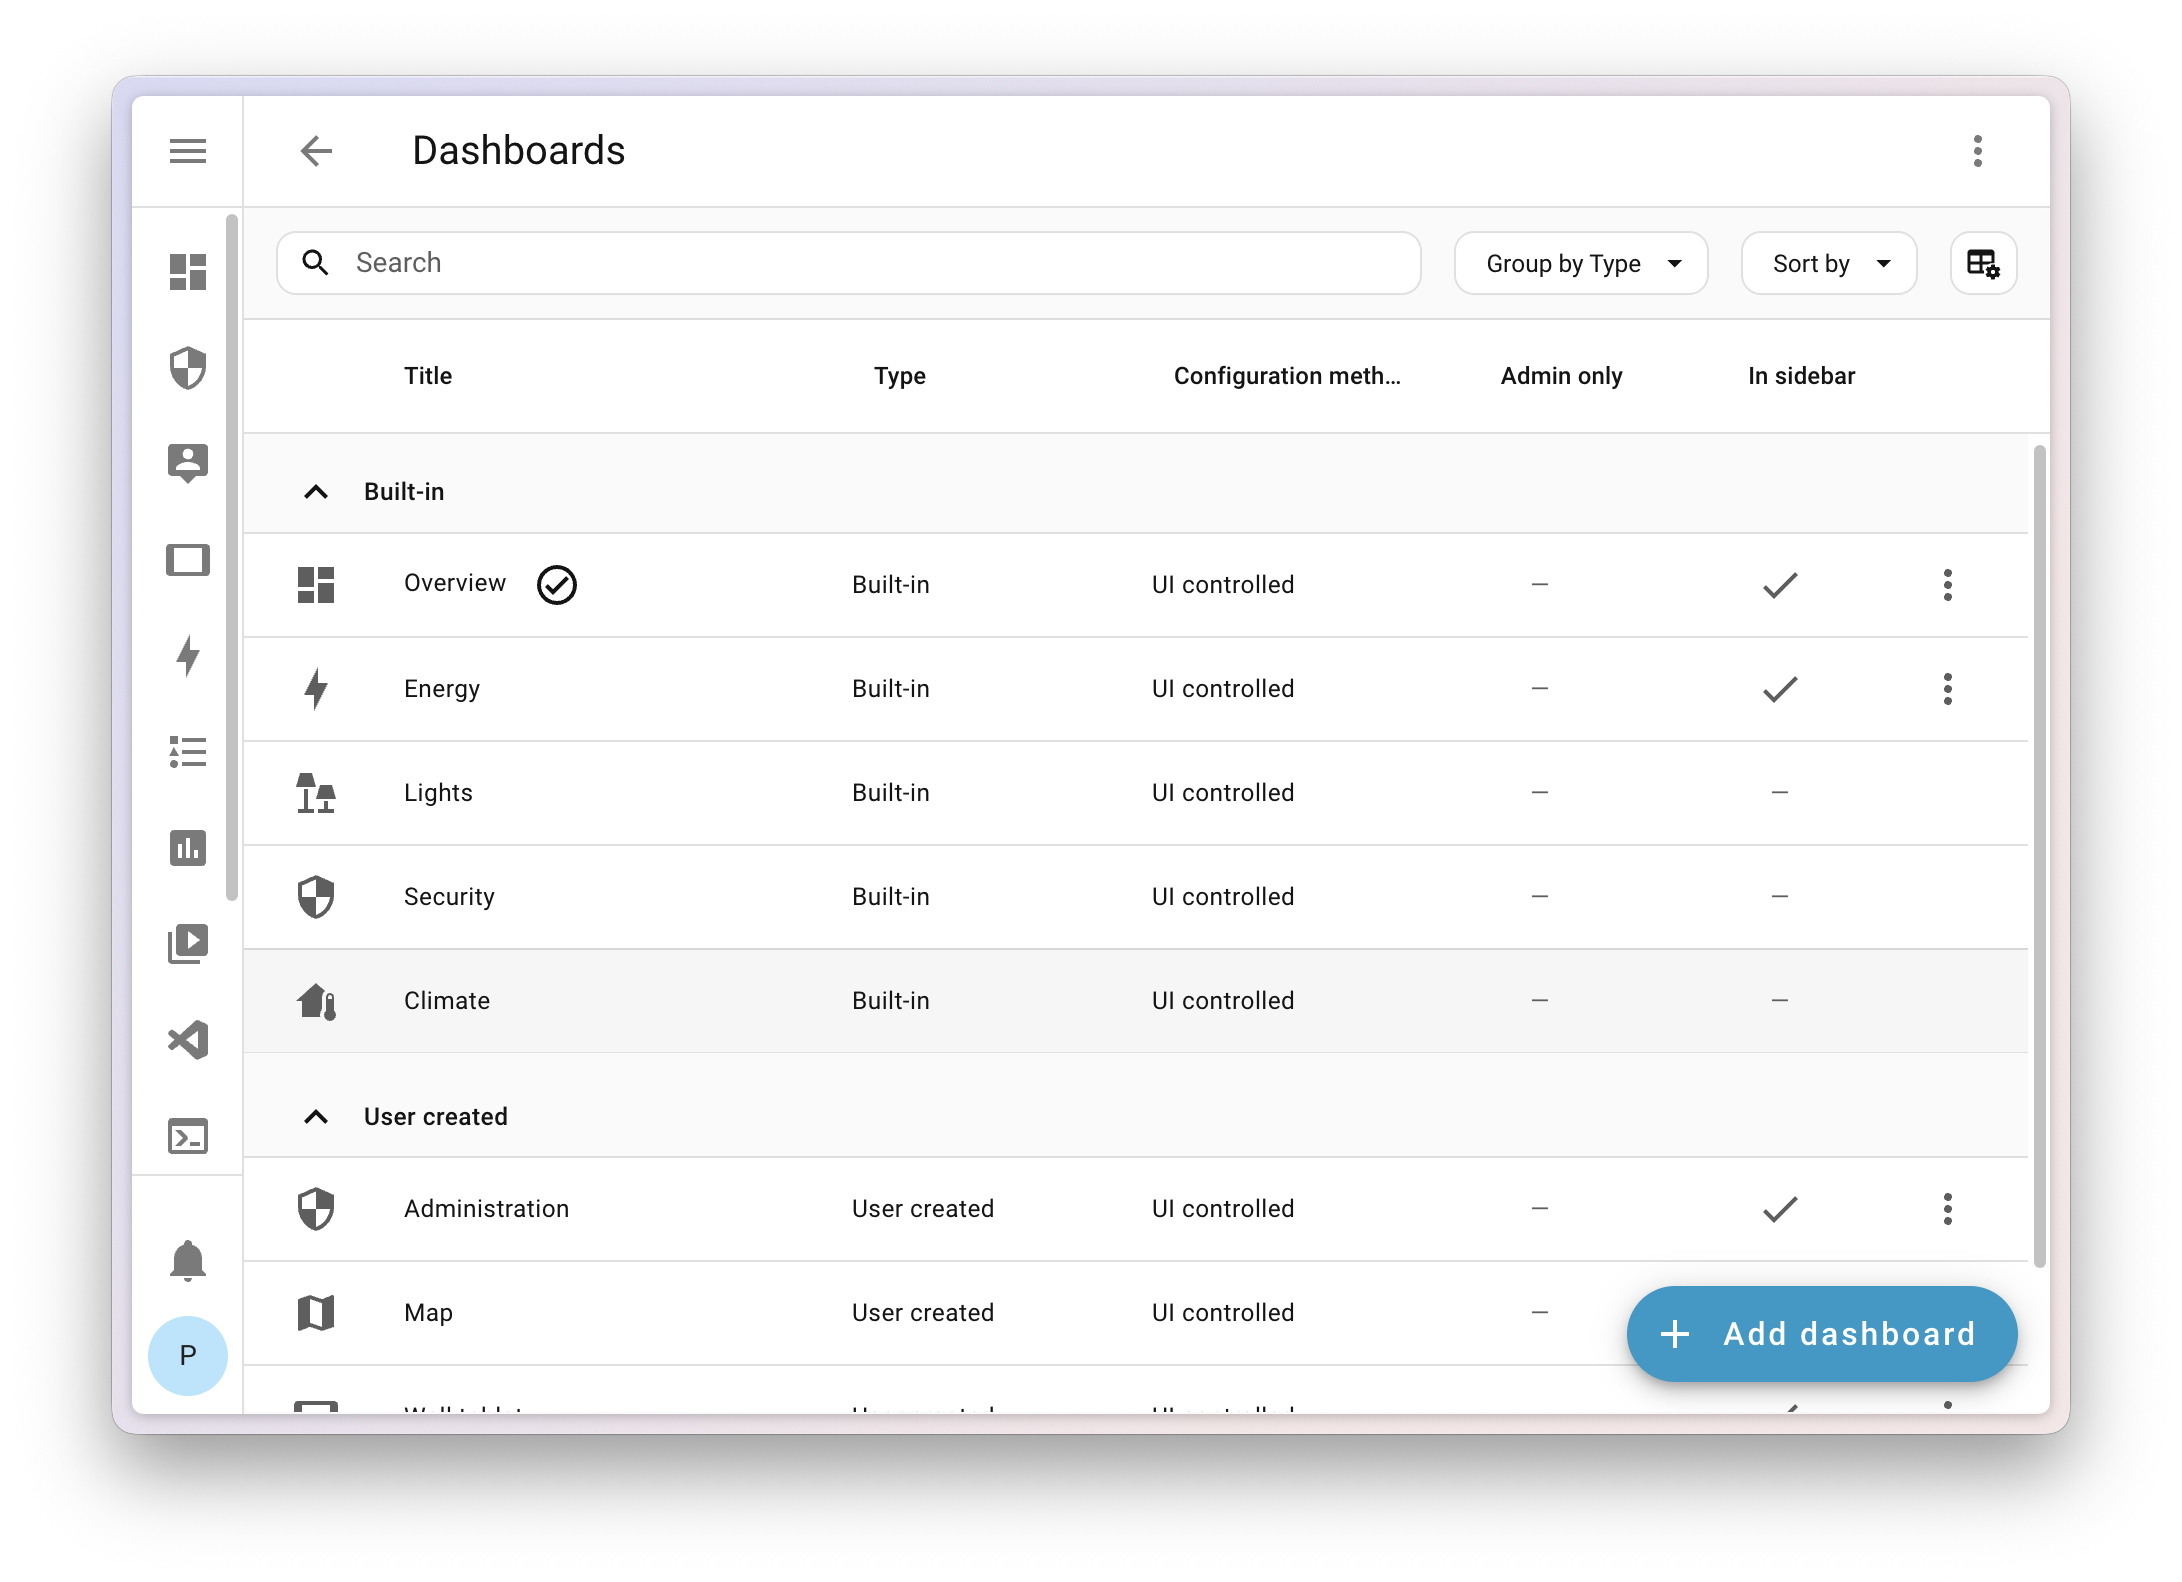


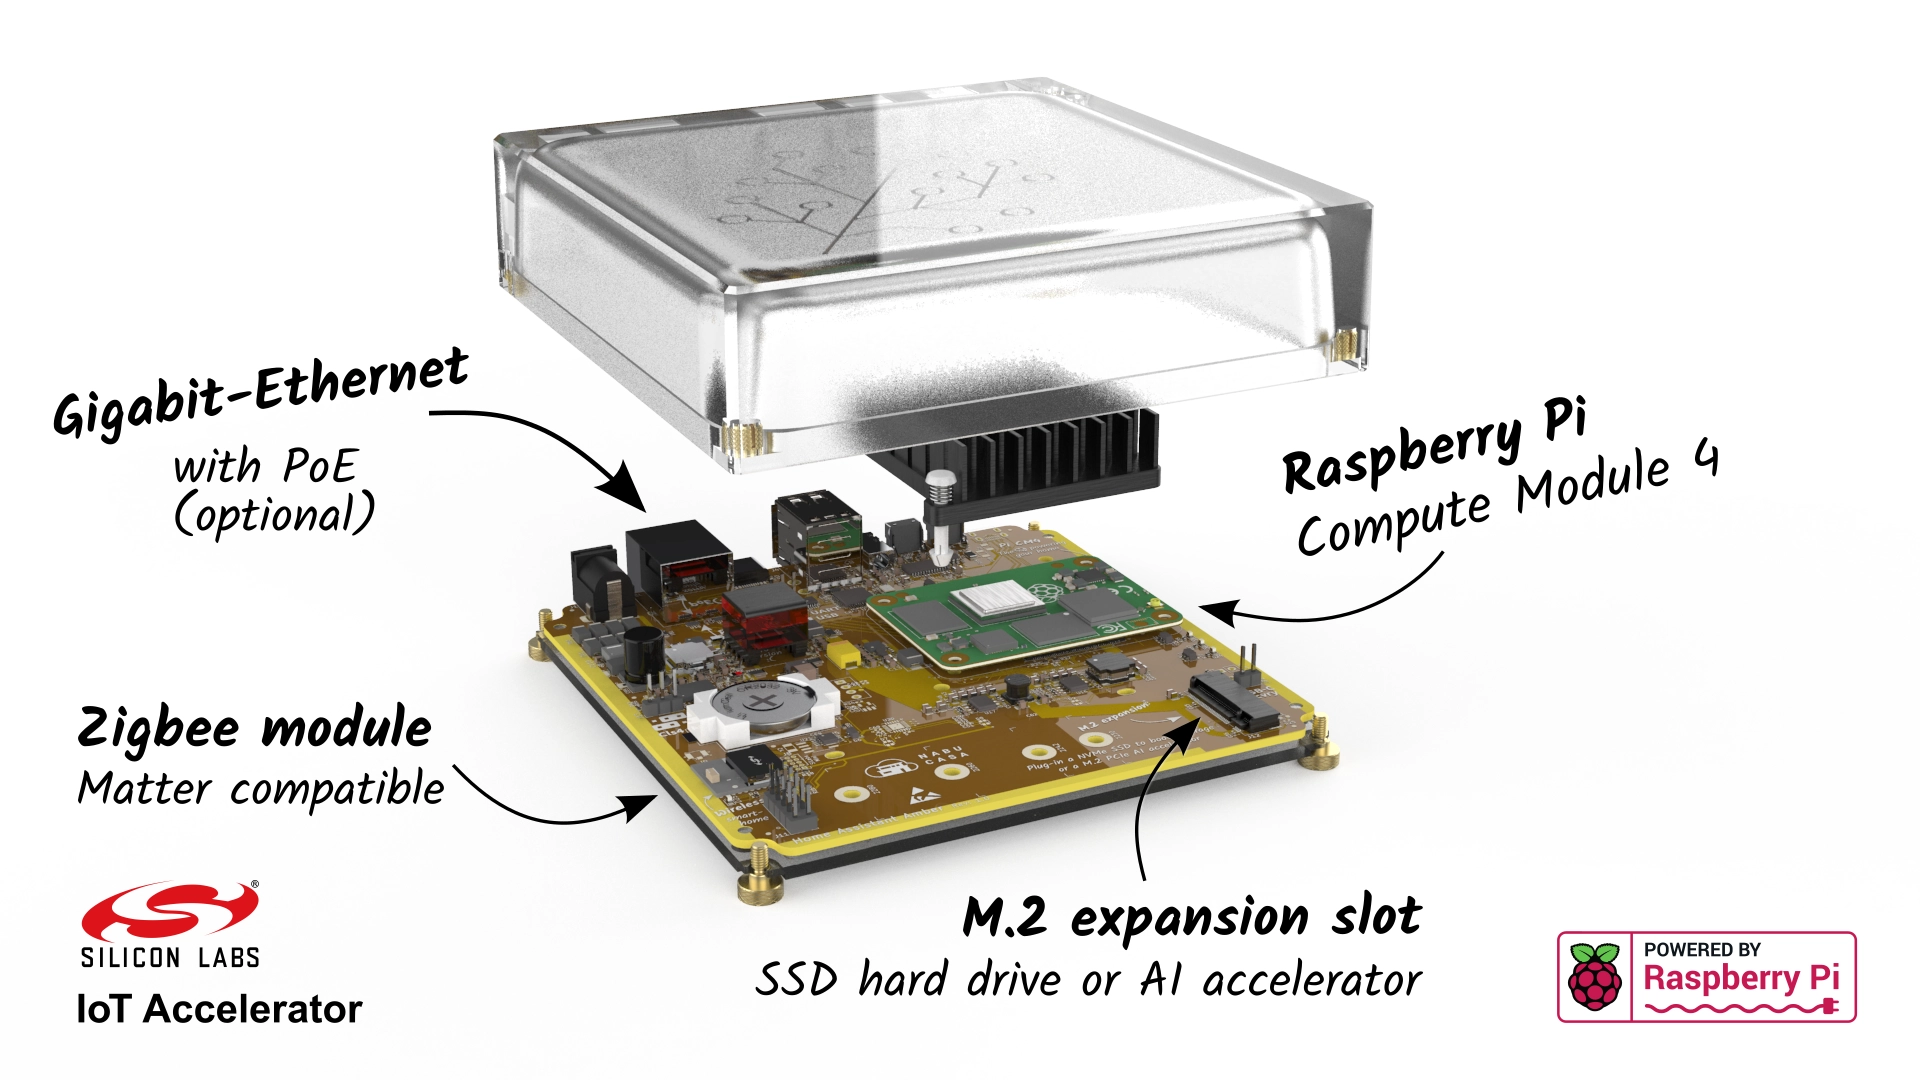 Small, but so much room for activities

 Home Assistant Connect ZWA-2 connected to a Waveshare ESP32-S3-ETH
 Home Assistant connected to the ZWA-2 via its integrated Wi-Fi chip.
 Home Assistant connected to the ZWA-2 via the PoE module.
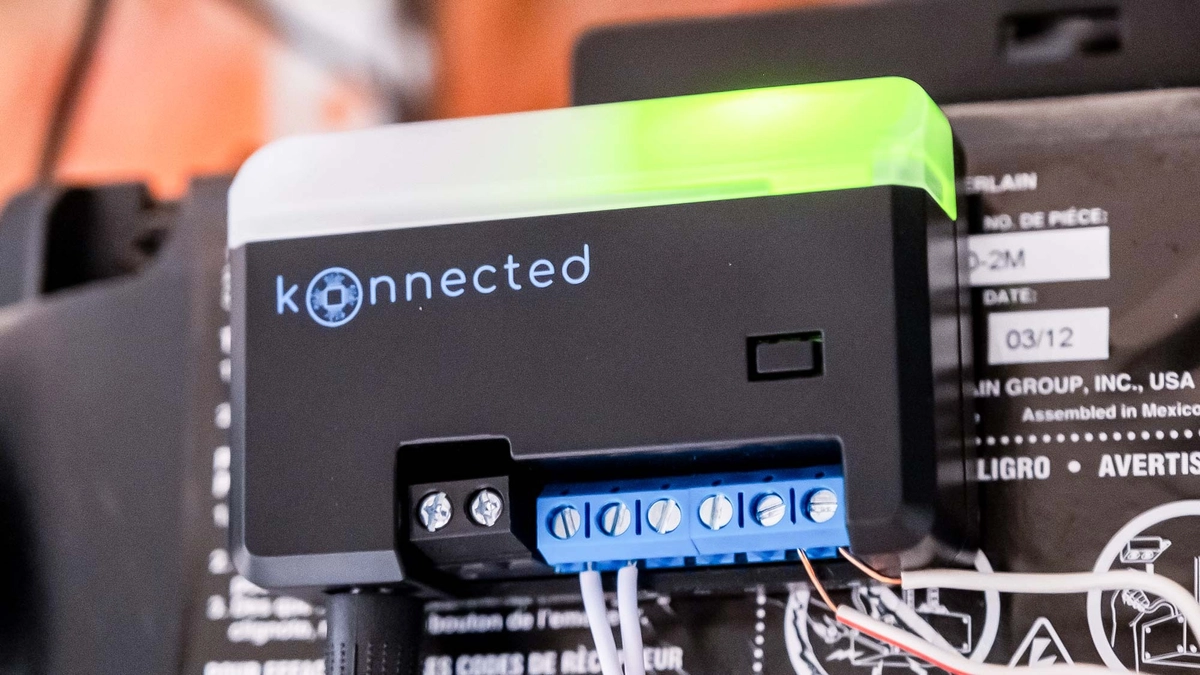 The Konnected Smart Garage Door Opener blaQ
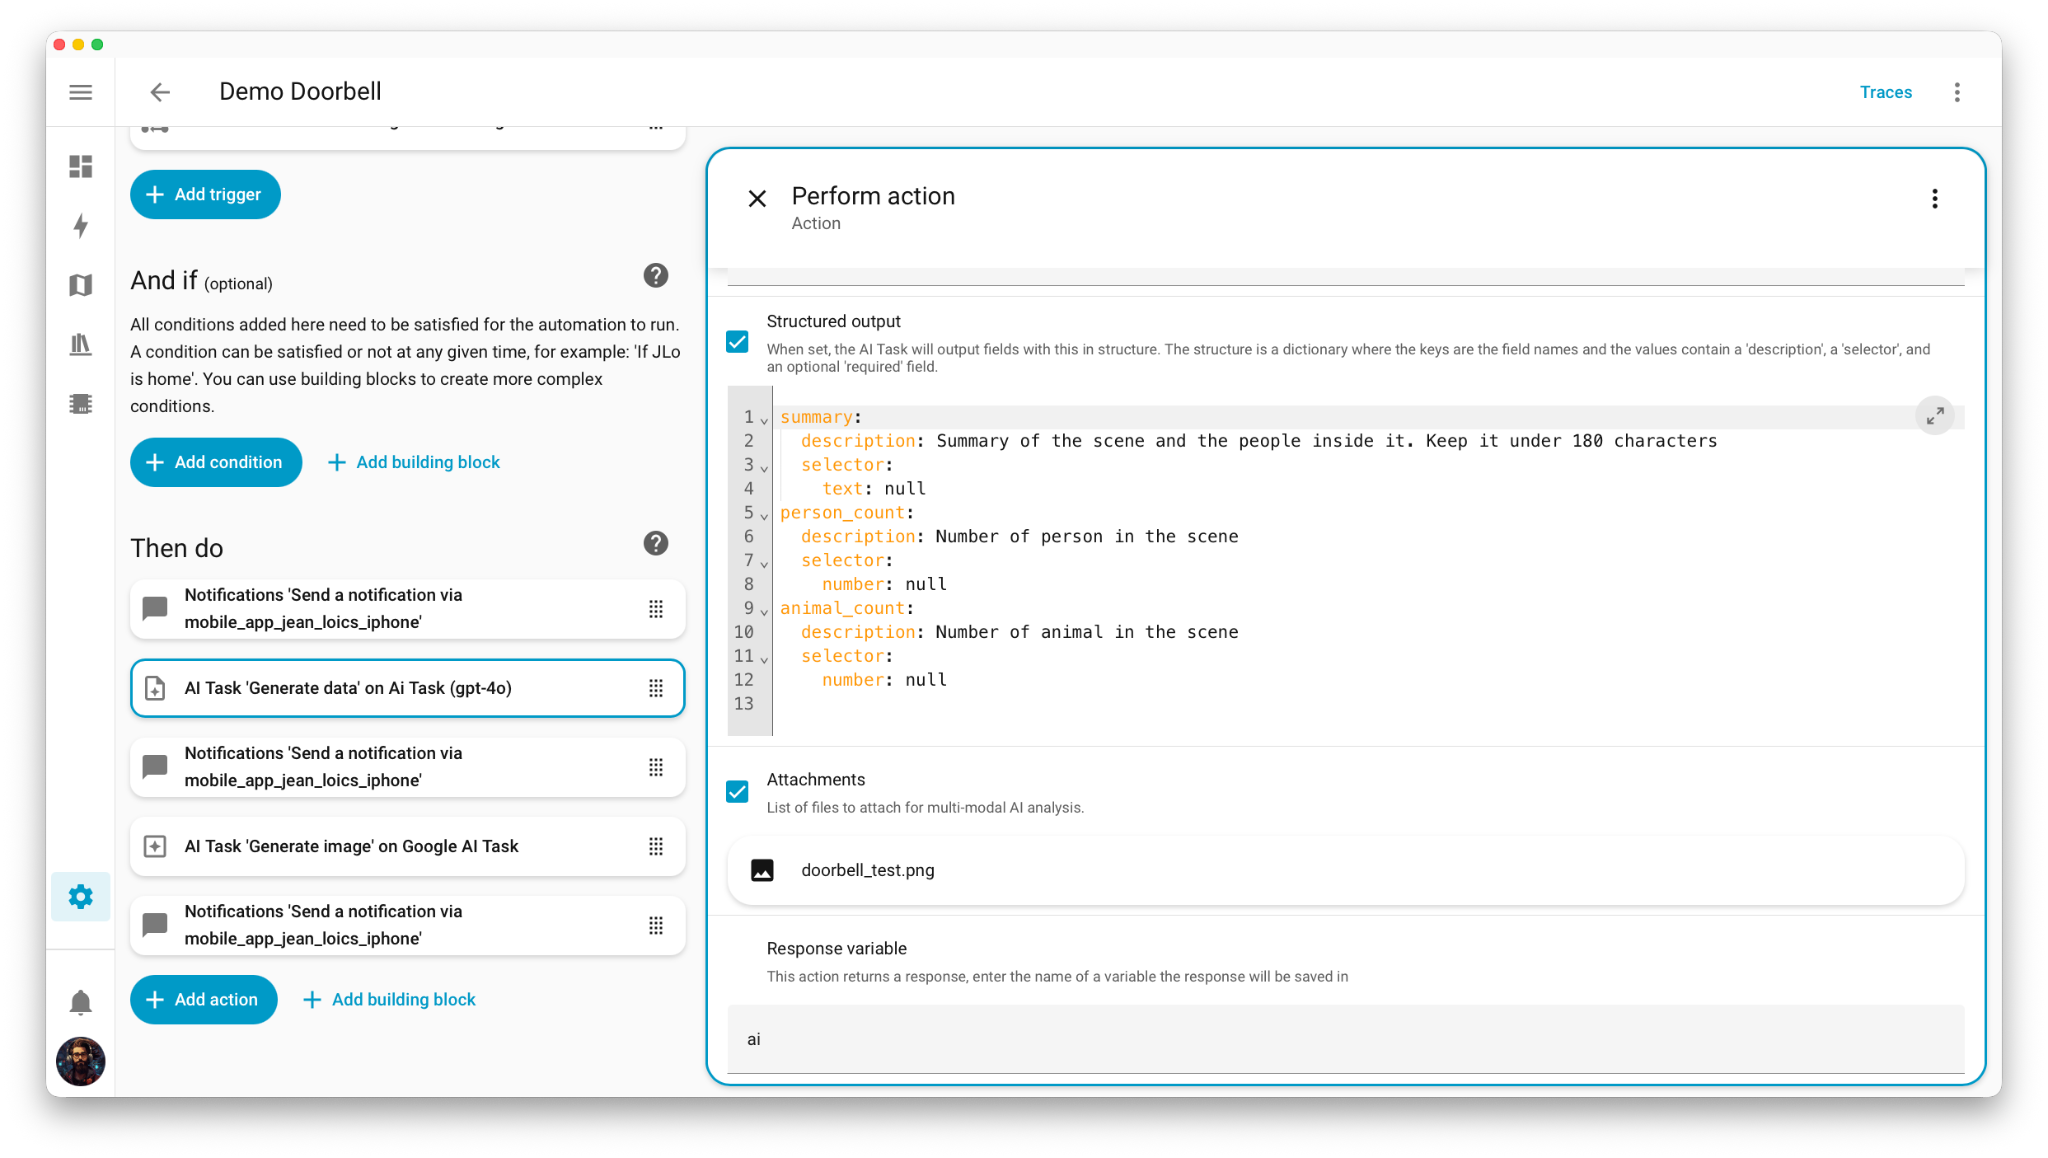


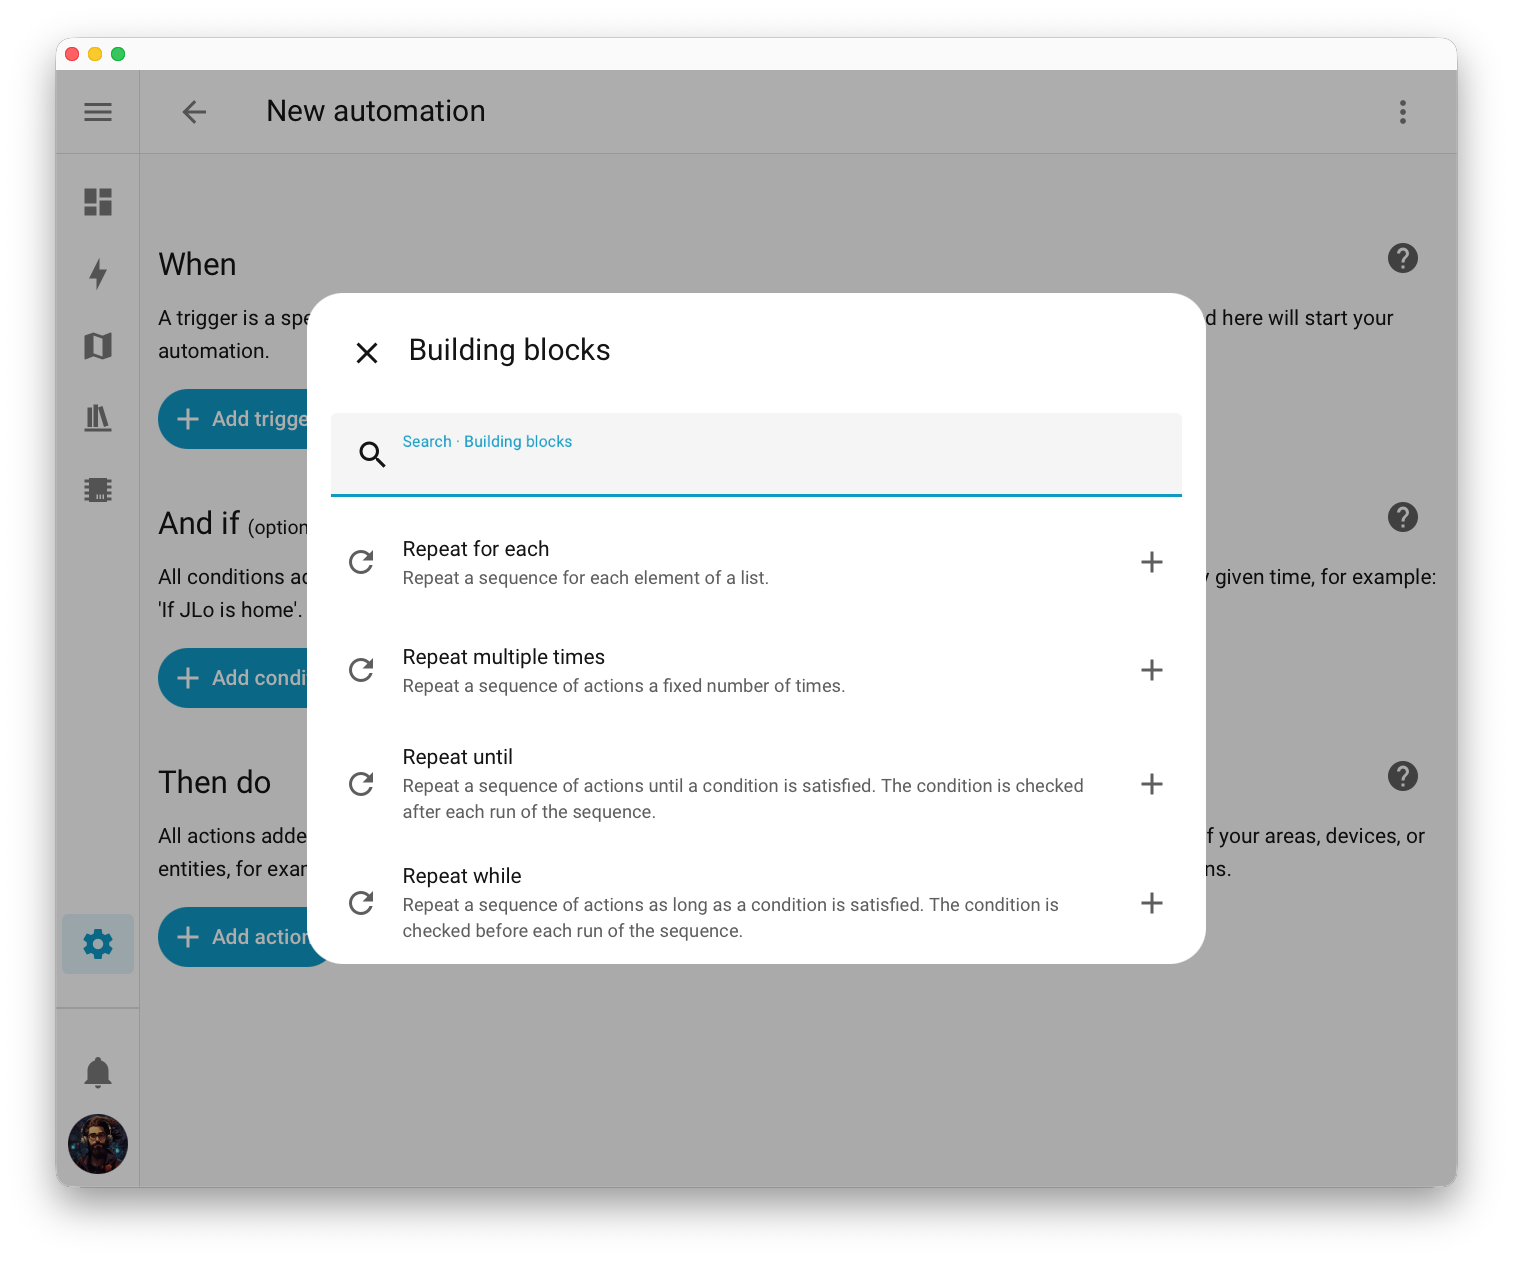
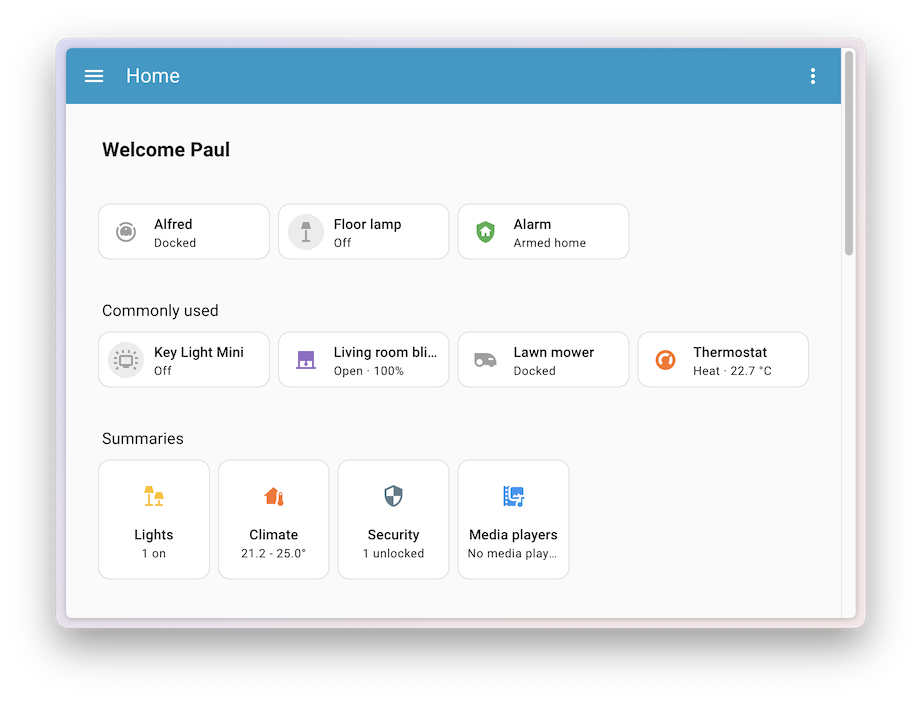
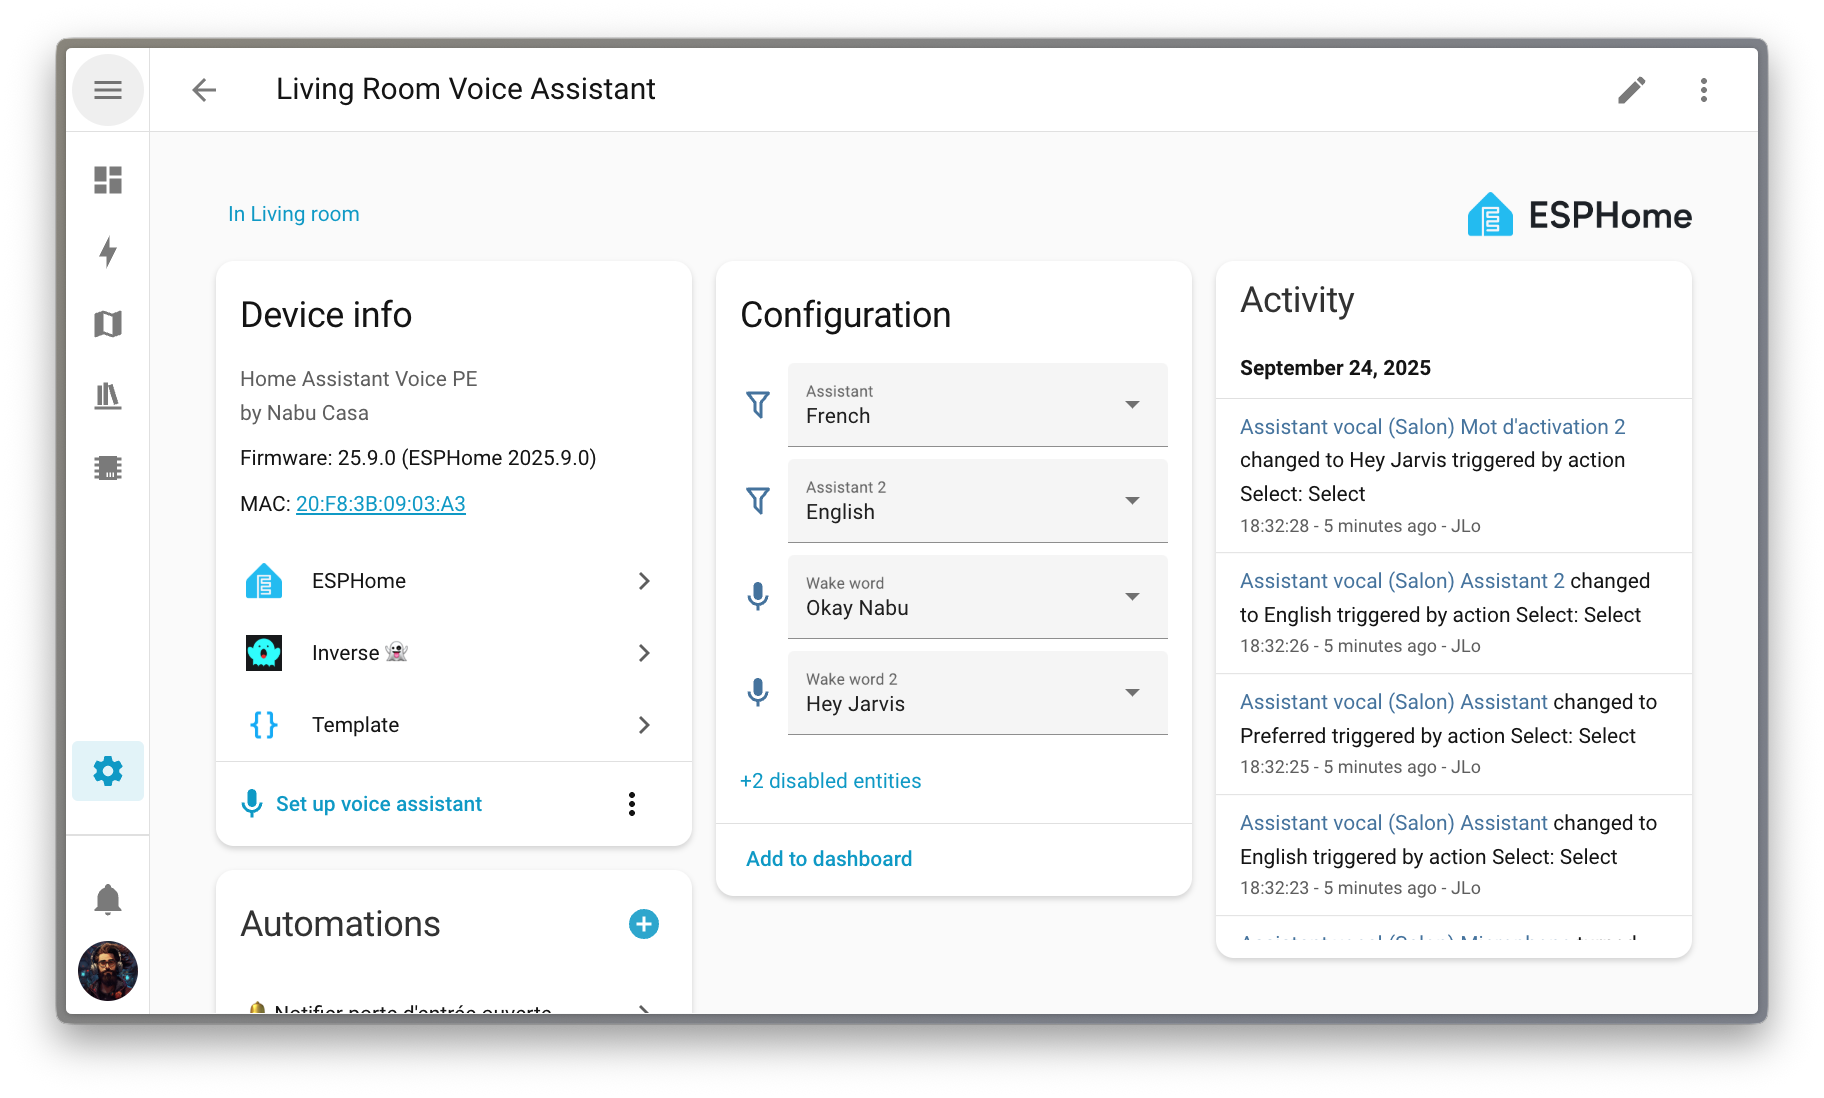
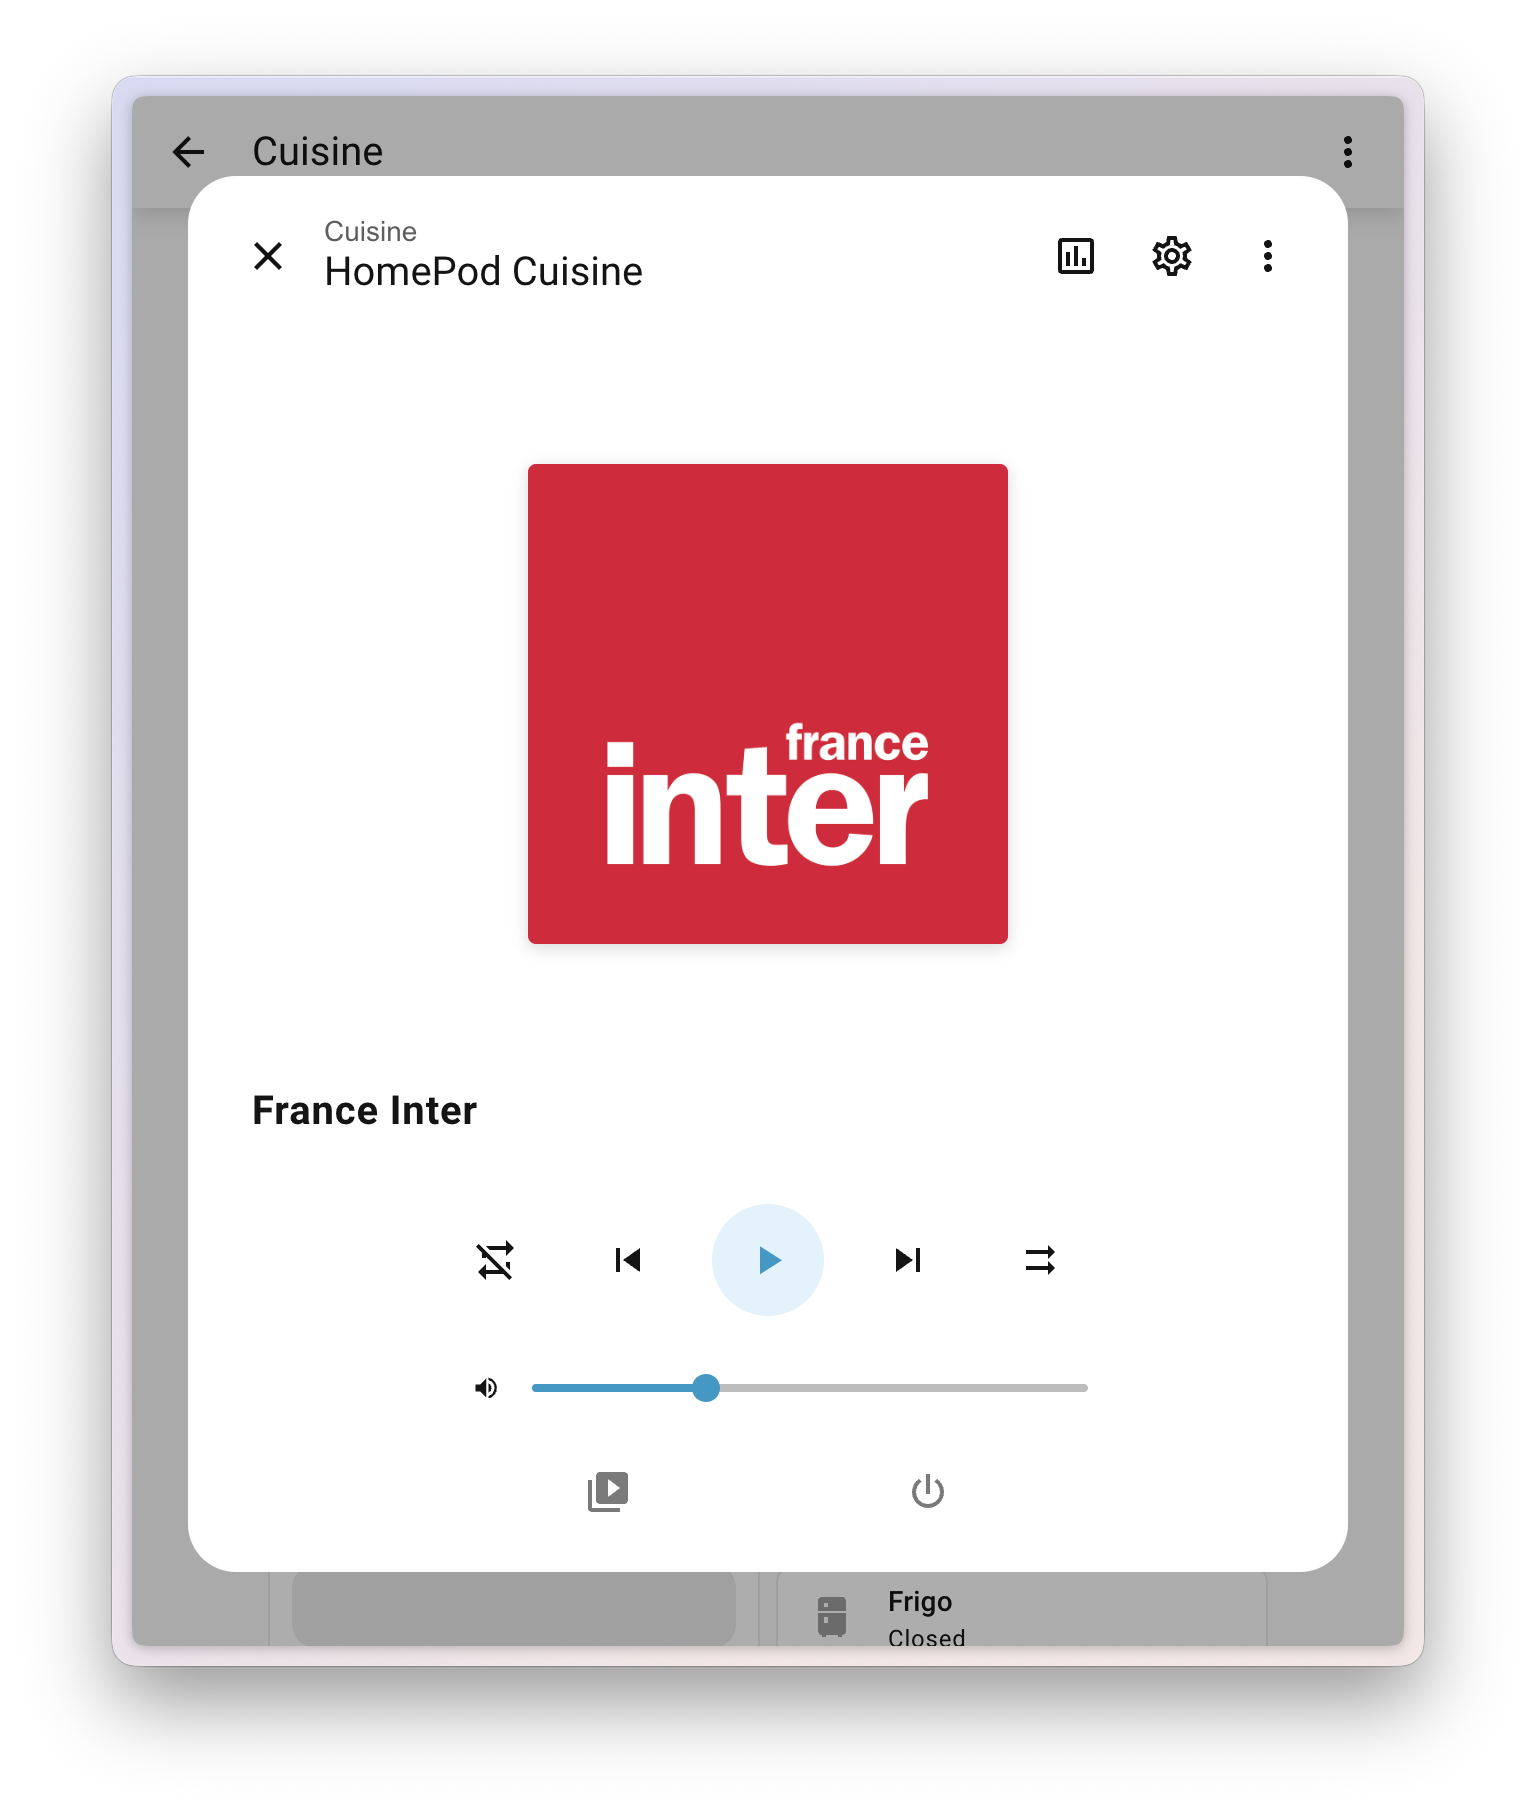
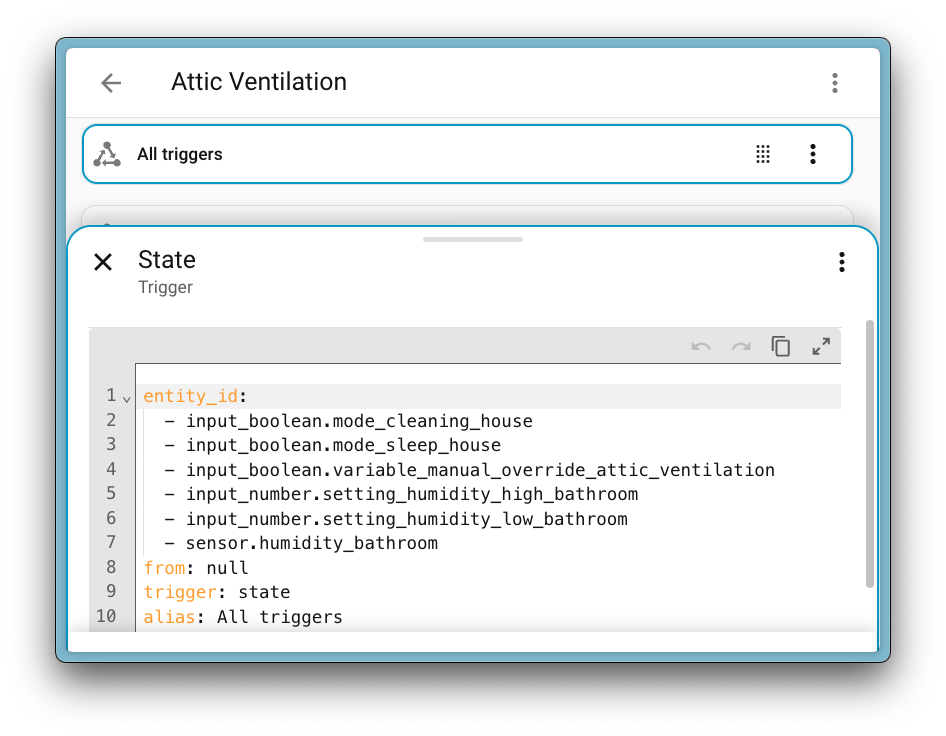

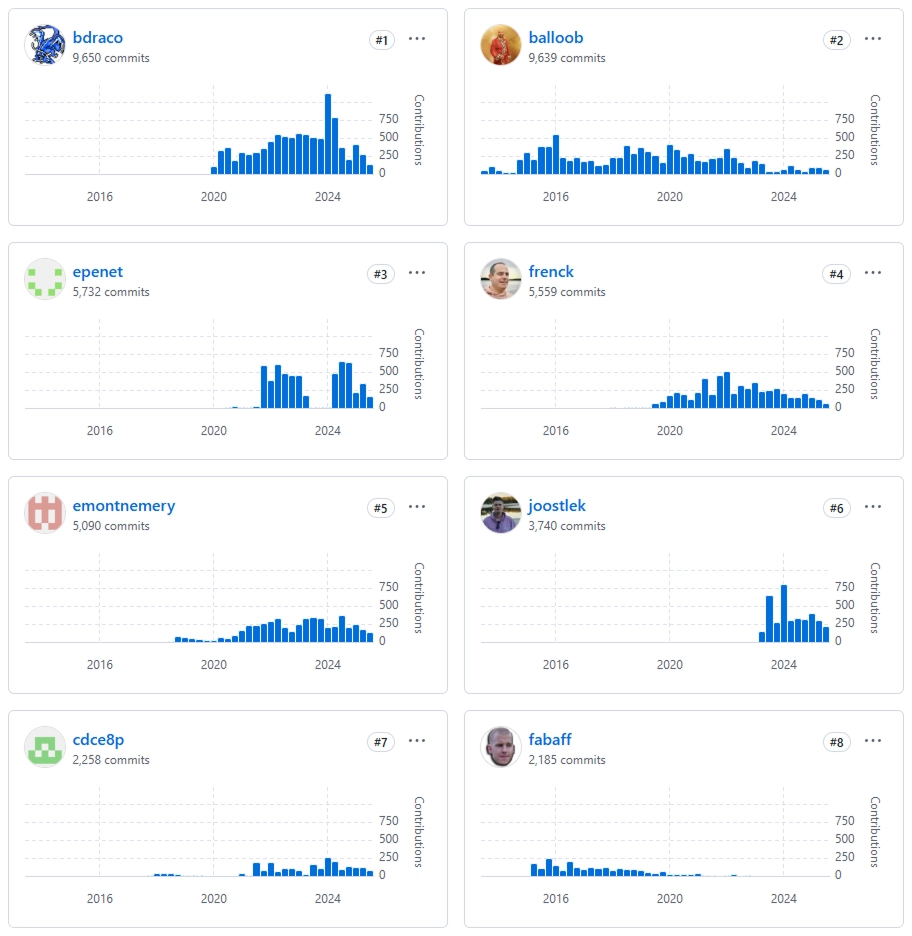 The top 8 contributors of all time in home-assistant/core👏🏻
 Voice Preview Edition is not only open and powerful, but it looks and feels great too!
 When clicked, it will send your automation configuration along with the titles of your existing automations and labels to AI to suggest a name, description, category, and labels for your new automation. Over the coming months, we’re going to explore what other features can benefit from AI suggestions.
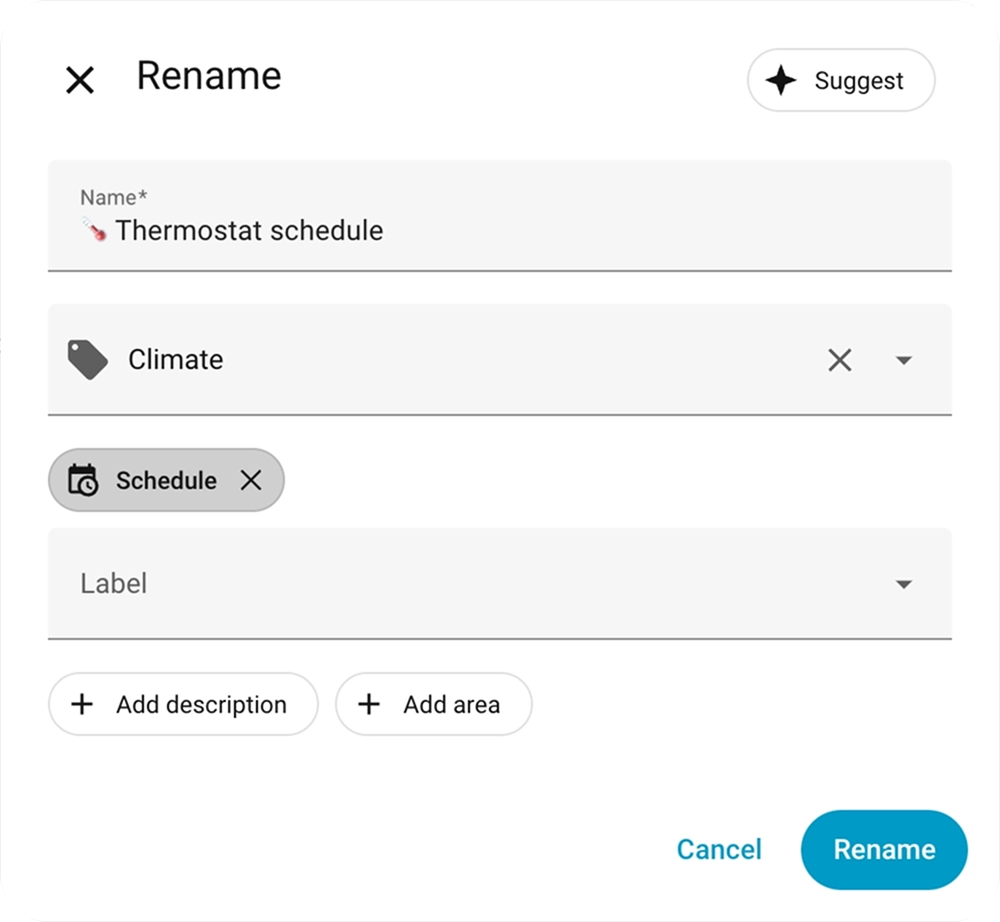
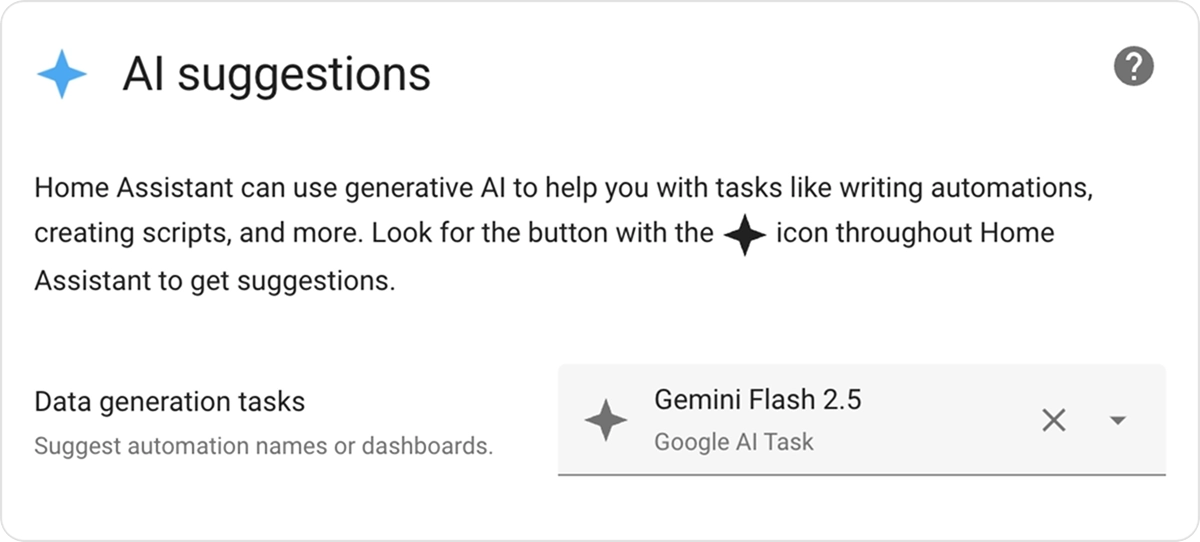
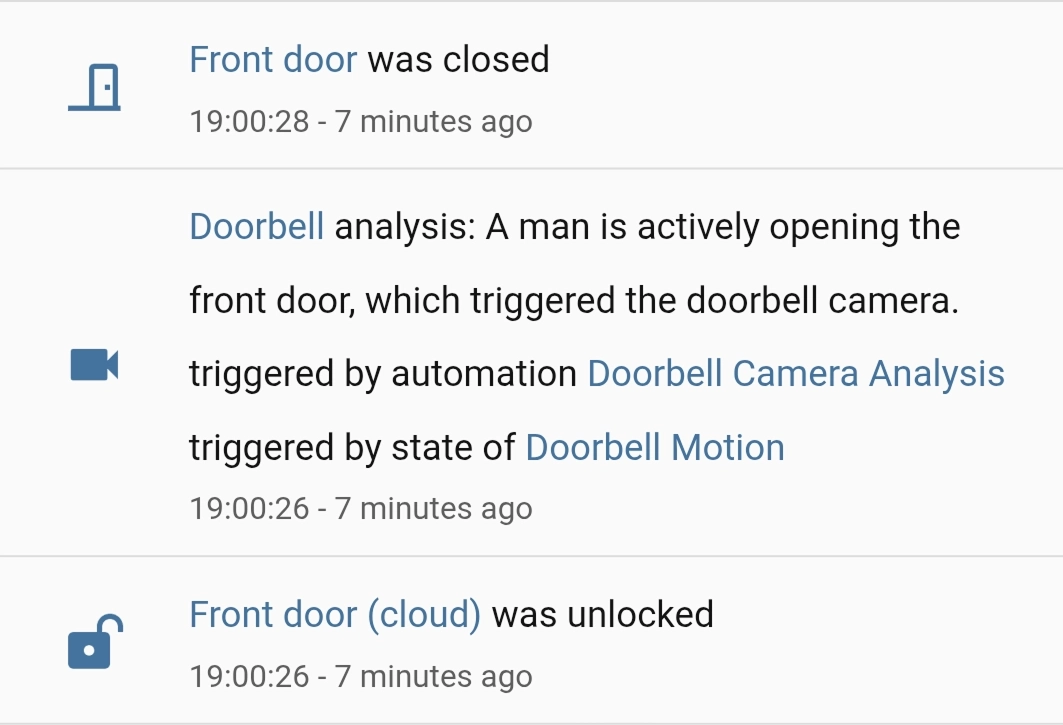 An automation triggers an AI Task to identify what caused motion on a camera.

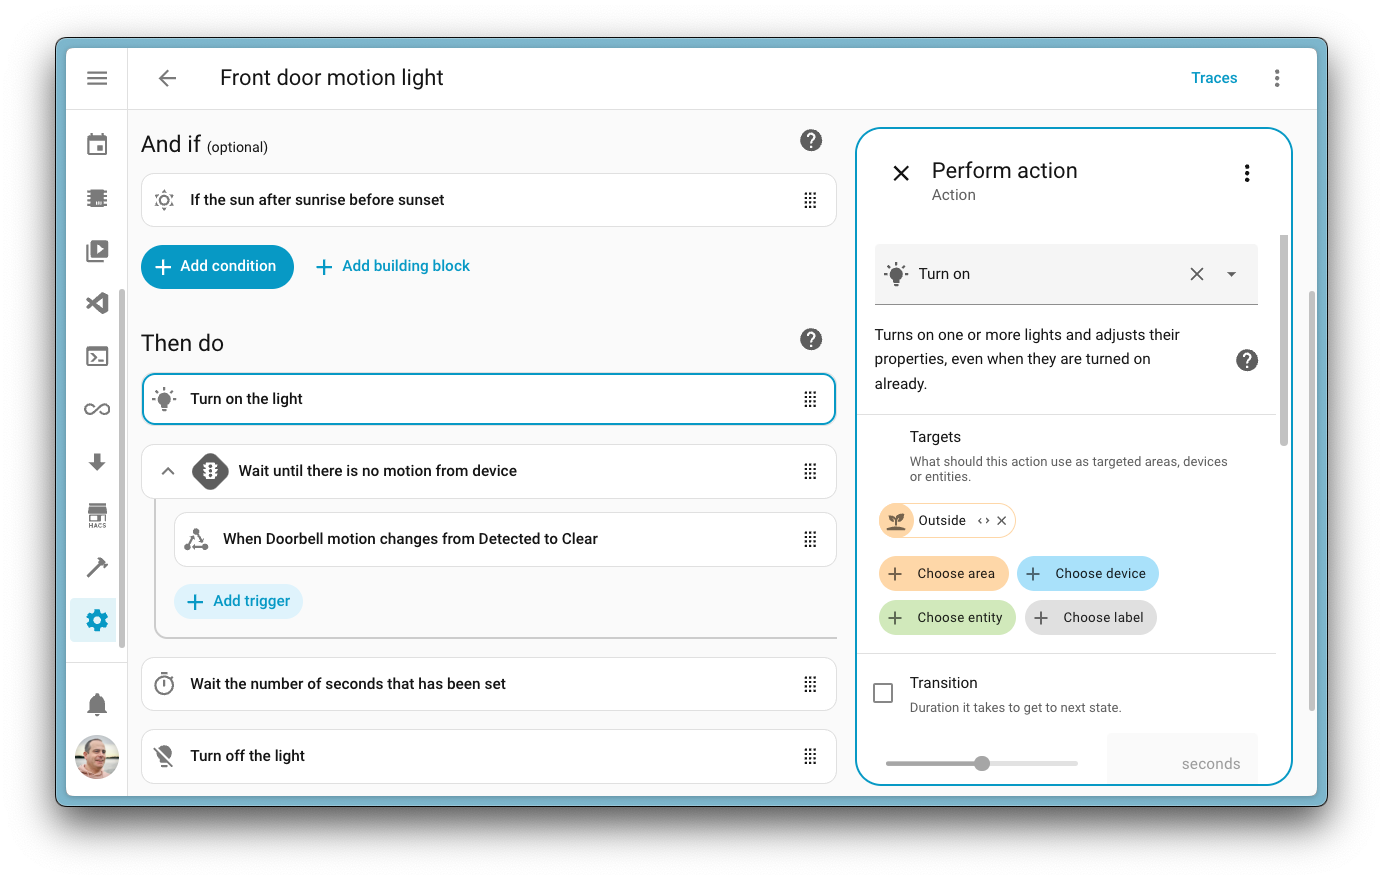
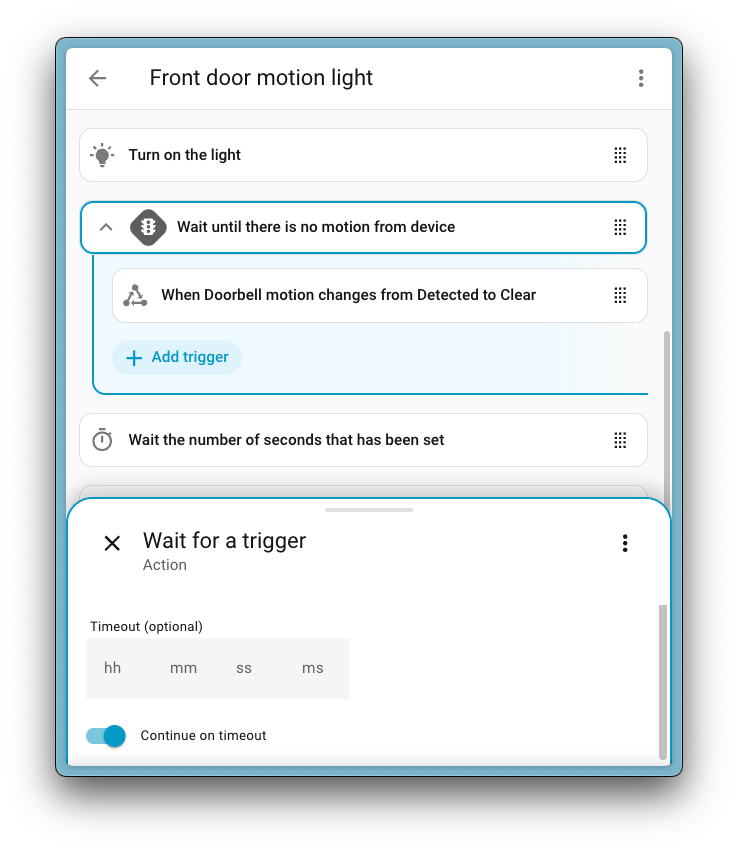

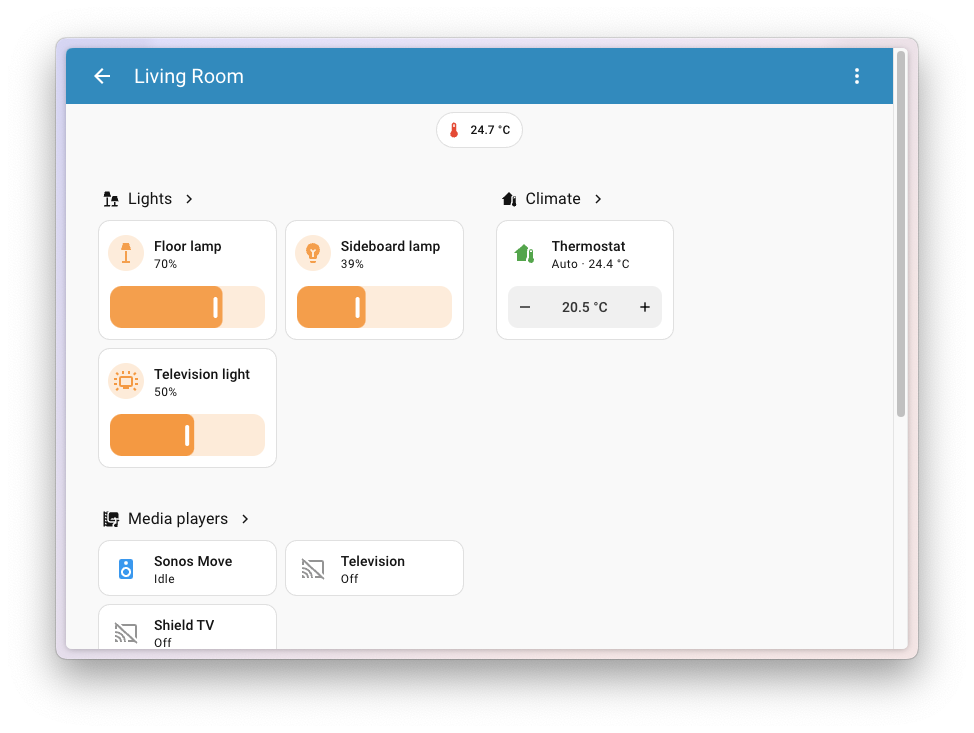
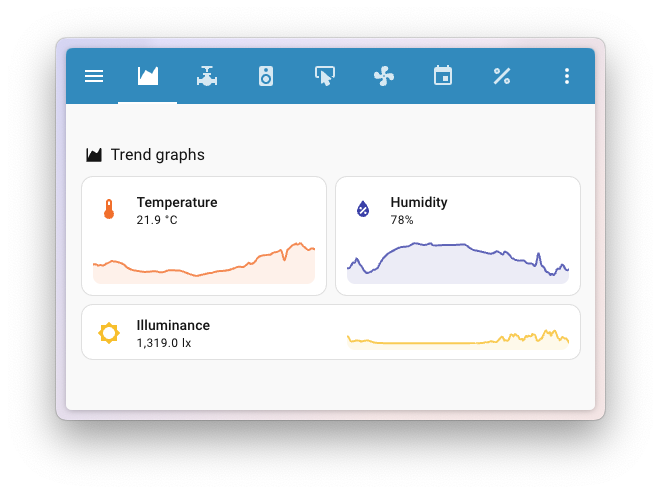
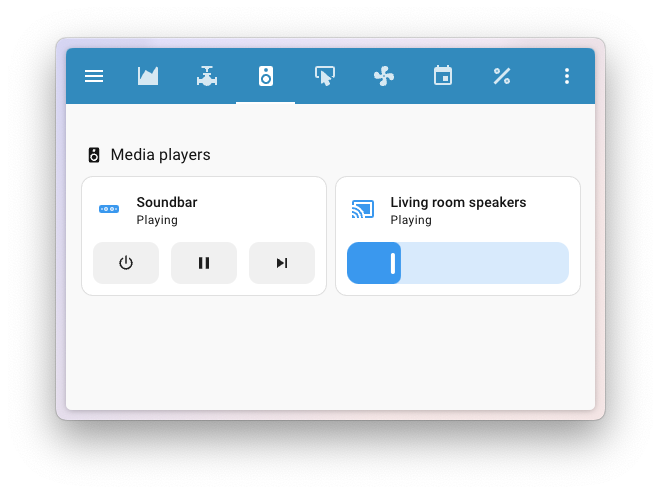
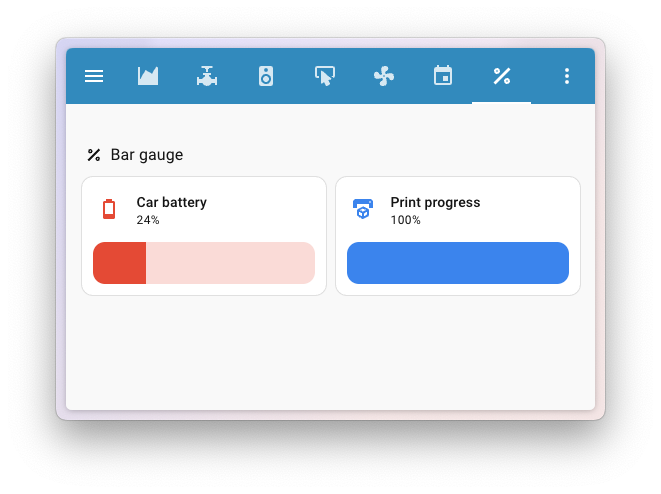
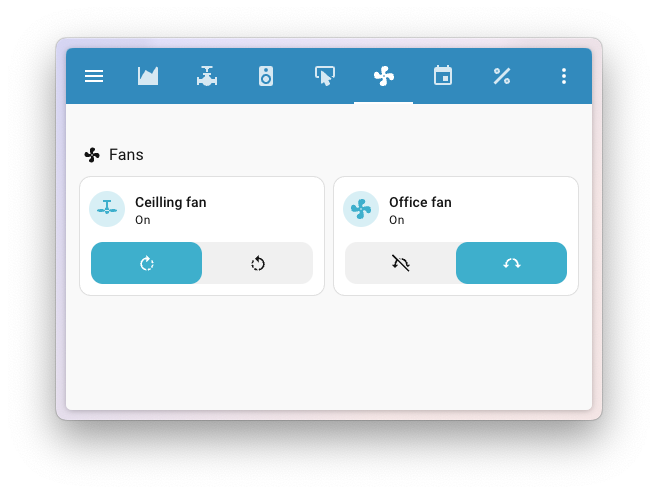
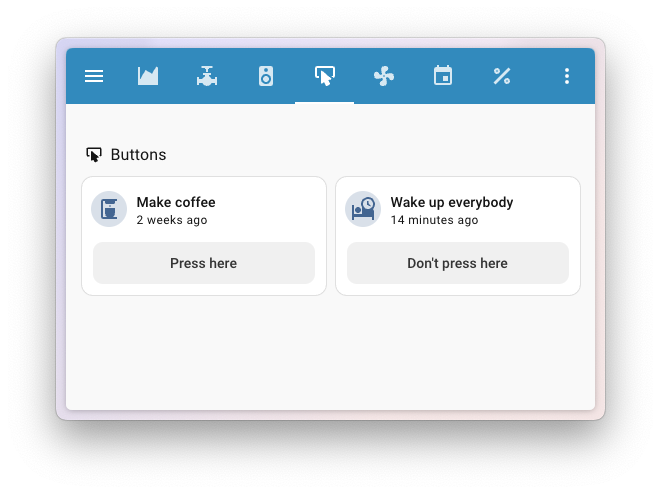
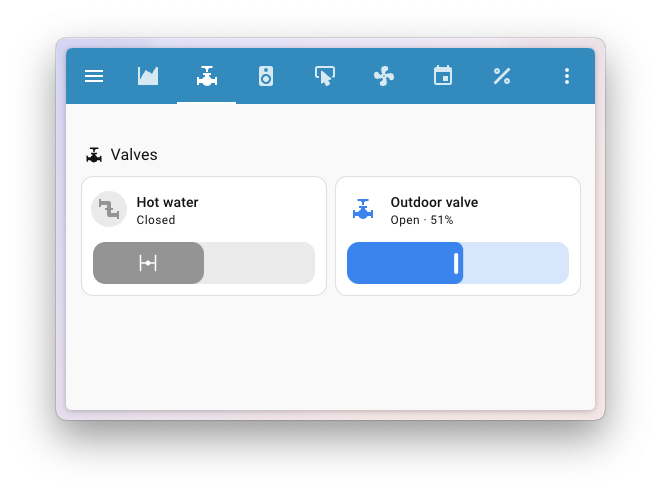
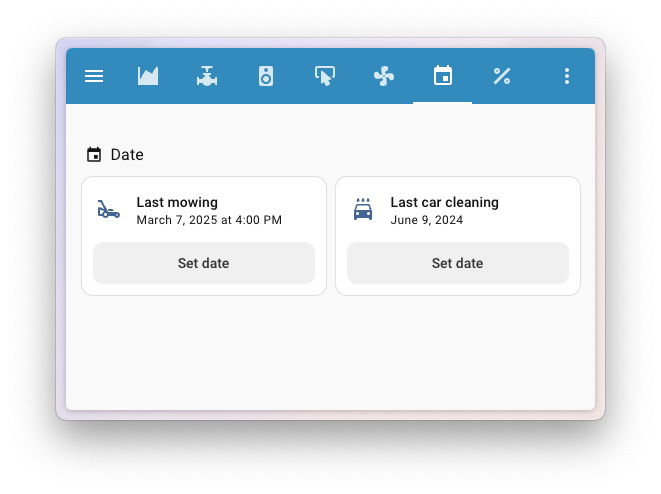
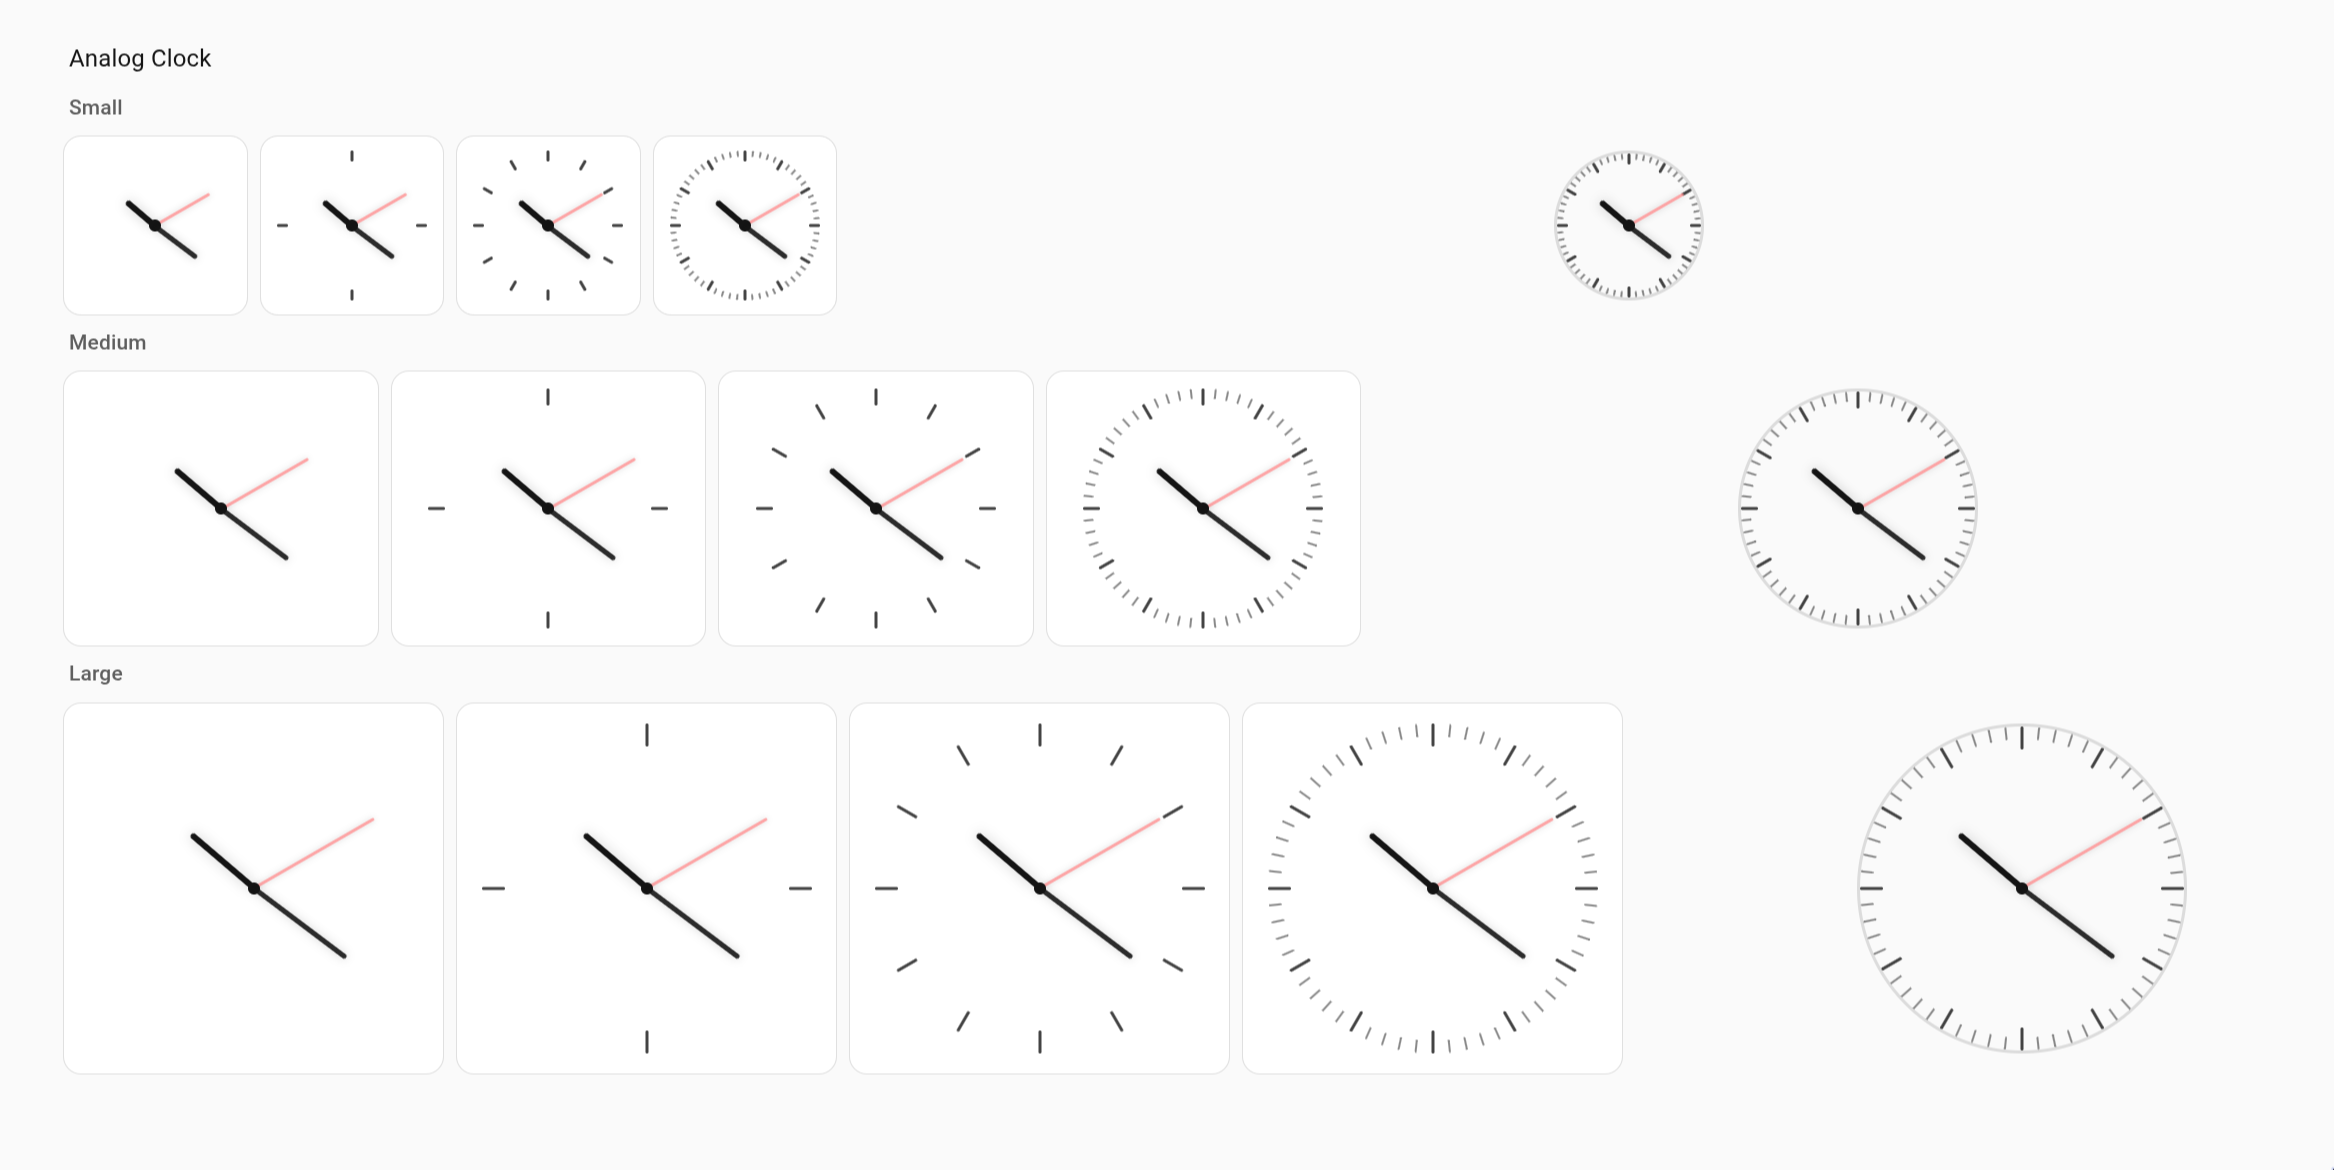
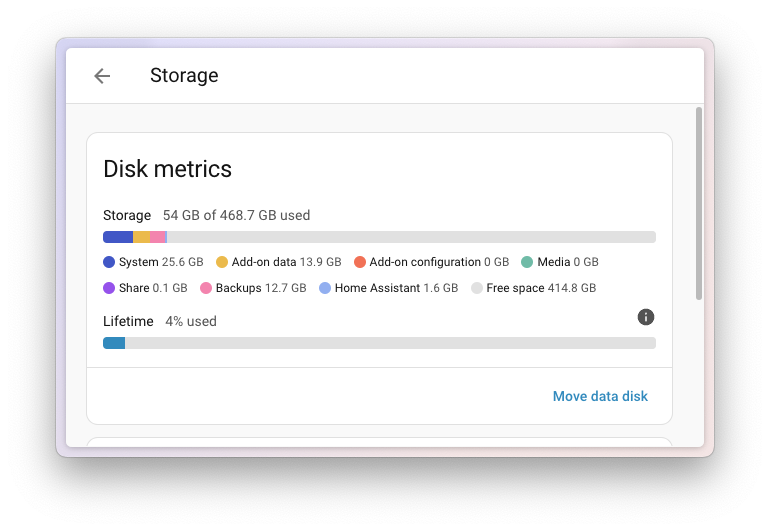

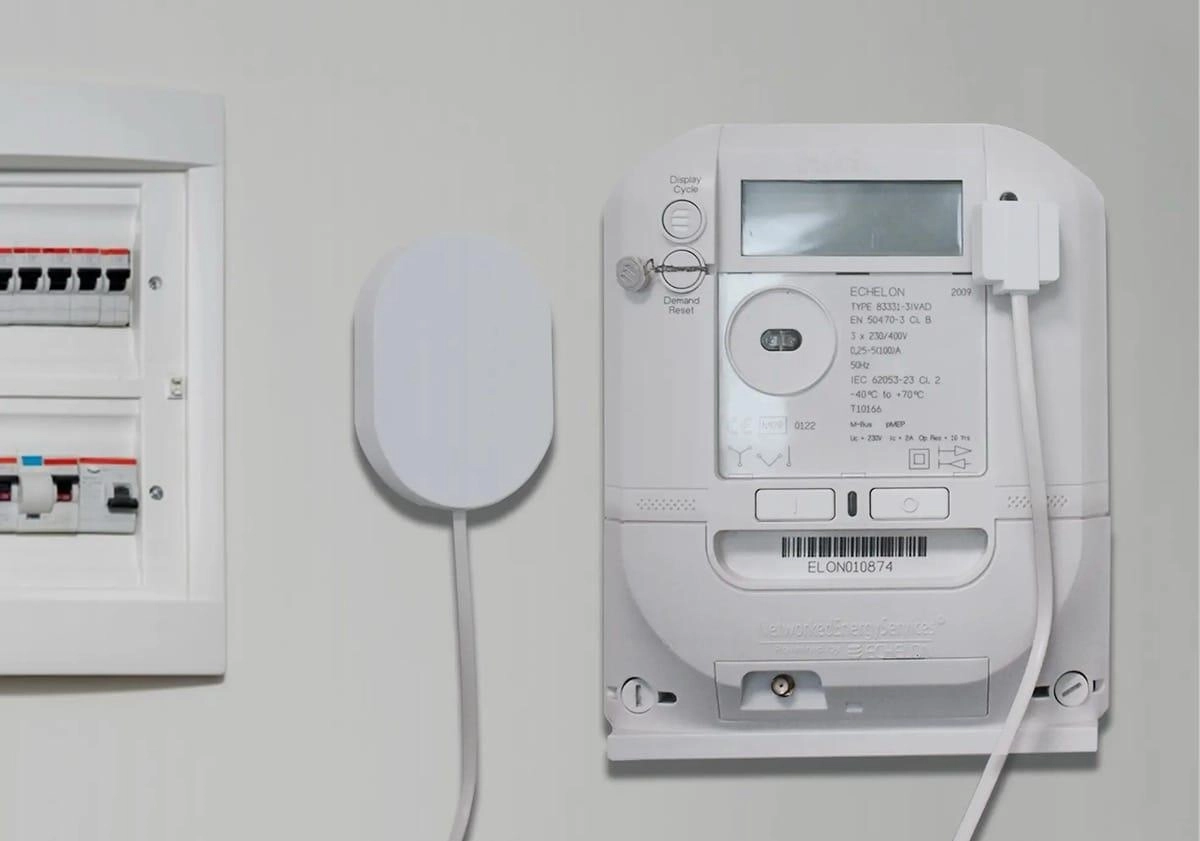 When your energy company won’t provide your raw usage data, there’s always another way 😉
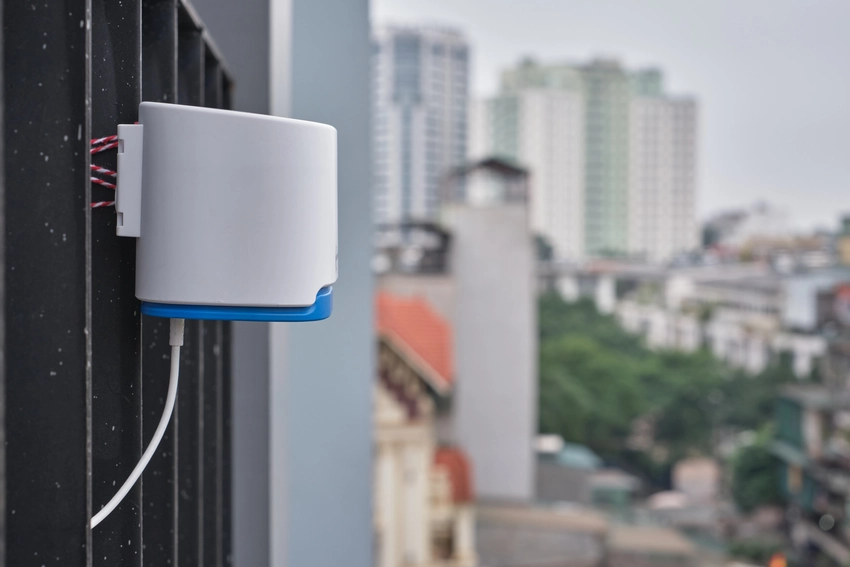 An Open Air Monitor in Vietnam
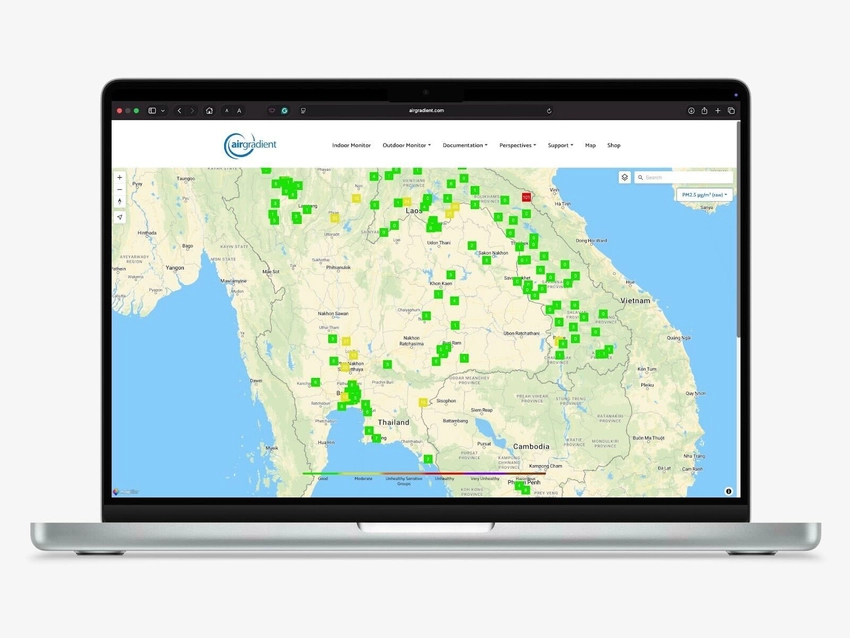
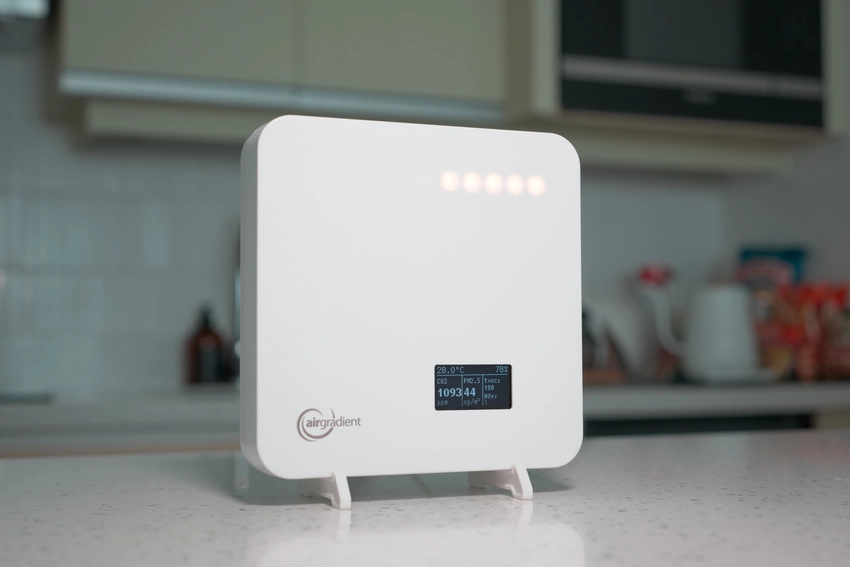 Finally, a metric to show precisely how badly you burned your dinner
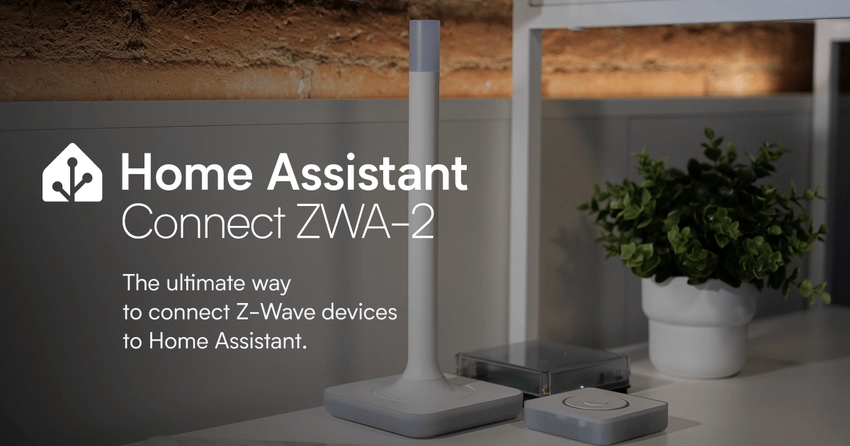


 See that bridge in the background? Our prototype connected to a device all the way over there.

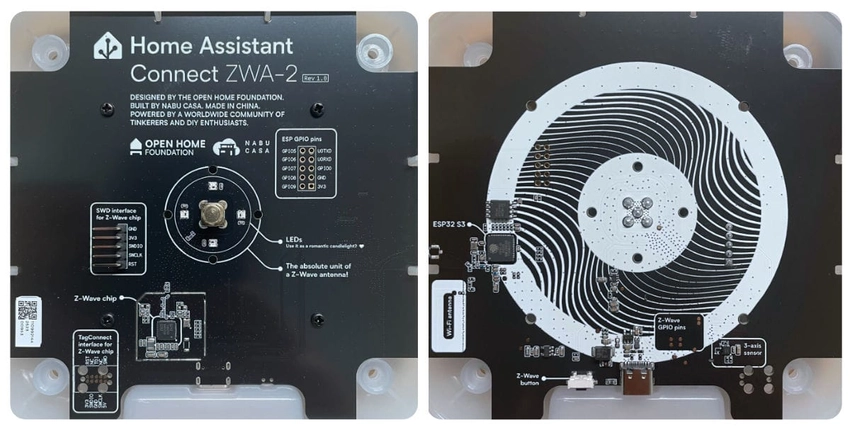 I’ll save you the time opening it up; here is the front and back of the PCB.

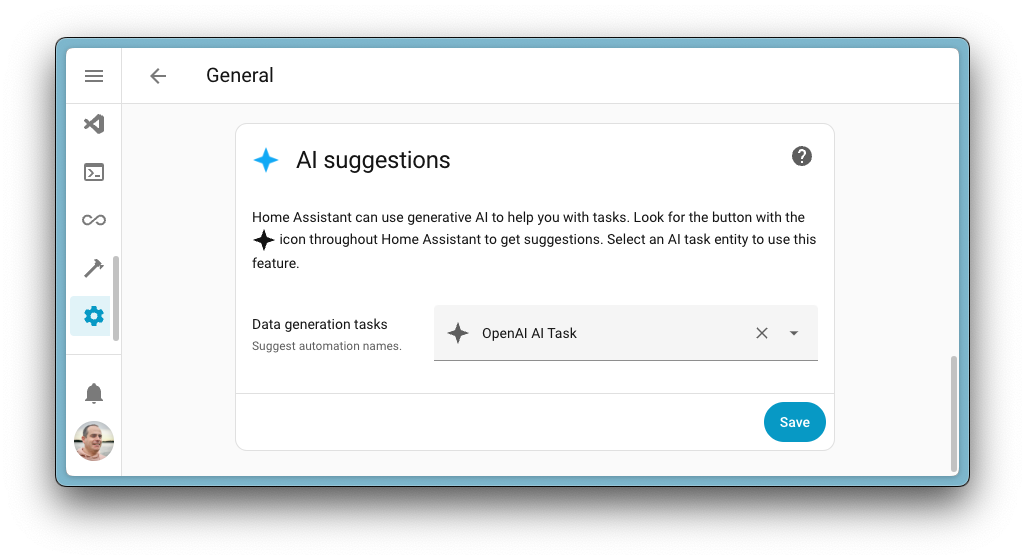

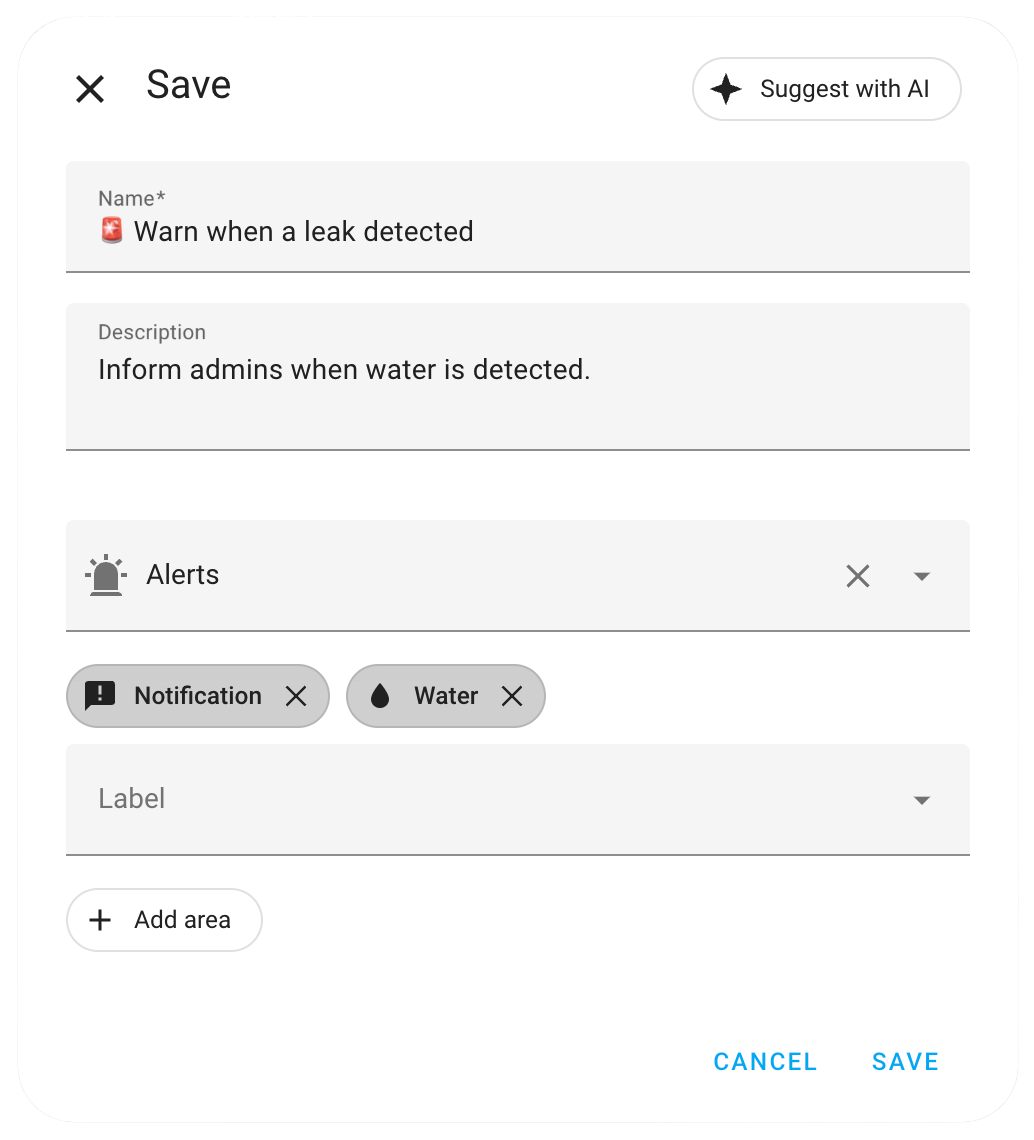
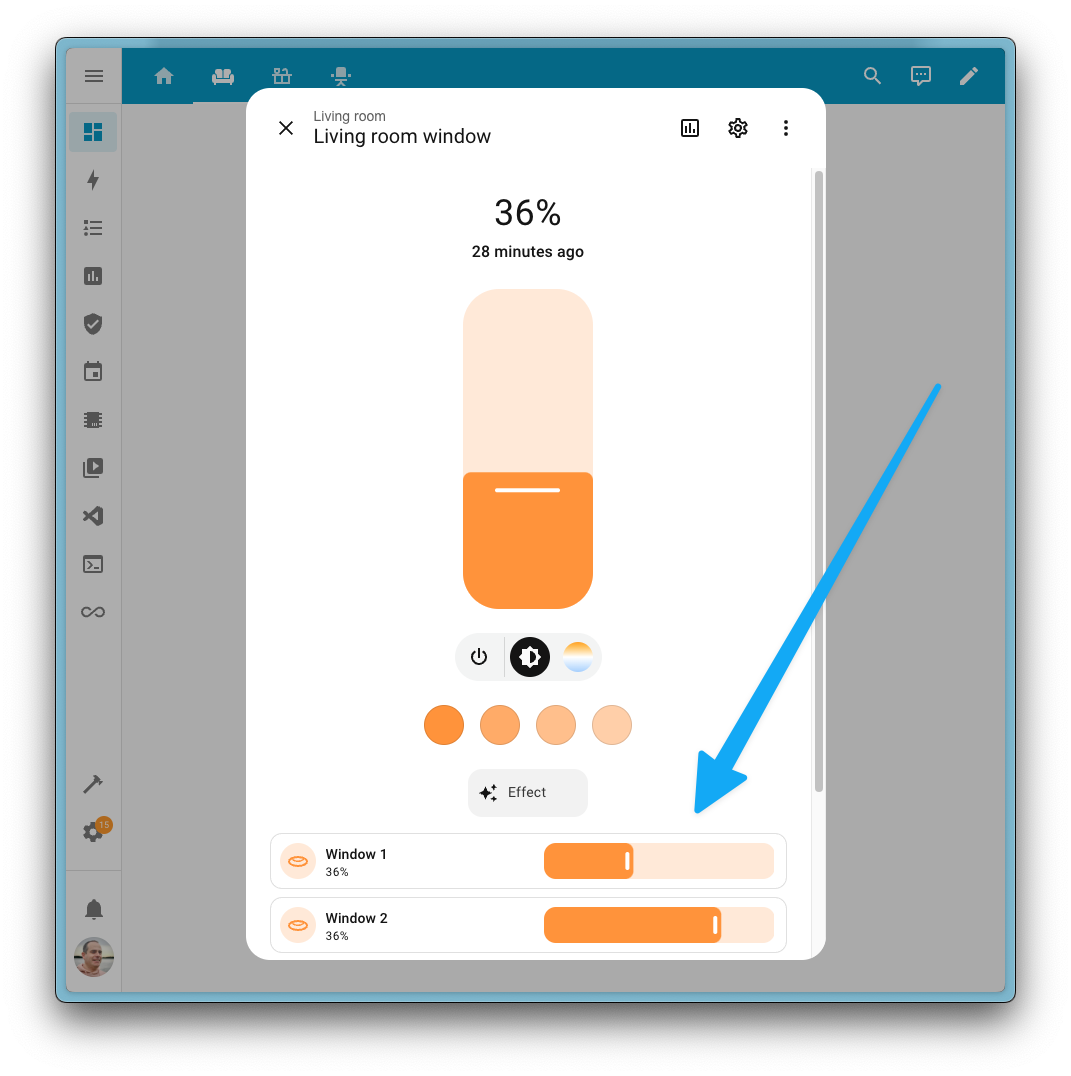
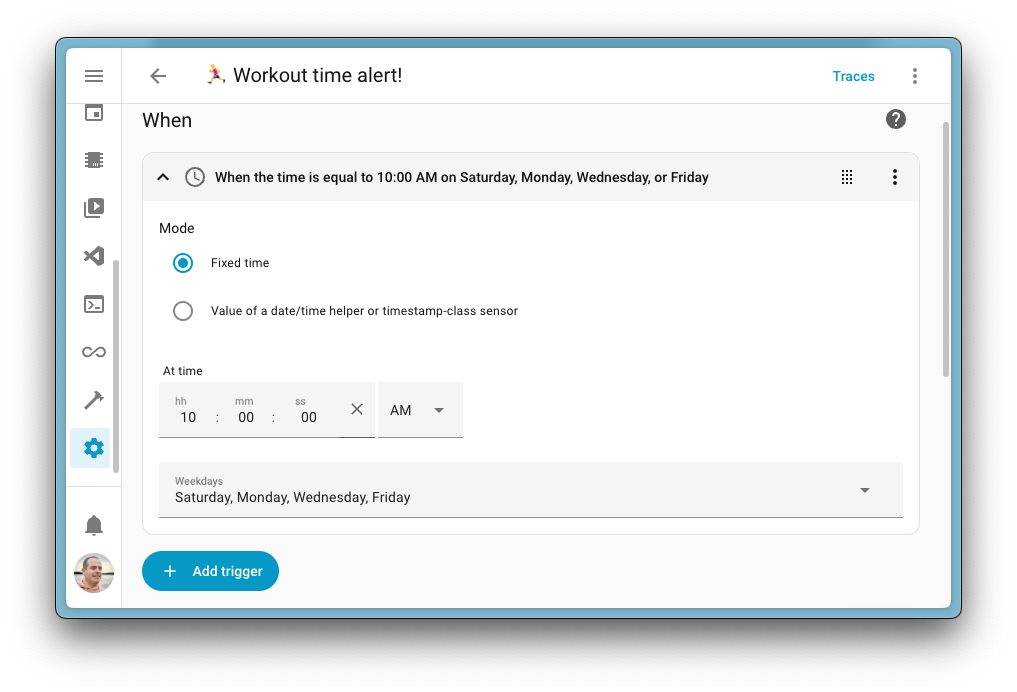
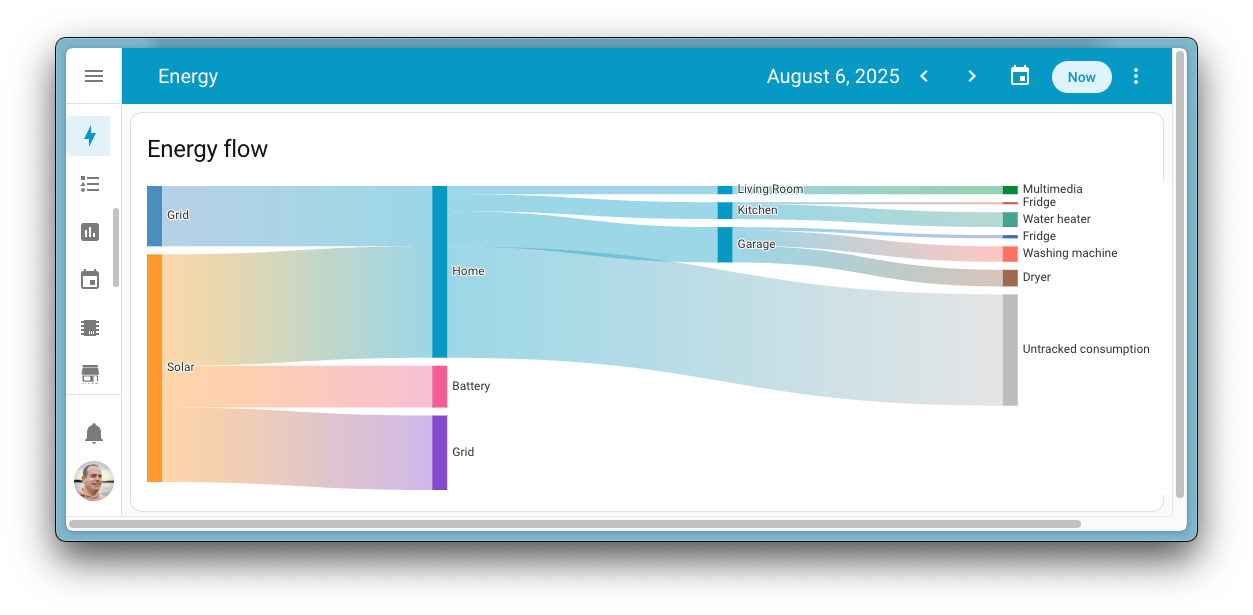
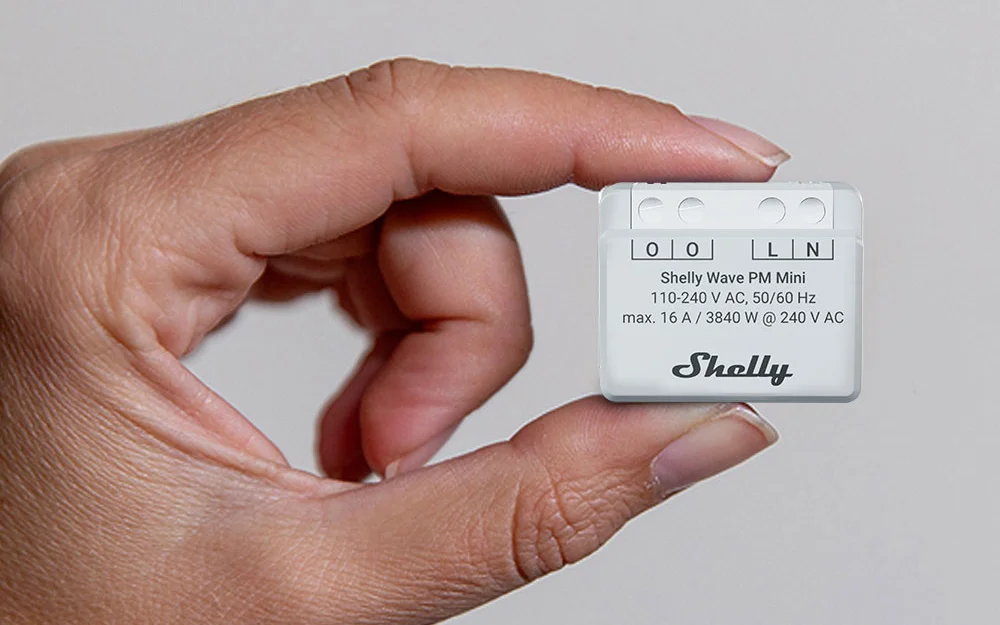 Mini? This thing is microscopic!
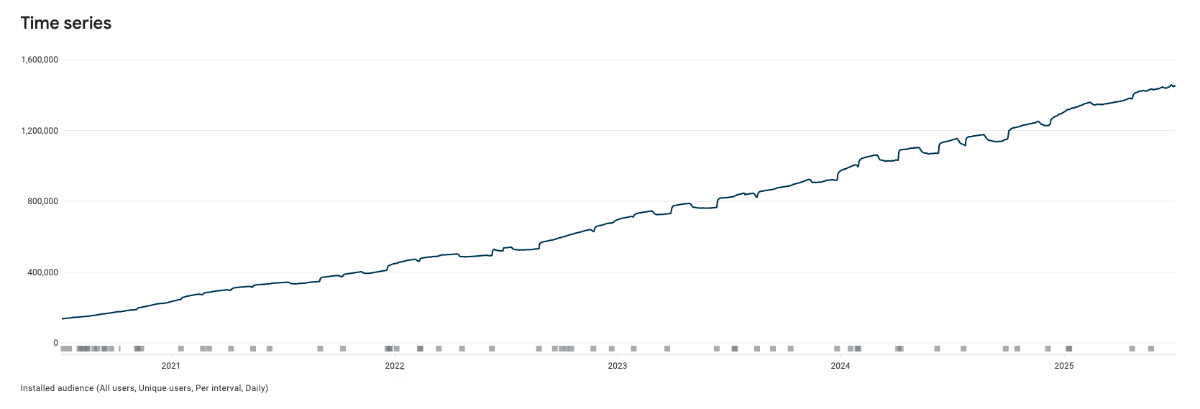 Very impressive growth in installs over the years!
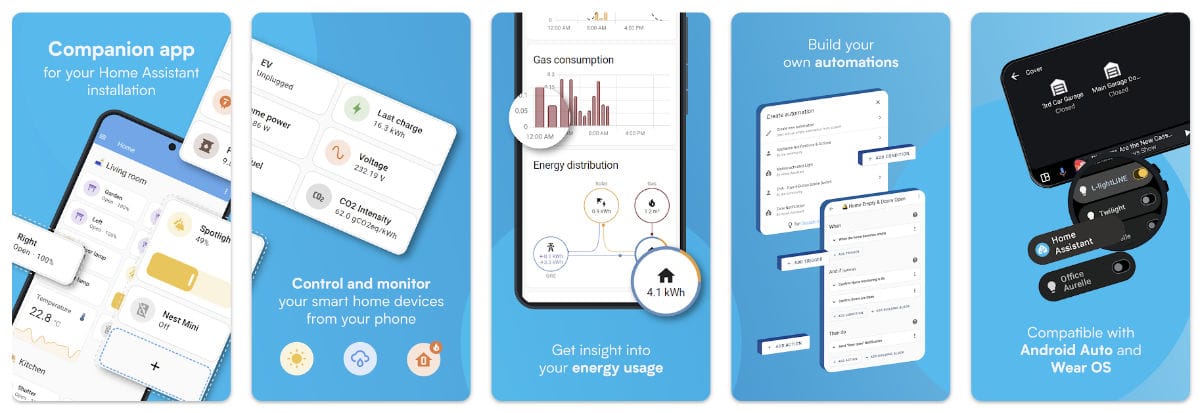
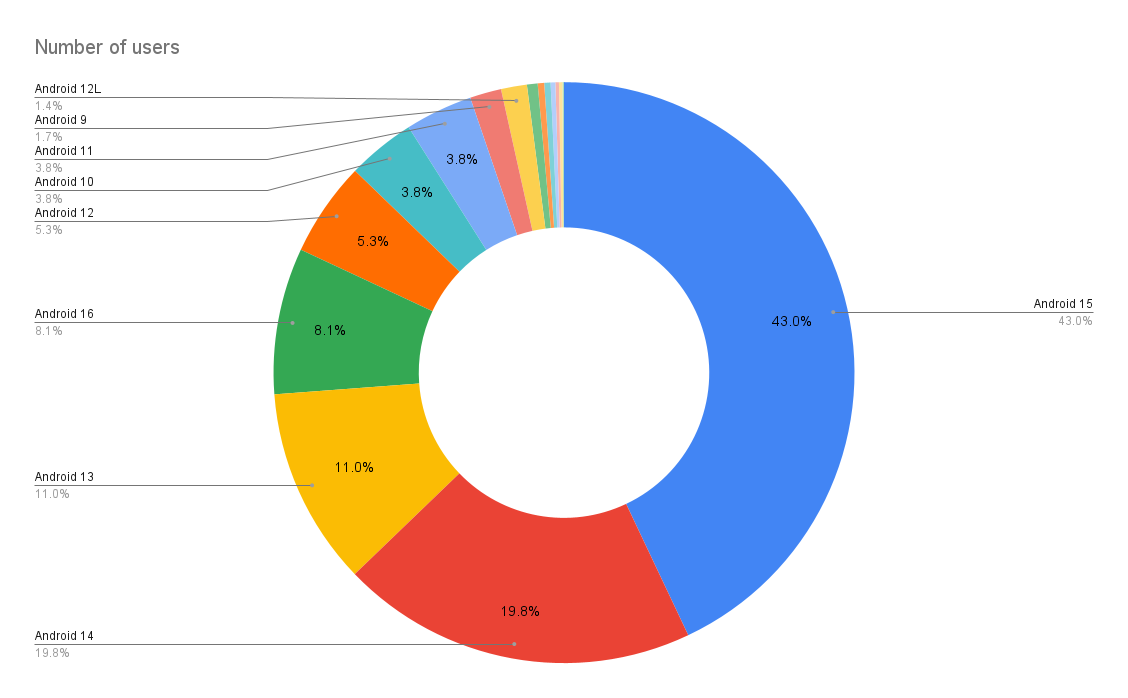 A huge percentage of our users are on pretty new versions of Android, but we want to support as many older devices as possible.

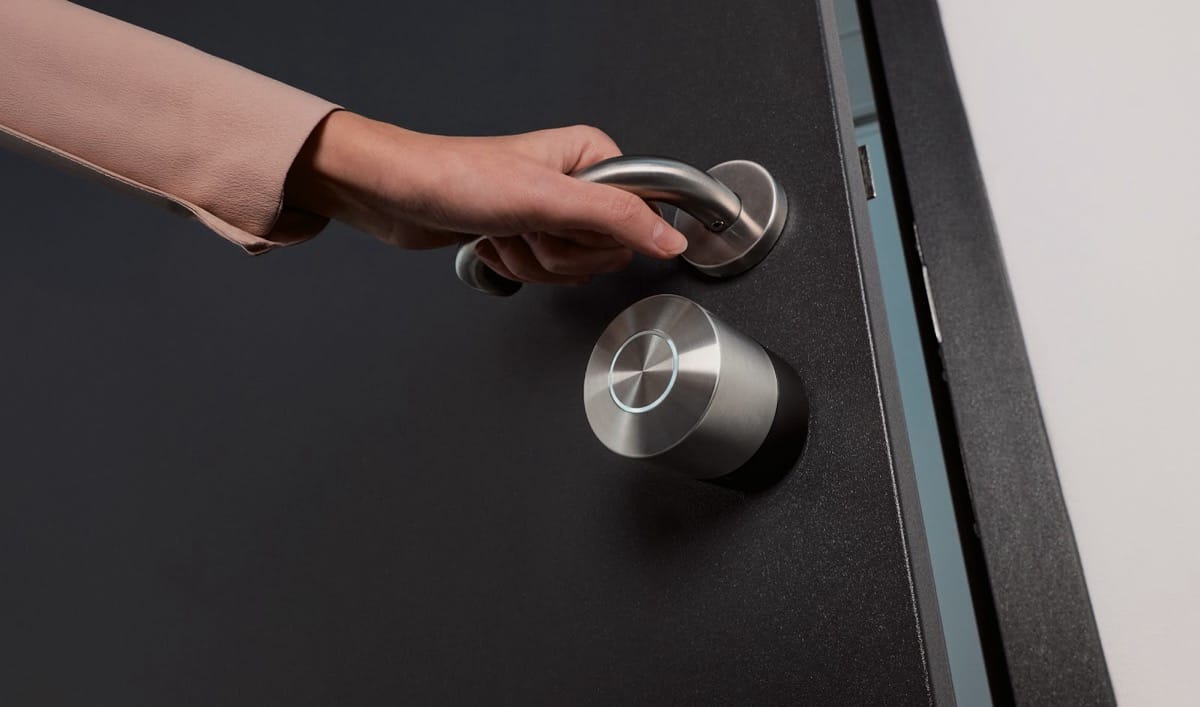 This lock is turning heads faster than it turns bolts
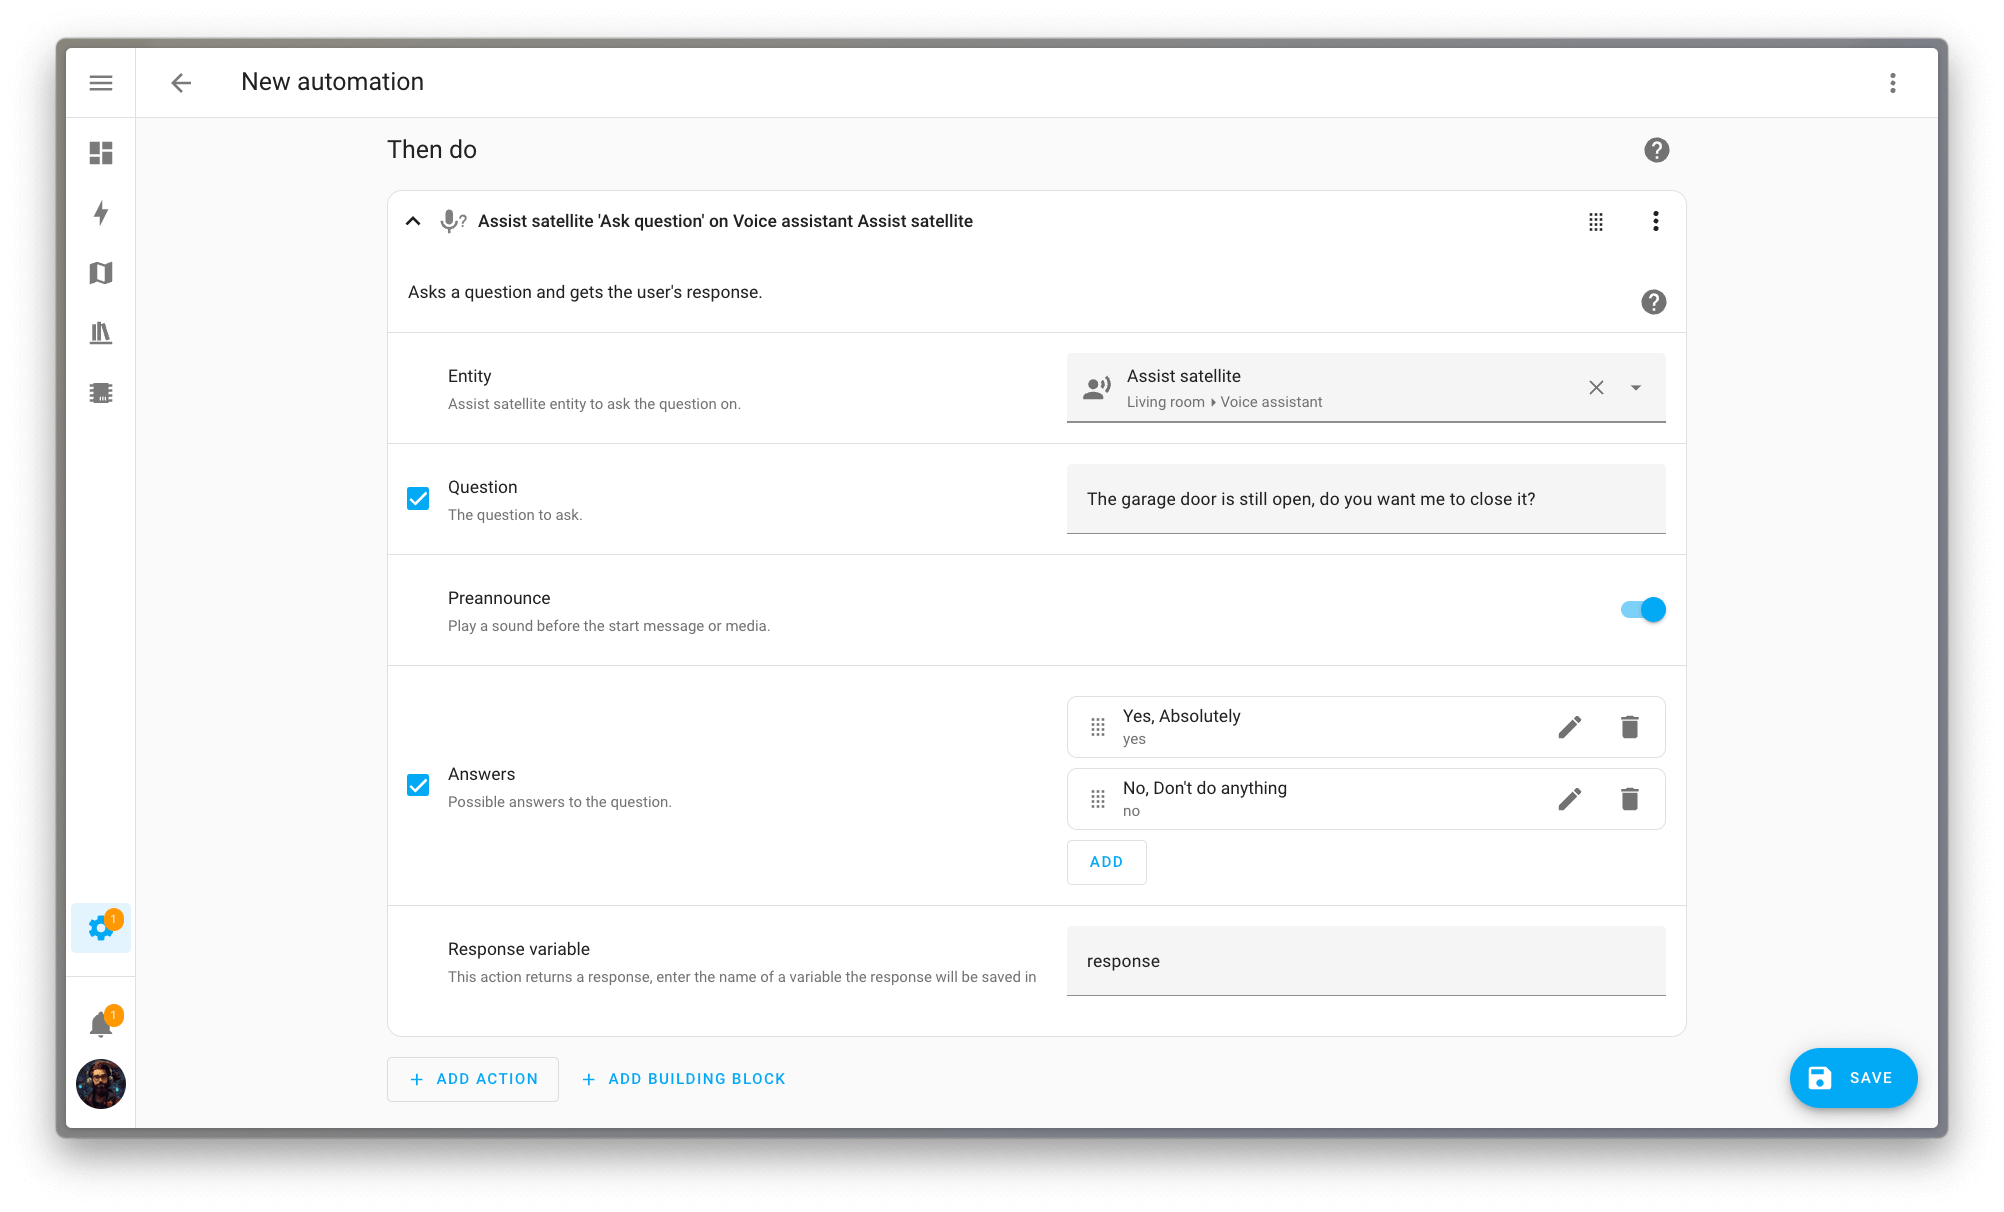
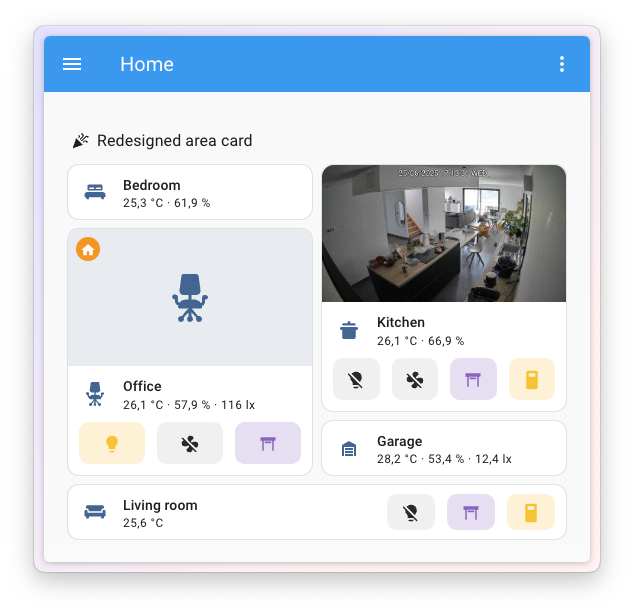
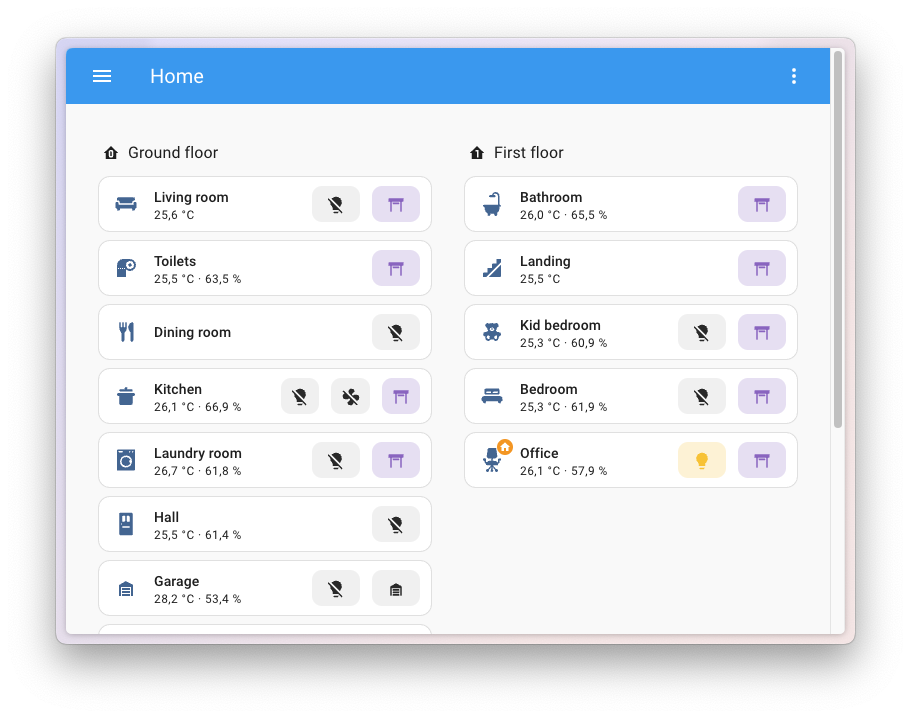


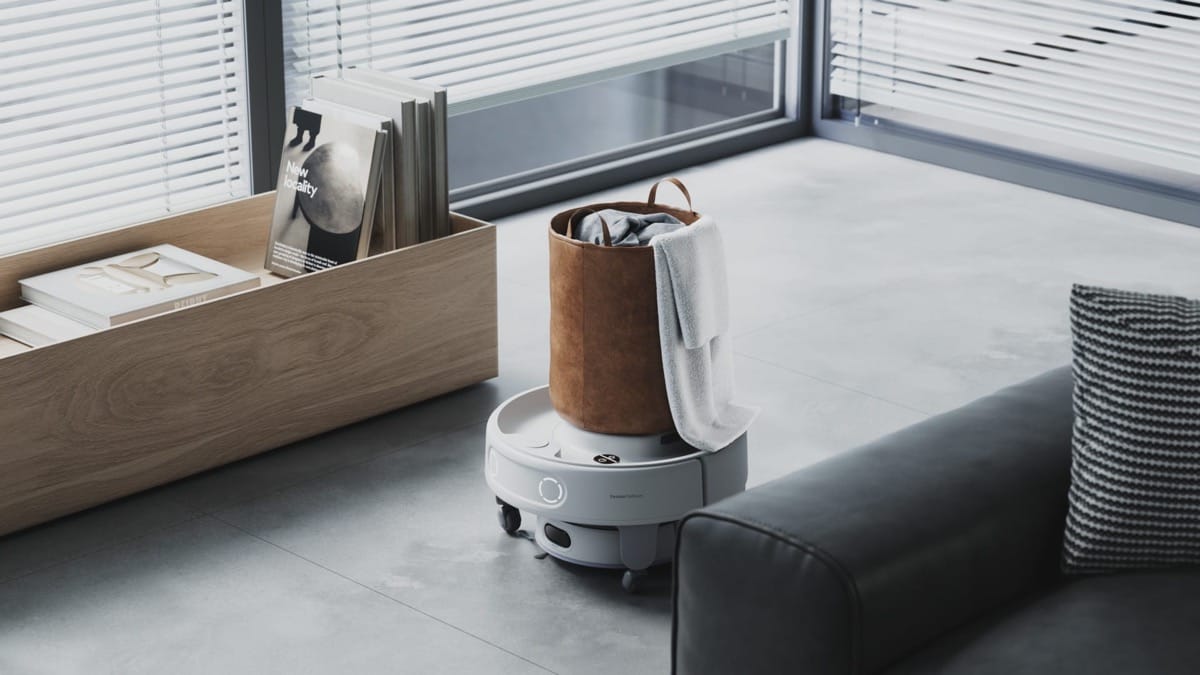 Eat your heart out Wall-E
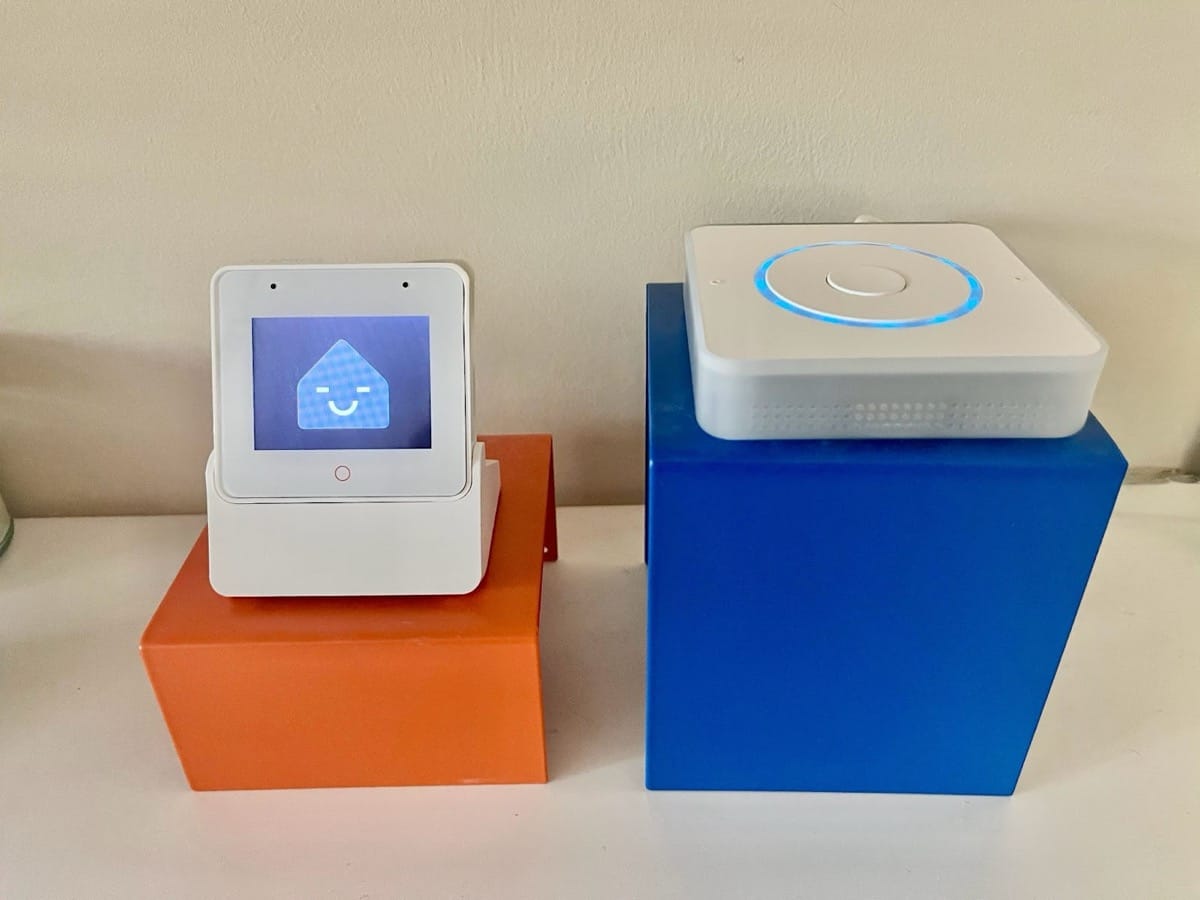 No device left behind!
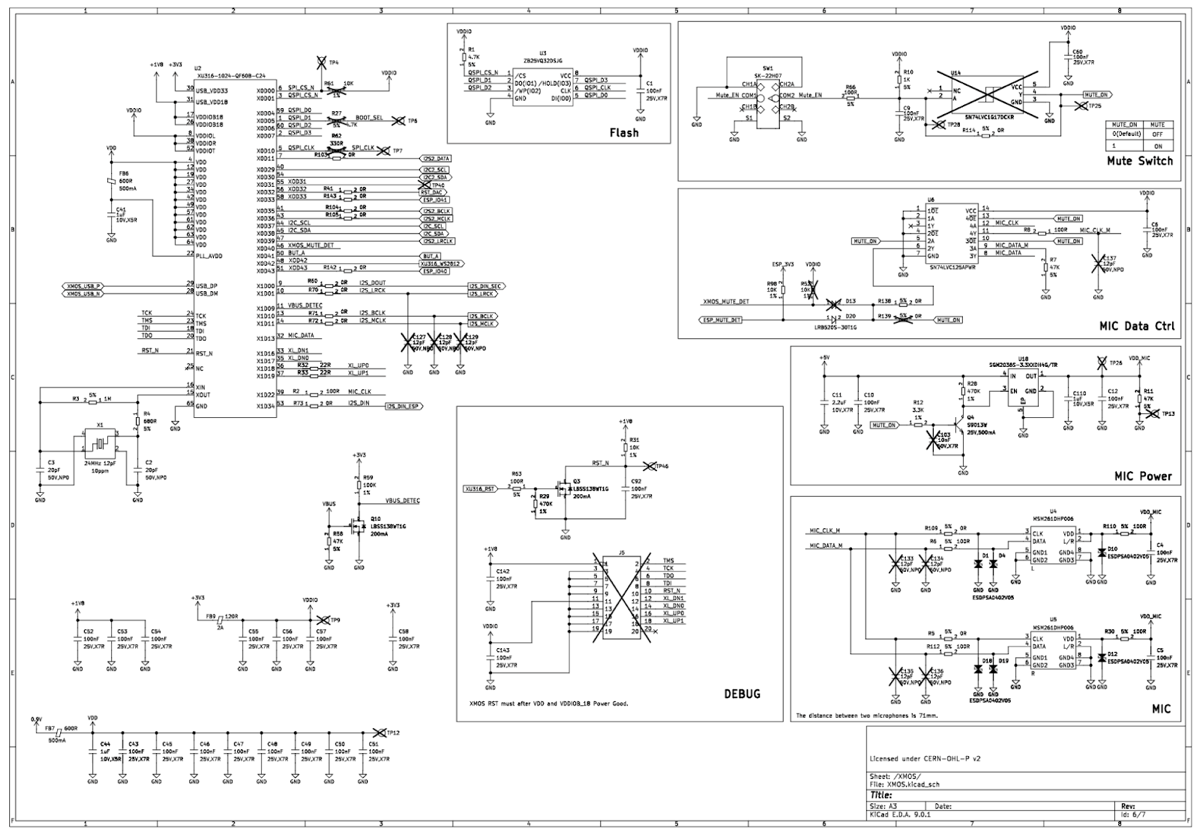 I'll just pretend I understand all this
 This is the score sheet for just intents... it can get complicated
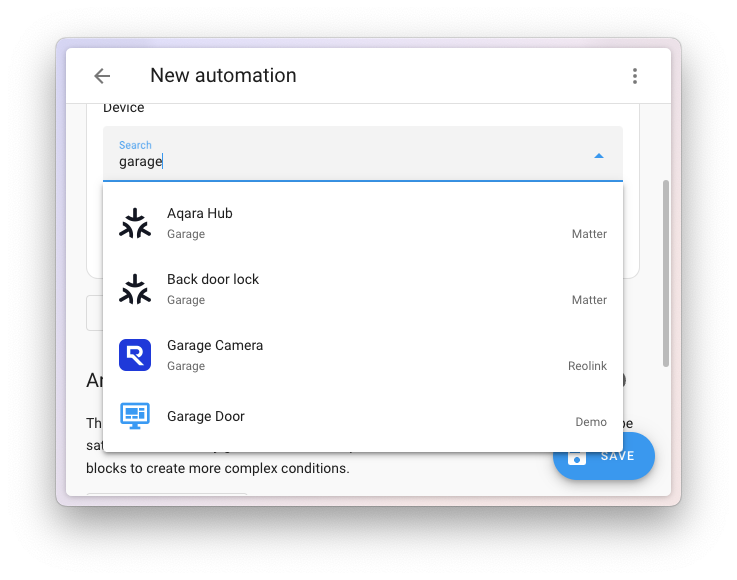
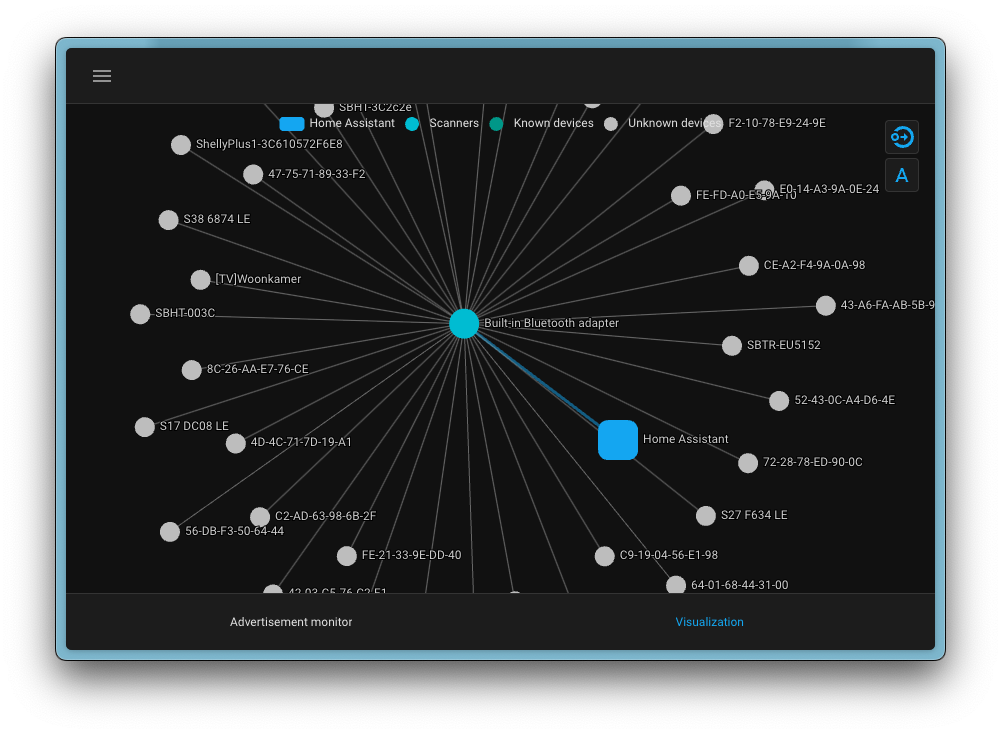
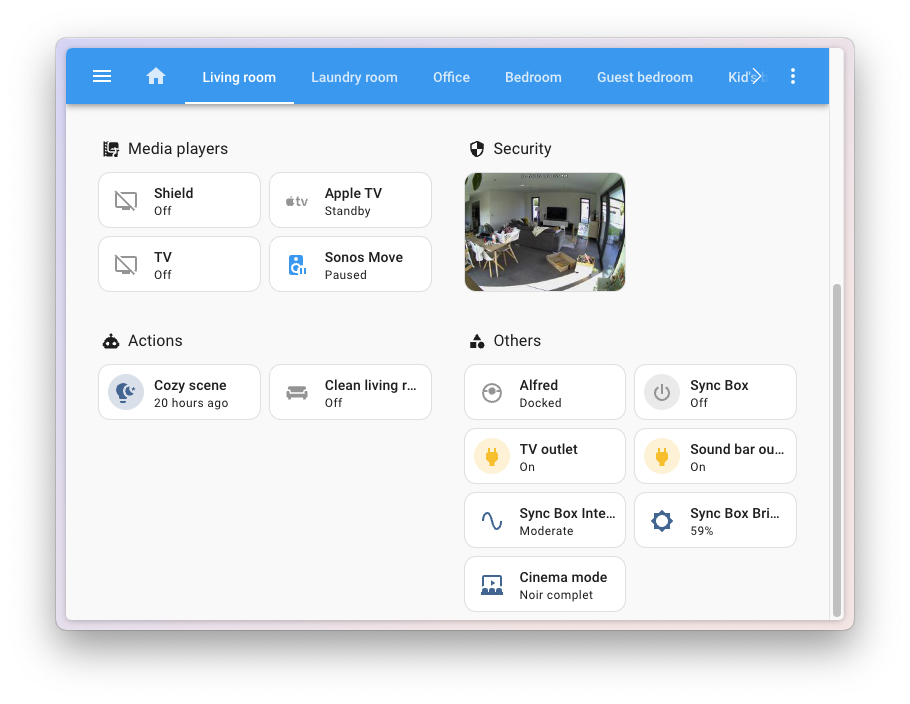
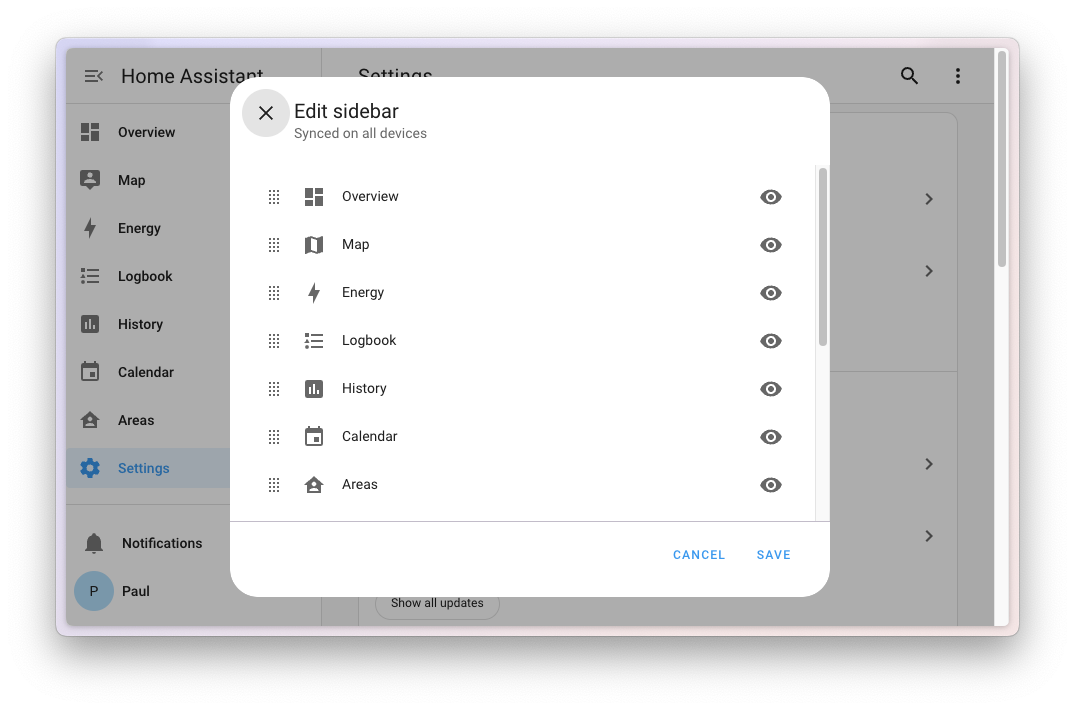
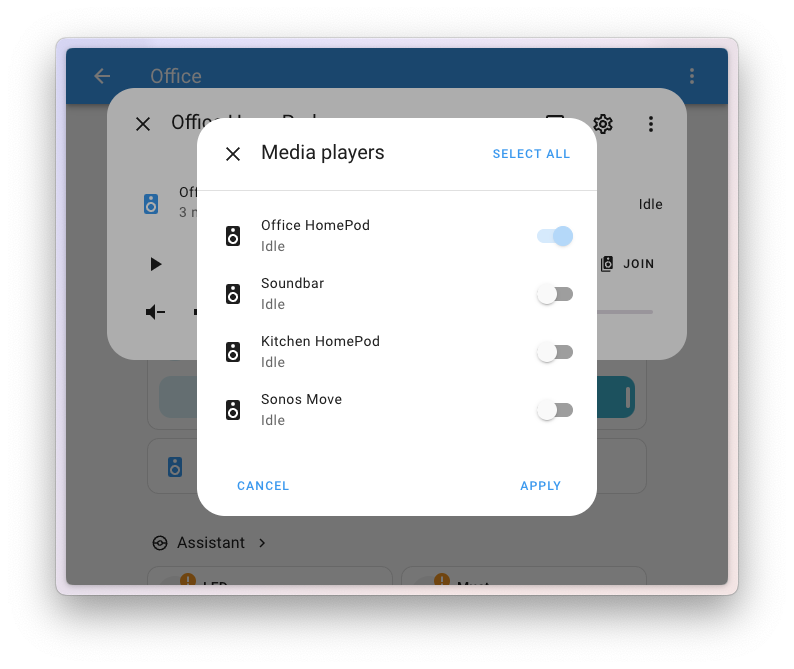
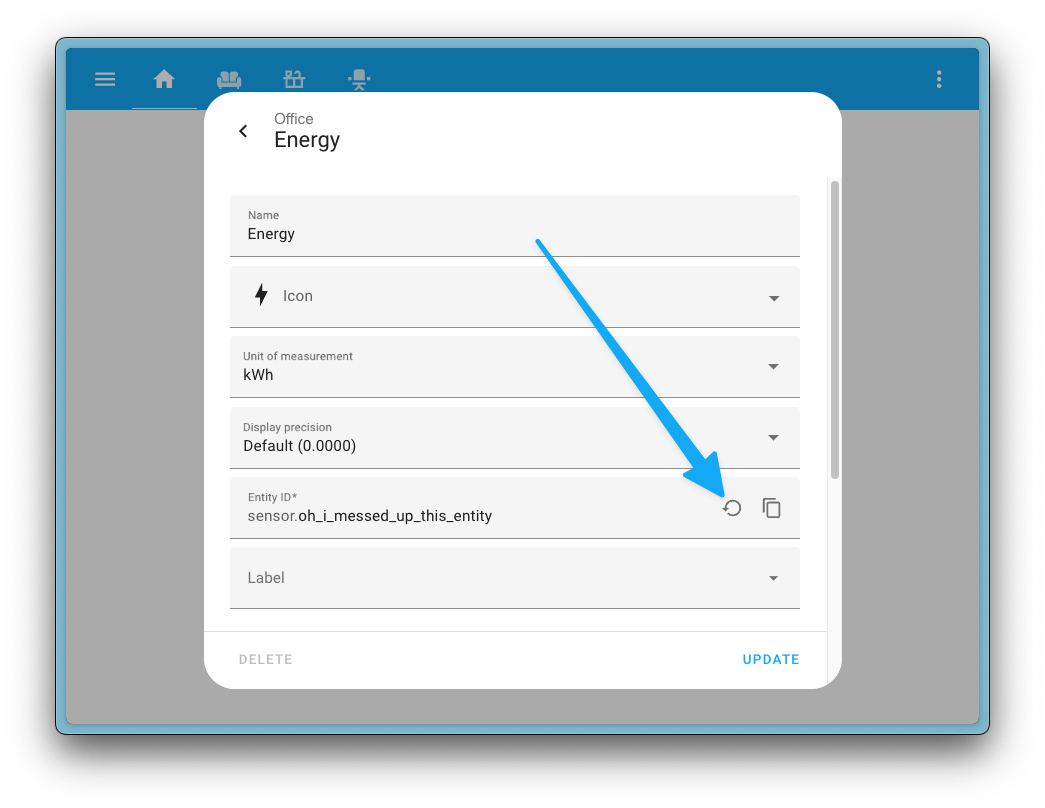
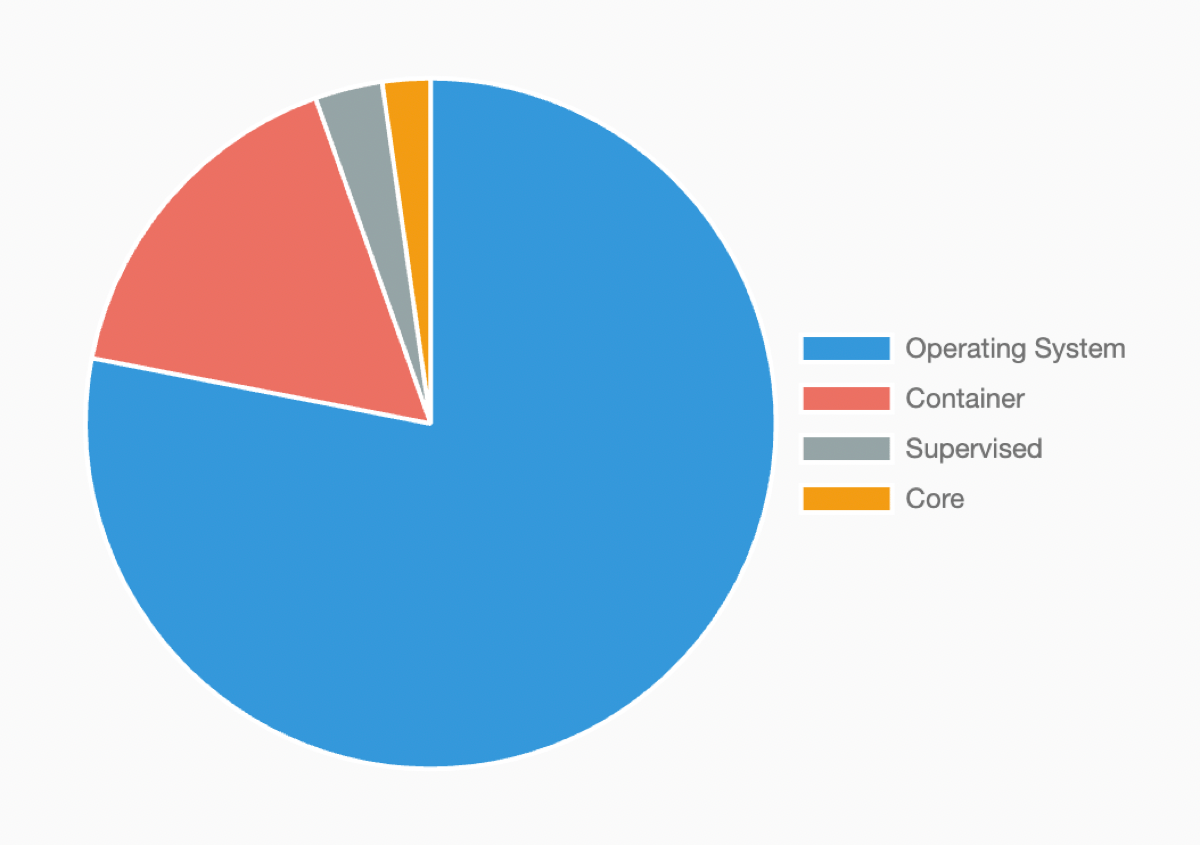 From our
  The blue arrow shows your installation type, and the red arrow displays the architecture.
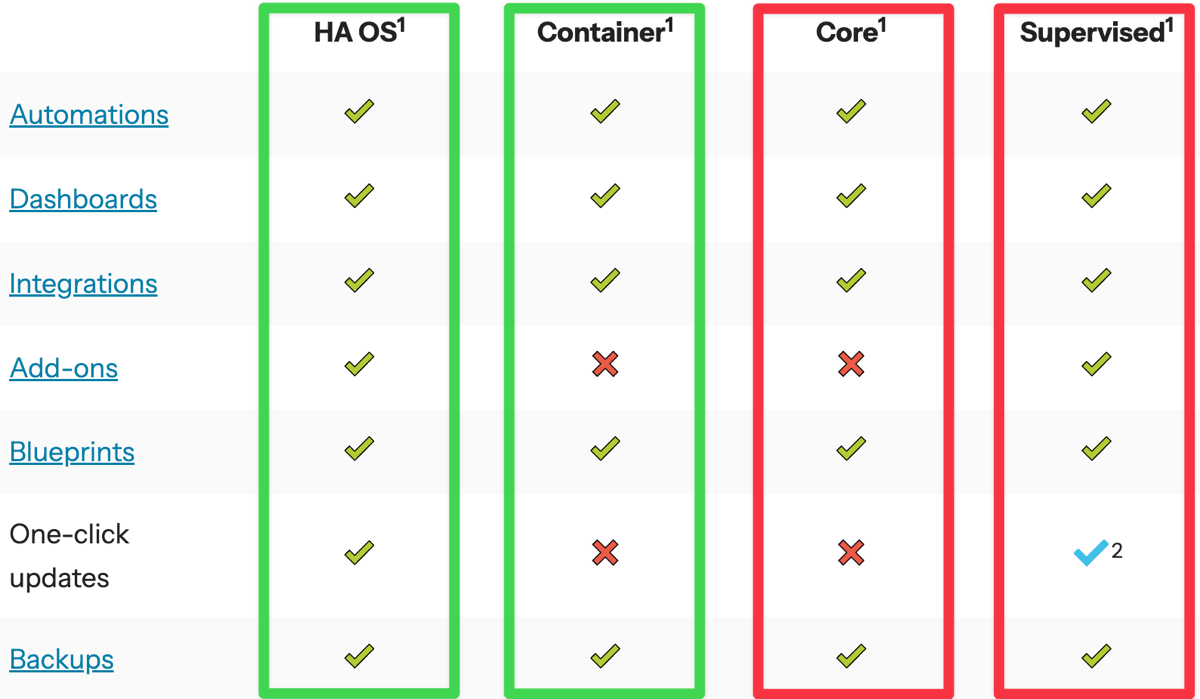 Green are staying, and red are deprecated.